Lemurian Ship
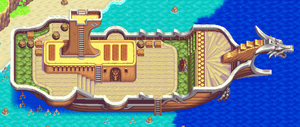
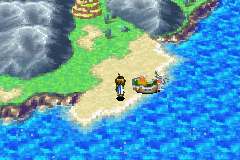
Lemurian Ships (レムリアの船, Lemuria's Ship) were originally created by the reclusive society of Lemuria long ago, and designed with technology that allows only Adepts to commandeer the ships and propel them forward through channeling their Psynergy through devices named Black Orbs.
At least three of these vessels are relevant to the series' plot, and many more are docked in Lemuria itself. In Golden Sun, one seems to be under the ownership of Menardi, and one that was originally stolen out of Lemuria by Babi is entrusted to Isaac at the end of the game. In Golden Sun: The Lost Age, a third is owned by new party member Piers, and after it is explored as a stationary dungeon, Felix's party gains use of it as a mode of transportation across the expansive oceans of the game world. In Golden Sun: Dark Dawn, Piers's modifications to Briggs's Sailing Ship appear to have effectively made it a Lemurian Ship, giving it the same figurehead and, as implied by one of the shipwrights, control system. Lemuria has apparently refitted some ships from Sana as well, and the Lost Ship also appears to be of Lemurian design.
As a Ship
Acquiring the Ship
To acquire use of the vessel the player must help Piers retrieve his stolen Black Orb (or "Black Crystal") from the Kibombo witch doctor to-be Akafubu. The Great Gabomba, the guardian of the village, requires an offering (a small round crystal) from Akafubu before he will be accepted as the new witch doctor. Unfortunately for Piers, when Akafubu's original crystal does not work, his one fits the bill as a replacement and is stolen from Madra. Felix helps Piers recover his crystal, allowing them to set out to sea. Unfortunately, when and they return to East Indra Shore they find the ship overrun with monsters known as Aqua Jellies. Felix and co. clear the ship of these monsters and place Piers' Black Crystal into a pedestal in the engine room, finally allowing the Adepts to set out to sea.
The Flying Ship
Shortly after the events at Jupiter Lighthouse the player will be able to acquire (or rather given) the Wings of Anemos from the citizens of Contigo. With these wings, and the help of the Hover Psynergy, Felix will now be able to fly over water as well as flat land by holding the B button (objects such as forests will still block the player's path though). Furthermore, while flying the player will be able to avoid monsters and travel at a much faster speed, although this does drain PP from the whole party. Choosing Hover from the menu (as opposed to pressing B) will put the ship in a semi-glitched state that is identical in every way to standard sailing except that no monsters will be encountered. This state doesn't drain PP from your party, which can prove to be more effective than using Avoid when you want no encounters whatsoever. This state is only available from the overworld.
The Cannon
After using a cannon in Loho to blow up a stone wall, the people there will give it to you as a reward and install it on your ship. The only function of the cannon is to be used in conjunction with the Magma Ball to blow up the ice wall that blocks the path leading to Prox.
As a Dungeon
Walkthrough
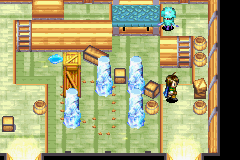
After you enter the cabin of the ship after Piers grants you admittance, search the lowest left barrel for an Elixir, then enter the door at the upper left of the room. The downstairs leading right leads to a dead-end, so go southwest to where an Aqua Jelly monster waits to be battled by being interacted with. Aqua Jellies are present all throughout the lower decks of the Lemurian Ship as non-random encounters with single enemies, and while they're a little tougher than your normal random enemy, 4-against-1 battles against these monsters should still be easy. When the Aqua Jelly is felled, its field sprite will melt into a puddle, which you can then hop down over to progress.
All Aqua Jellies turn into puddles which can be turned into ice pillars with the Frost Psynergy, and a second Aqua Jelly below the first demonstrates that this will be used in solving puzzles; defeat it, freeze its puddle into a pillar, and hop left across the pillar to reach a chest containing a Potion. Proceed down the stairwell to the lower right, and enter a doorway in the hallway beyond that (incidentally, hallways like this that are not inhabited by Aqua Jellies are areas with random encounters against Conch Shells, which are only fought in these areas at this point in the game). The subsequent room has many Aqua Jellies visible amongst crates, but you cannot reach them for now, so exit out of the doorway to the lower right, and in the next hallway enter the doorway to the right.
The next room is the first room where you are to employ the Aqua Jelly/frostable puddle mechanic to proceed. Climb down the ladder, defeat and Frost the two lower Aqua Jellies, and Move the tall crate into the spot in between the two ice pillars to create a hoppable path to the doorway to the lower right. In the hallway you exit out into, ignore the crate to the left as you enter the next doorway to the right.
The next room is the "big puzzle" of the Lemurian Ship, and every Aqua Jelly here needs to be destroyed and its puddle Frosted. First, climb down the ladder to the lower right, and defeat and Frost the lone Aqua Jelly there. Hop right across its ice pillar, climb down the ladder at the lower right part of the area, and defeat and Frost both Aqua Jellies you have access to from this side of the room. Return to the left side of the room, defeat and Frost the westernmost Aqua Jelly, hop right across its ice pillar and climb down a ladder to defeat and Frost the remaining Aqua Jelly here. Also Move the tall crate left and down, and now you have a hoppable path from the nearby ladder to the upper right elevated portion of the area. The leftmost crate at the upper part of the area left of another ladder contains an Antidote, then climb down this ladder to defeat and Frost the last Aqua Jelly. This creates another hoppable path connecting the upper right part of the room with the exit doorway at the upper left part of the room, so hop left and enter the door, and go through an extremely short hallway.
When you enter the Aqua Jelly room you were in earlier from the upper right doorway, an Aqua Jelly will get startled and hop under a mechanized lift system. This lift system is not working, as noted by the game when trying to flip the switch on the wall, since when you try to step onto the blue lift it drops you down and the Aqua Jelly jumps back up above the ladder, and when you climb back up the ladder the Aqua Jelly darts under the lift again. To get past this obstacle and enter the door to the upper left, simply climb down the ladder and defeat and Frost the Aqua Jelly, and now the lift will be supported by the ice pillar. Go through one more subsequent hallway.
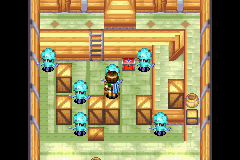
In the last main room of the Lemurian Ship with the six Aqua Jellies scattered around Crates and a chest, inspect the barrel to the right for an Oil Drop, then hop to the one elevated Aqua Jelly. Save your game before interacting with it, because doing so will trigger the tough boss fight with the Aqua Hydra, created when all the Aqua Jellies join together to merge as one. The Oil Drop here is meant to be used against the Hydra for a small burst of damage. After defeating the Aqua Hydra, the entire room will be flooded, and all the crates will be floating on top of it and serve as hoppable platforms which you can use to reach the upper left doorway. The chest in this room will be submerged and inaccessible for a good portion of the game; you can only collect it while the ship is docked at either Lemuria's harbor or Atteka Inlet so that you can reenter the ship as an area and use the Parch Psynergy to remove the water. For later reference, the chest contains a Mist Potion.
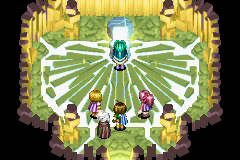
Follow the linear path down to a lower level, where a simple puzzle just like in the previous game's Tunnel Ruins is located: Push the empty pillar at the lower right one space up and once space left onto the water-drop tile, and cast the Douse Psynergy on the pillar to make it sink into the tile and open the door above. The linear path that follows leads to the last room, where a cutscene automatically triggers to make the Lemurian Ship sail into the ocean under your control, thus rendering the dungeon complete and East Indra Shore no longer visitable.
Enemies
| Bestiary | ||||||||||
| Monster Name | LVL | HP | ATK | DEF | AGI | EXP | Coins | Weakness | Drop | Drop Rate |
| Aqua Jelly | 22 | 225 | 161 | 33 | 78 | 96 | 99 | 1/32 | ||
| Conch Shell | 20 | 102 | 158 | 43 | 72 | 80 | 81 | 1/16 | ||
| Aqua Hydra (boss) | 26 | 2776 | 173 | 38 | 63 | 963 | 1612 | 1/1 | ||
Collectibles
![]() Antidote: In a wooden crate to the upper left of the rightmost big puzzle room.
Antidote: In a wooden crate to the upper left of the rightmost big puzzle room.
![]() Elixir: In the lower left barrel in the initial captain's quarters.
Elixir: In the lower left barrel in the initial captain's quarters.
![]() Mist Potion: In the chest in the room with the Aqua Hydra boss battle. It can only be got to later in the game when you're parked at Lemuria and use the Parch Psynergy on the water that fills the room after the boss.
Mist Potion: In the chest in the room with the Aqua Hydra boss battle. It can only be got to later in the game when you're parked at Lemuria and use the Parch Psynergy on the water that fills the room after the boss.
![]() Oil Drop: In the barrel in the room with the Aqua Hydra boss battle.
Oil Drop: In the barrel in the room with the Aqua Hydra boss battle.
![]() Potion: In a chest to the lower left early on.
Potion: In a chest to the lower left early on.
Trivia
- Interestingly enough, Isaac and co. also have a Lemurian ship, which was given to them by Babi, but it is never seen after the epilogue at the end of the first Golden Sun. Even so it is mentioned by villagers in many different towns spread throughout the Eastern Sea. It is never seen nor mentioned after Isaac and Felix's teams join forces and its fate and whereabouts are unknown. Due to Piers's ship already occupying the docks at Atteka Inlet, this also raises a question of where Isaac landed on Atteka, since other than Atteka Inlet there was no place to land on Atteka to get to Jupiter Lighthouse. Strangely, when shown in the first game, the ship has a very different appearance and even seems to have wings.
- Menardi also has what appears to be a Lemurian Ship docked at the Idejima peninsula. It is unknown how Menardi could have obtained a Lemurian Ship. It disappeared after Idejima began floating across the sea and was most likely destroyed by the tidal wave.
