Yampi Desert
Yampi Desert (ヤンピ砂漠, Yanpi Desert) is a dungeon-like location in Golden Sun: The Lost Age, presented as a maze-like desert filled with cliffs in the northwest portion of the continent of Osenia, just south of the coastal town of Alhafra. In-game, it amounts to a crossroads that must be traversed by Felix's party in order to reach Alhafra because of how a critical bridge west of the town gets destroyed by the pirate Briggs, whom Felix needs to follow to Alhafra. During the party's mandatory exploration of it somewhat early in the game, they must find and defeat the local King Scorpion boss to earn the Scoop Gem Utility Psynergy item.
Uniquely, Yampi Desert contains a hidden entrance into a separate dungeon, Yampi Desert Cave, which is positioned as an optional extra-hard bonus dungeon. It can only be reached by using the Sand and Teleport Psynergies.
Walkthrough
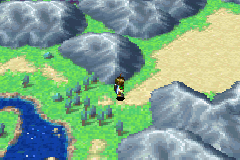
When your party passes east through Osenia Cliffs to enter Osenia at its northwest edge, your mandatory goal is to reach the coastal town of Alhafra at the top center-left of Osenia's landmass, which is north of Yampi Desert — the left of two prominent swaths of desert land represented on the overworld map. You cannot travel directly east from your starting point because of a bridge that is currently broken, so getting to Alhafra requires traveling southeast a short ways and entering Yampi Desert through its far western edge. This is not represented by an icon in the overworld itself; instead, the location transitions as you walk northeast through the gap between mountains leading to the visible sandy terrain.
You can opt to pass south of the west entrance into Yampi Desert and navigate the rest of the explorable portion of Osenia (which encompasses all but the east third of the continent). The right of the two deserts displayed in Osenia contains the eventually-mandatory Air's Rock dungeon, and north of this above the river is a cave icon leading into a part of the Yampi Desert location where a sandfall blocks your way up. This is a one-way exit out from the east end of Yampi Desert, which is close to the third, two-way exit at the northeast edge of Yampi Desert's stretch. Alhafra lies just north of this northeast exit, which also lacks an icon.
The player is generally expected to begin this segment of the game by entering Yampi Desert through its west entrance and progressing through to the end of one branching route east, where they must defeat the King Scorpion boss and earn the Scoop Gem Utility Psynergy item. Scoop will be needed to open up the other branching route north and east through the dungeon. Once you have taken the northeast exit out of Yampi Desert and reach Alhafra, you can fight the boss battle with Briggs there right away; however, this is significantly tougher than the previous boss. You may decide to explore and complete the remainder of Osenia with the help of your newfound Scoop Psynergy to advance your party's power, and Air's Rock would also be ideally completed at this time. Whether you beat Briggs when you first reach Alhafra or put him off until a subsequent visit, the best way to get out of Alhafra's closed-off quadrant of Osenia is to head back south into Yampi Desert and fall off the aforementioned one-way sandfall so you can exit out of the cave icon north of Air's Rock.
Hypothetically, once you win the Scoop Gem, you can cast Retreat, leave Yampi Desert's west entrance, and explore and complete the rest of Osenia — Air's Rock included — so that you only have to traverse the branch of Yampi Desert that leads to the Alhafra exit once rather than twice, presuming you are planning to put off Briggs' boss battle until Air's Rock is completed. However, this would force the party to play through said content without having picked up the usefully strong Blow Mace later in Yampi Desert.
Scoop Gem branch
In the first screen of Yampi Desert, take the lower route through the cliffs until you reach a chest visible behind a wooden stake in the sand; cast Pound to reach it and claim the Guardian Ring, which grants hefty HP and Defense bonuses when equipped. In the next screen, you can talk with the group of NPCs from Madra if you wish, but head south to a T-intersection and take note of the sandy spot between four rocks off to the left before proceeding east.
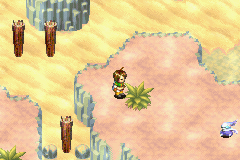
The next screen is a puzzle where a Jupiter Djinni is barely visible on a raised cliff-like platform off to the right; the wooden stake left of it will be needed to reach the Djinni. To reach it, Pound the wooden stake far to the left near where you entered, then follow along east past multiple standing stakes until you reach a cliff slide at the far east end, with a stake flanked by two stones just northwest of that. This cliff slide will bring you close to the exit east into the next screen, but if you slide down this prematurely without having yet gotten the Djinni here, you can Pound another stake southwest of that at the bottom edge of the screen to climb back up to the current level.
Pound the stake northwest of the east cliff slide to head to the northeast corner of the area, then pound a third stake just off to your left to expose a cliff ladder behind it. You can open the chest west of this ladder for an Antidote if you wish, but climb the ladder and hop west across a standing wooden stake north of the chest to reach the northwest corner of the screen. Hop east across the standing stake just south of the chest, head south past the bush, and hop down and left across two more stakes. Walk down and hop right across one more standing stake to reach the Jupiter Djinni Blitz, and save here so that you do not have to repeat this puzzle if Blitz happens to run away during your battle with it. Once you've won, slide down the nearby cliff slide and Pound the stake just left of the Djinni's original position so that you can use the cliff slide east of said position, letting you drop into the sand and walk into the next screen to the right.
The next screen is a straightforward area where you are presented with a Psynergy Stone and three wooden stakes; Pound the center stake to climb up the ladder it was concealing. The next screen up north is where an animated lump of sand is shown perpetually traveling in a clockwise fashion under the sandy surface, making a right turn whenever it collides with a previously Pounded stake and passing underneath the stake that has yet to be pressed into the sand with Pound. Once you Pound this stake, once the sand lump collides with it, it will redirect its course east into the next screen, showing itself to be a red scorpion-like monster.
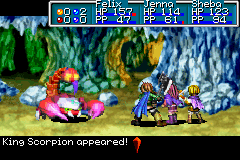
Follow the scorpion into the next screen, where there is a more complex arrangement of already-depressed stakes in the ground dictating the sandy lump's course. Timing is important when deciding when to Pound the sole stake here into the ground because you want it to press against the stake from the right and be redirected north into the next screen up north, rather than press against the stake from the bottom and be locked into a perpetual, small course at the bottom part of the puzzle. If you do not time the Pound properly, you will have to leave and reenter the screen to perform a puzzle reset. To lock it into the proper course that will send the scorpion northward, cast Press as the lump is starting to pass underneath it from south to north. The lump does not freeze in place while you have any menu open, and yet opening the Psynergy menu will blind you to its movements because the menu takes up the entire screen, so you may find passing this puzzle will become easier by assigning Pound to a shoulder button shortcut and casting Pound via the shortcut at exactly the moment you need.
The final screen of this series of puzzles has the scorpion's sandy lump passing underneath two raised stakes, and the objective is to redirect its course into the sandy depression circled by stones at the north part of the screen. Shoulder-cast Pound right after the lump has passed under the lower-right stake from right to left so that it will stop in the depression; as you approach it, a cutscene will show the scorpion leaping out from the sand as Felix walks on the depression and casting the Scoop Psynergy on the sand to make Felix fall into its den underground, and then dropping after Felix to engage the party in a boss battle. When you have beaten it, you will receive the Scoop Gem; cast Scoop on the circular depression in the center of the cave to expose a water spout, and ride it back to the surface. Your goal now is to return to the screen with the Madran NPCs, so you can either backtrack several screens to there or cast Retreat and travel one screen east to there.
Alhafra route
Once you are back at the second screen from the west end of Yampi Desert with the group of Madran travelers, head back down the T-intersection and go left to the previously noted sandy spot enclosed between four stones, and cast Scoop on it to expose a ladder. Follow along a linear route and climb above an oasis east of the NPCs; as you walk through the cliffs just right of the NPCs, a cutscene will show them noticing you and discovering the path you made. You may head back east and talk to the NPCs now crowding around the oasis if you want, but you will need to head north and through a wide-open desert screen with several conspicuous sandy spots in order to enter a cave door at the northeast corner. Only the lower-right sandy spot contains an item that can be dug up with Scoop, which will turn out to be 315 coins.
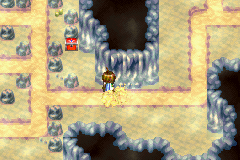
Inside the cave is a network of rushing sand rivers that are too fast to run directly against, but you can step off them into any open space next to them. Ride the river to the upper-left corner and step up onto the solid land as the river turns east and then southeast, then run across the top part of the river being feed by a sand-spewing hole in the wall to make it just above where a red chest is visible underneath you. Ride the river to the right and let it take you all the way underneath this chest, stepping off so you can grab its Hard Nut, then return to the spot north of the chest. Zig-zag across the vertical sand river flowing downward from up north and position yourself left of the base of the right-facing T-intersection of sand rivers, and carefully run to end up in the small alcove just left of the wooden stake next to another chest. Remotely cast Pound on this stake, then use the sand river to reach the chest, which contains the powerful Blow Mace artifact weapon. Ride the river southeast and step east onto solid ground so you can take the east exit out of the cave, then travel through a straightforward and uneventful outdoor screen east.
The final screen at the end of the main route through Yampi Desert is large and complex. Get down to the sandy lower level either by climbing or by falling off either of the area's left two thick sandfalls, then proceed all the way northeast through a linear route until you climb up a cliff ladder next to the area's right two sandfalls. Run left across both sandfalls so you do not fall back down. If you have the Lash Psynergy (which you can technically put off collecting until the future Kibombo Mountains dungeon mandates its use), head west past the east sandfalls and cast Lash on the coiled rope so you reach the source of the right of the two western sandfalls. From here, you can optionally climb the cliff ladder to the upper left of the sandfall; while there is no reward-based incentive to doing so, this lets you see the hidden entrance to the endgame dungeon Yampi Desert Cave from afar. At any rate, step into the sandfall from the right so that you drop down one level and press against a rock directly underneath yourself, letting you walk onto the solid ground to your right and reach the chest placed conspicuously on a ledge just south; it contains the unique Trainer's Whip class-changing item.
Return to the spot west of the east pair of sandfalls and climb the cliff ladder left of the left sandfall, then walk around to the rocky spot between the two sandfalls' sources. Run east through the top part of the right sandfall just underneath its source so that you run just above the lone rock, and fall down past that rock so you land on the top rock of the level below. Walk off to the right onto solid ground above a bush and head northeast out of Yampi Desert and into Alhafra.
Subsequent visits
The area at the northeast corner of the final screen branches off south into a cliff trail that leads to the source of a fifth, southeast sandfall in this screen, and a sign next to this sandfall accurately describes the route further south as a one-way trip you cannot come back from. If you drop down this, you will find a cave with a circle of stones in it that the Reveal Psynergy can expose as hiding a Psynergy Stone, and the exit brings you out of the cave icon north of Air's Rock's position in the overworld. If you drop down this sandfall without having finished all of your business in Alhafra up north, you will have to reenter Yampi Desert through its west entrance and traverse its Alhafra branch all over again when it comes time to return to the town.
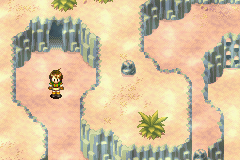
Once you get the Reveal Psynergy from Air's Rock, you can return to the final sandfall screen of Yampi Desert and cast Reveal at each of the two 3x3 arrangements of stones in the lower sand levels. The right set of stones will reveal a hidden chest containing one of the game's finite Lucky Medals, while casting Reveal at the left set of stones will make their arrangement appear as an arrow pointing to the northwest; this further reinforces that the cave that is barely visible at the upper left corner of this area is worth exploring.
Regardless, Yampi Desert Cave's entrance cannot be reached without the Sand Psynergy earned at Gaia Rock. Once you do gain Sand, you can land your ship at the coast west of Alhafra, enter Yampi Desert's northeast exit, and cast Sand while standing either on the leftmost sandfall river itself or at the sandy surface underneath it. Climb up the sandfall and manifest at the source past the the rocks, and you will enter the small, starting screen of Yampi Desert Cave, which contains a chest with a Water of Life for your trouble. (Sand can also be used to traverse the "one-way exit" sandfall at the southeast end of the area in either direction.)
The starting cave also contains a detailed circular pattern on the ground that can only be made use of with the Teleport Psynergy acquired near the end of the game at Mars Lighthouse. When it is time to explore the optional, extra-hard dungeon contained within Yampi Desert Cave, warp to Alhafra using Teleport in the overworld, enter Yampi Desert's northeast exit/entrance once more, use Sand to reach the cave's entrance at the northwest corner of the large final screen, and cast Teleport on the pattern itself.
Enemies
| Bestiary of Yampi Desert | ||||||||||
| Monster Name | LVL | HP | ATK | DEF | AGI | EXP | Coins | Weakness | Drop | Drop Rate |
| Dino | 10 | 82 | 84 | 23 | 35 | 40 | 39 | 1/16 | ||
| Emu | 11 | 98 | 89 | 21 | 46 | 53 | 51 | 1/32 | ||
| Gnome | 11 | 85 | 73 | 15 | 38 | 29 | 40 | 1/32 | ||
| Kobold | 10 | 77 | 80 | 17 | 47 | 40 | 45 | 1/16 | ||
| Momonga | 10 | 53 | 66 | 16 | 51 | 29 | 31 | 1/32 | ||
| Spider | 11 | 69 | 75 | 22 | 22 | 25 | 32 | 1/16 | ||
| Jupiter Djinni (Blitz) (unique) | 11 | 267 | 65 | 17 | 50 | 109 | 126 | N/A | ||
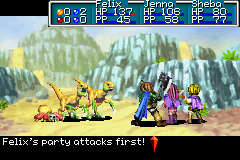
| King Scorpion (boss) | 18 | 1064 | 101 | 32 | 39 | 440 | 228 | 1/1 | ||
Enemy Formations
- Group 1: Kobold x1, Momonga x0-2
- Group 2: Emu x1, Momonga x0-2
- Group 3: Spider x1, Momonga x0-2
- Group 4: Kobold x1, Dino x1
- Group 5: Emu x1-2
- Group 6: Spider x1, Dino x0-2
- Group 7: Gnome x1, Dino x0-1
Collectibles
 Guardian Ring: In a chest in the first screen from the west entrance into the desert, right behind a Poundable stake.
 Blitz: On one of the elevated portions of a large screen, reachable by Pounding certain brown stakes while leaving certain other stakes standing so you can hop across them.
 Antidote: In a chest in the upper left part of the large area where the Jupiter Djinni can be found.
 Scoop Gem: Acquired as a reward for felling the King Scorpion boss.
 315 Coins: In the screen north of the screen with a small oasis, cast Scoop on the lower-right sandy spot separated from the surrounding sand.
 Hard Nut: In a chest in the cave area with the rushing sand rivers.
 Blow Mace: In a chest in the cave area with the rushing sand rivers.
 Trainer's Whip: In a chest in the final main exterior area with the multiple sandfalls. Requires Lash to reach.
 Lucky Medal: In an invisible chest in the center of the right of two square-shaped sets of nine stones; use the Reveal Psynergy to make it appear.
 Water of Life: In a chest in the cave entrance to Yampi Desert Cave, reachable with the Sand Psynergy.
History
At the start of The Lost Age, the tidal wave impacts coasts lining the southwest perimeter of the Eastern Sea, causing the island continent of Indra to get wedged between Gondowan and Osenia. The Champan pirate Briggs, who had up until that point been raiding rich settlements throughout the Eastern Sea, gets thrust by the tidal wave into the custody of the southernmost settlement of Indra, Madra, and thrown into their jail. His surviving crew launch a violent attack on Madra to bust him out of the jail, and they cross east into Osenia on foot to seek a replacement ship at the port town of Alhafra. Briggs destroys a critical bridge just west of Alhafra to stymie any pursuers.
The villagers of Madra, seeking to vent their frustrations at a scapegoat, rashly take captive another sailor who washes up near Madra shortly after the invasion, Piers, and throw him in their jail under the baseless suspicion that he is part of Briggs' crew. The Elder of Madra seeks to secure Piers' release but feels that the people need Briggs' own vow that Piers is not affiliated with the Champa in any way. He decides to bring his son, the Mayor of Madra, and several other Madrans on a trip directly to Alhafra to secure this vow. The bridge Briggs broke forces them into a detour through Yampi Desert, but they find themselves unable to surmount the cliff-ridden terrain. The Elder sees this as a necessary test of his son's worthiness as Madra's mayor and purposefully refrains from giving him advice on how to overcome Yampi Desert's adversity.
Felix and his traveling party of Adepts come across Piers in his jail and realize he is an Adept as well, and they have a need for his Lemurian Ship beached near Madra. Thus, they cross into Osenia to help Madra's leaders beat out of Briggs the latter's vow that Piers is not one of his men. Felix crosses into Yampi Desert and uses his Psynergy to clear the way for the stalled Madrans, and the group get some much needed rest and recuperation at an oasis that was just out of reach. Felix and the Madrans separately traverse the remainder of the desert to reach Alhafra and put Briggs in his place. With the vow secured, the Madrans who originally accompanied their mayor and elder are sent back through Yampi Desert to relay the news to their village, and Felix also has to travel back through the desert to continue with his quest. The Mayor and Elder stay at Alhafra for a while and return west to Madra once the bridge is repaired.
Trivia
- If you are using a cheat device to reposition the party in The Lost Age so that they are in the area in the first game's Angara where Lama Temple and the entrance to Lamakan Desert would have been, walking into Lamakan Desert will suddenly make you enter Yampi Desert as though you had just entered the latter through its northeast entrance. This is an unusual piece of leftover code from the first game, especially considering that none of the other locations that could be visited from the overworld in the first game send you anywhere if you walk over either their placeholder icons in The Lost Age or the areas where said icons or unmarked location entrances used to exist.
