Izumo Ruins
The Izumo Ruins (イズモの地下遺跡, Izumo's Underground Ruins) are an optional dungeon in Golden Sun: The Lost Age. It is a small network of subterranean caves based underneath the village of Izumo on the island of Nihan. While it can be entered as soon as Izumo itself can be first entered (meaning, as soon as the Lemurian Ship is acquired), reaching the Ulysses summon tablet at the end of it requires completing both Gaia Rock just southeast of Izumo and Aqua Rock near the Apojii Islands, earning the Sand and Parch Psynergies, respectively.
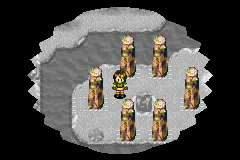
The entrance to Izumo Ruins lies hidden in the center of the ring of earth pillars located at the north end of Izumo village. Using the Reveal Psynergy will expose the entrance ladder leading down into the ruins — though this hole will initially start off sealed until the misaligned earth pillar to the left is moved back one space to the right using the Move Psynergy.
In-universe, the ring of stone pillars have been standing there for ages, and supposedly, no one in the village knows who put them there. However, village leader Uzume, her brother Susa, and her sister-in-law Kushinada seem to be aware of the ruins and have apparently entered it in the past by using their Move Psynergies to realign the stone and cause its hidden entrance to open. For an unknown reason, Uzume has assigned one villager to constantly guard the stone formation.
Walkthrough
Enter Izumo Ruins by casting Move on the left pillar at the northern ring of pillars in Izumo and moving it one tile right, then exposing the now-open ladder in the center with Reveal.
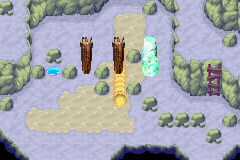
In the first room you climb down into, you will need to create two ice pillars out of the two standing puddles with the Frost Psynergy — but without the Sand Psynergy, you cannot reach the left puddle without Pounding the right wooden stake into the ground, which will defeat the purpose of the puzzle and force you to head back to the village above. While standing on the discolored beige part of the floor just above the right wooden stake, cast Sand to blend into the ground and travel south past the pillar so that you can reform and cast Frost on the left standing puddle. Cast Sand again to return north of the wooden stakes, turn the other puddle to the right into a Frost pillar, climb the wall ladder to the right, and hop left across the four pillars.
The next area is a hallway that leads to a T-intersection. Head east and climb down the southeast wall ladder so that you can Pound the standing wooden stake, then use Sand to get past the small stones above the stake, and finally head northwest and cast Move to remotely shift the earth pillar one tile right so that it forms a viable path to the ladder hole east of it. Use Sand to retrace your steps to the T-intersection and follow the long clockwise route west of it until you can hop east across the earth pillar and climb down said ladder hole.
In the floor below, the chest at the lower left can be gotten to by climbing up the short wall ladder east of the long one you just climbed down from and following the linear counter-clockwise route to the chest, hopping across two wood stakes; it contains the Phantasmal Mail. (If you already Pounded one of these two stakes, you will have to climb back up to the floor above to perform a puzzle reset.) Head back to the two ladders and Pound your way past the two stakes, and you will be presented with two short wall ladders off to the left; climb up the right ladder and cast Parch on the greenish pond north of it, then climb up the left ladder and follow the route into the now-exposed cave entrance into the last screen of the dungeon, where the summon tablet containing the Ulysses summon sequence waits to be collected. Cast Retreat to save time leaving the dungeon.
Enemies
| Bestiary of Izumo Ruins | ||||||||||
| Monster Name | LVL | HP | ATK | DEF | AGI | EXP | Coins | Weakness | Drop | Drop Rate |
| Clay Gargoyle | 25 | 209 | 210 | 90 | 84 | 100 | 147 | 1/32 | ||
| Dread Hound | 25 | 252 | 211 | 56 | 90 | 116 | 176 | 1/64 | ||
| Fire Worm | 25 | 97 | 211 | 49 | 94 | 158 | 113 | 1/32 | ||
| Gnome Mage | 25 | 162 | 179 | 50 | 108 | 86 | 126 | 1/16 | ||
| Golem | 25 | 266 | 217 | 57 | 40 | 105 | 161 | 1/64 | ||
| Gressil | 26 | 175 | 243 | 70 | 145 | 259 | 208 | 1/64 | ||
| Wight | 25 | 192 | 205 | 55 | 54 | 92 | 115 | 1/16 | ||
| Wood Walker | 25 | 230 | 213 | 75 | 94 | 242 | 201 | 1/16 | ||
Enemy Formations
- Group 1: Fire Worm x1-2
- Group 2: Wight x1, Fire Worm x1-2
- Group 3: Gnome Mage x1, Fire Worm x0-2
- Group 4: Golem x1, Wight x1
- Group 5: Gnome Mage x1, Clay Gargoyle x0-1
- Group 6: Gressil x1, Dread Hound x1
- Group 7: Gressil x1, Woodwalker x1
- Group 8: Woodwalker x2
Collectibles
 Phantasmal Mail: Found in a chest in the lower floor, reached by hopping across two wooden stakes before casting Pound on them to proceed further into the dungeon.
 Ulysses: The summon tablet that stands at the last chamber of this dungeon teaches this Mars-aligned summon sequence that additionally requires Mercury Djinn on standby.

