Shrine of the Sea God

The Shrine of the Sea God (海神様のやしろ, Sea God's Shrine) is a dungeon-like location in Golden Sun: The Lost Age. It is located in northern Indra just east of Daila, the earliest town in the game, and it can be visited even before visiting the first "main" dungeon in the game, Kandorean Temple. However, completing it can only be done after Felix's party has recruited the Mercury Adept Piers, whose Frost Psynergy allows the party to bring the Sea God's Tear from Daila's sanctum to unlock the rest of the dungeon. At the pinnacle of the tower is the Right Prong of the Trident of Ankohl, a weapon needed to defeat Poseidon, the creature lurking in the Sea of Time that is perhaps what the "Sea God" in the dungeon's title alludes to.
Walkthrough
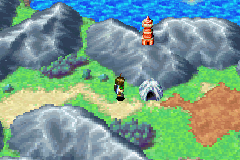
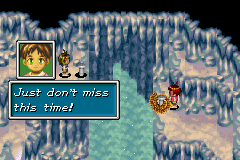
Shrine of the Sea God's location in the overworld is represented by two separate icons, including a cave icon at the base of a mountain and a tower situated at the peak of the mountain. If you travel east from Daila as soon as you can and enter the cave icon, you will see a cutscene where a boy named Riki fails to toss a rope to another boy named Tavi. The coiled rope in question cannot be manipulated by the Psynergy you start the game out with, and talking to Riki will only affirm that nothing can be done for the moment.

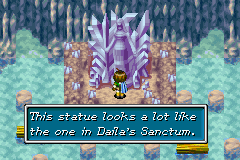
After completing Kandorean Temple southwest of Daila, the party will have gained the Lash Pebble allowing them to proceed through Dehkan Plateau to the southeast. Before going that way, you will have the option of returning to Shrine of the Sea God and casting Lash on the coiled rope, which will cause another cutscene that will lead to Daila "updating" in terms of NPC gossip. Climb up along the coiled rope, and in the next cavernous screen, cross west across two wooden bridges. Only bother going down the stairs if you want to see the statue in the Shrine of the Sea God from afar, which resembles the one in Daila's sanctum. Walk over a cracked bridge next to a Jupiter Djinni so that it gives way, then climb up and follow the Jupiter Djinni along a linear route that brings you downstairs.
Head southwest and walk along the shallow water to reach three separate staircases headed upstairs. If you head up the bottom stairs first, you will watch the Djinni cross a wooden bridge above your head, indicating that you should go up one of the other two stairs — so go up one of those stairs first to save time. You will watch the Djinni fly north underneath the wooden bridge, so now you can take the south staircase and follow the Djinni's trail to the dead-end with the vaguely lavender man-made structure. Move the purple pillar with the flame on it into the gap just north of it, then climb the stairs to follow the Djinni until it finds itself trapped between you and the flame. Interact with the Jupiter Djinni to battle it, and Breath will be added to your Djinn collection once you defeat it (though if it runs away on one of its turns, you will have to exit and reenter the area to make it reappear). You can now cast the Retreat Psynergy to warp back to the entrance of the dungeon to save time making the return trip to the outside world.
Later visit
You can technically return to the north region of Indra as soon as you have returned to southern Indra from Gondowan with Piers in your party, making a trip all the way through Dehkan Plateau. Just about every player will elect to complete the Lemurian Ship "dungeon" first and gain the capacity to sail the Eastern Sea with it, though, which will allow the party to dock at any of the three beaches around Daila and the Shrine of the Sea God very quickly. At any rate, presuming the village has "updated" thanks to you having helped out Riki and Tavi, the floodwaters will have receded from inside Daila's sanctum, allowing you to climb down to three puddles and cast Frost on them to turn them into ice pillars. This will let you hop across them to reach the Sea God's Tear rare item. You will also need to have collected the Reveal Psynergy from Air's Rock in Osenia to complete the dungeon.
Now return to the Shrine of the Sea God and travel back through the dungeon you may have traveled through before to get to the Jupiter Djinni Breath, maintaining the effect shared between Sacred Feathers and the Avoid Psynergy to prevent encounters with extremely weak monsters. Once you are near where you had gotten Breath, cast Frost on the three puddles west of the lavender structure and use them to hop into the cave north. The random monster bestiary does not improve as you explore the remainder of the Shrine grounds, so keep maintaining Avoid.
You will end up at a screen with blue water at the base of a maze of narrow gray pillars, with three routes you can begin hopping along. Follow along with the leftmost route to step onto a small, elevated island, then hop up and right form it to reach the visible earth pillar and push it down to the ground below. Hop right and go down the staircase.

You are now in a large room with several rushing rivers and multiple wooden bridges near the top part. Climb down the northwest wood ladder and then climb up the wood ladder south of that, then hop right and cross two horizontal bridges; the right one will break off and deposit you near a coiled rope. Before Lashing that and climbing it back up, walk along the shallow water heading up past it to reach the chest at the northeast corner of the room, which contains a Rusty Staff (which will be reforged into the Glower Staff back at Yallam). Once you've climbed the rope back up, make your way to the cracked bridge at the north end of its room and ride its broken plank to the bottom edge. You can Lash the bottom coiled rope if you wish, but go up the nearby staircase.
Southeast of the staircase you just climbed out of is an earth pillar you can Move one tile left onto an indentation in the ground next to it, creating a shortcut from near the area where you had trapped the Jupiter Djinni Breath. Go down the staircase north of the broken wooden bridge and follow along through the water-filled chamber with the statue, hopping along multiple rocks and floating wooden logs until you reach an empty ring in front of the goddess statue. Cast Reveal to expose the invisible platform in the center of the ring that lets you hop to the statue, inspect the statue, and use the Sea God's Tear to cause the water level to rise and make the statue's platform float to the top of the dungeon. From there, it should be an easy trip up through the top of the man-made portion of the dungeon, where you can pick up the Right Prong from its pedestal. Cast Retreat to save time leaving the dungeon.
Enemies
| Bestiary of Shrine of the Sea God | ||||||||||
| Monster Name | LVL | HP | ATK | DEF | AGI | EXP | Coins | Weakness | Drop | Drop Rate |
| Angle Worm | 6 | 37 | 40 | 9 | 14 | 12 | 10 | 1/32 | ||
| Ghost | 7 | 56 | 38 | 12 | 12 | 9 | 9 | 1/16 | ||
| Giant Bat | 5 | 32 | 30 | 6 | 22 | 6 | 6 | 1/16 | ||
| Wild Wolf | 5 | 45 | 34 | 8 | 13 | 7 | 7 | 1/16 | ||
| Jupiter Djinni (Breath) (unique) | 7 | 184 | 37 | 8 | 27 | 43 | 89 | N/A | ||
Enemy Formations
- Group 1: Wild Wolf x1-2, Giant Bat x0-1
- Group 2: Angle Worm x1-2, Giant Bat x0-1
- Group 3: Angle Worm x1, Wild Wolf x1-2
- Group 4: Ghost x1
- Group 5: Ghost x1, Angle Worm x1
- Group 6: Ghost x1, Wild Wolf x1
Collectibles
 Breath: Available in the first time you can explore the area after having acquired the Lash Psynergy. Pursuing the Djinni to the eventual dead-end, and pushing a flaming pillar up against a wall, allows you to fight it and earn it.
 Rusty Staff: In a chest in a room with several rushing rivers. Give it to Sunshine the blacksmith in Yallam and he will reforge it into the Glower Staff.
 Right Prong: The reward at the top of the dungeon available for when the dungeon can be explored later on. Once this and the Center Prong and Left Prong key items are collected, an event in Champa will yield the Trident.
History
It is not known for sure whether this ancient shrine pertains to the mythical, demigod-like king of the seas, Poseidon, or what connection it shares with two other similarly designed structures located across the Eastern Sea: Ankohl Ruins and Tundaria Tower. All three towers respectively contain a separate prong of the ancient Trident of Ankohl, which is the only weapon that can bring Poseidon low. The residents of modern-day Daila apparently fear the shrine as a place that could curse whoever "angers the sea god."
At the start of The Lost Age, the tidal wave emitted by Poseidon's reemergence within the Sea of Time heavily damages several settlements based around the Eastern Sea, but the mountain range the Shrine of the Sea God is built into coincidentally shields Daila from suffering the worst of the damage. This leads some in Daila to believe that the "sea god" represented by the shrine "saved" the village from the wave, unaware of the irony that it may very well have been the selfsame entity that caused the wave to begin with.
However, two of the village scamps, Riki and Tavi, had been playing inside the Shrine when the wave hit, driving Tavi onto a distant ledge inside with no way down and Riki unable to throw a rope to him. When Felix (the traveling Adept who played a role in lighting Venus Lighthouse — which incidentally was what roused Poseidon from his slumber) begins his quest to search for the remaining two Elemental Lighthouses, he enters the Shrine on a whim and uses the rope-tying Psynergy he acquired at Kandorean Temple to help Tavi out and let both boys return to the village.
Much later in Felix's quest, he and his newfound traveling companion Piers find that they cannot reach Lemuria within the Sea of Time without assembling the Trident of Ankohl, so they comb the Eastern Sea tapping into the powers of locales like Gaia Rock and gathering all three of the Prongs so that they may be forged by Obaba in Champa. This includes his party retrieving an ancient artifact enshrined in Daila's sanctum and using it on a similarly sculpted statue in the Shrine of the Sea God to reach its respective prong piece.