Ankohl Ruins

Ankohl Ruins (アンコール遺跡, Angkor Ruins) is a mandatory dungeon in Golden Sun: The Lost Age. It stands near the south coast of Angara a short ways east of Champa and on the other side of a river dividing its area from Xian in the first game. It is the namesake of the ancient Trident of Ankohl that Felix's party seeks to assemble while exploring the Eastern Sea, and it also contains one of the Trident's three prongs. The Left Prong can only be reached by exploring the dungeon with the help of the Sand Psynergy taught to Felix in the previous Gaia Rock dungeon.
Walkthrough
When the party in The Lost Age begins sailing the Eastern Sea, several dungeons open up all at once, but some dungeons require Psynergy earned in others to play all the way through. Virtually none of Ankohl Ruins can be explored fruitfully without having earned the Sand Psynergy for Felix in Gaia Rock, a dungeon that can be explored and completed as soon as the Eastern Sea segment of the game opens up (so long as you have also collected the Reveal Psynergy from Air's Rock).
Broadly speaking, after the party completes Gaia Rock and Aqua Rock for their unique Psynergy rewards, their objective to clear the Sea of Time and reach Lemuria requires them to collect all three prongs of the usable Trident equipment at three other dungeons: Shrine of the Sea God, Tundaria Tower, and Ankohl Ruins. Only after having Obaba reforge them into the completed Trident at Champa near Ankohl Ruins can the party defeat the otherwise invincible boss lurking in the Sea of Time.
Perhaps moreso than any other dungeon in the series, Ankohl Ruins is a maze set up to disorient the player and trick them into repeatedly covering ground even when doing so might not yet be necessary at that point. Various lengthy routes lead to dead-ends, only some of which actually contain mandatory steps that help make dead-ends elsewhere worth reaching even if they had already been reached earlier. Players not already knowledgeable about the ideal progression order will most likely fail to recognize when they should return all the way back to the starting hub once they have fulfilled a step at a particular dead-end, and not using the Retreat Psynergy will ultimately cause them to spend more time wandering the dungeon grounds.
Entering the dungeon

After entering the main structure beyond the cracked wall out front, you will be presented with several bushes against the walls that can be cleared away with Whirlwind (or Gale). The rooms behind the left and right bushes are filled with three empty treasure chests each, representing that the pirates of Champa have long since picked this early part of the dungeon clean.
Past the top-center bush is a long hallway with seven stone faces and three open entrances at the bottom left, top center, and bottom right. The top exit from this "opening hub" hallway leads to the separated bottom section of the currently inactive "late sandfall chamber," and the bottom-right exit leads into the "east wing" of the dungeon but currently stops at a "sand intersection" closed off by an earth pillar placed on the sand itself. The lower-left entrance leads into the "west wing" of the dungeon and is the only viable route at present.
Before you head out through the lower-left exit, you can hop onto the platforms in front of each of the six complete stone faces and remotely drop their center segments into the abyss using the Move Psynergy. The rightmost face conceals a Crystal Powder, the second face from the right leads to where you can remotely Move an earth pillar off sand near a chest, the leftmost face lets you cast Sand on the sandy trail to travel underneath the blocks and reach said chest (which contains a Nut), and the second face from the left conceals a chest containing 210 Coins. The Coins and Crystal Powder are technically the only treasures that can be collected from Ankohl Ruins if you enter it early without having added the Sand Psynergy to your Psynergy repertoire.
Exploring the "west wing"

Taking the southwest exit from the "hall-of-faces hub" brings you to a room with bushes against the wall to your left. Head south and then west to take the room's open lower-left stairwell up, then follow along and cast Sand on the sand trail poking out to travel underneath the black space separating areas. Follow the sand trail up and then right to emerge near a chest behind three blocks to gain the strong Thanatos Mace. Then emerge in the open space west of the chest and head north, following along until you get to a dead-end where you can push a piece of a stone face right into where it obviously goes; the completed stone face fills the room with sand.
Return to the southwest first-floor area with the bushes (either by retracing your steps or casting Retreat and taking the lower-left exit from the hall-of-faces hub), and now clear away the northwest bush and go up the stairs it concealed. You will arrive at the "sand pool" you just filled up, and a chest left of that contains a Power Bread. Cast Sand to travel upward, then climb the ivy right of the completed stone face and go upstairs.
You will end up at branches leading west and south. If you do not care about getting chests containing 365 Coins and a Vial, then just follow along with the south branch until you arrive at a T-intersection far to the north, then take the east branch. (Otherwise, go west from that T-intersection and remotely Move an earth pillar off a patch of sand, then return to the first west-or-south branch, go west from there, go north at the west T-intersection, and use Sand to reach the Vial in the chest you opened the way to. Then return to the west T-intersection and take its south fork, following along all the way until you get to its chest of coins. Then return all the way to the far-north T-intersection and proceed east from there.)

You will end up at a puzzle room with a floor switch very near you to the left and a short pillar with a floor switch on it situated in the sand pit. As soon as you step on the left floor switch, the stone face will spew sand that raises the sand level, and you will have three full seconds to move around on the sand before the face automatically raises the sand level again. This will bring the sand level to the same height as the short pillar, and you must step on the short pillar's floor switch during that three-second window to open the stairwell at the upper right corner of the room. If you do not step on the pillar's floor switch in time, you will have to leave and reenter the room through its upper-left exit to perform a puzzle reset.
Follow along until you slide down into a hole in the ground, and you will drop into the upper-left portion of the previously described "late sandfall chamber". Move the left earth pillar into its neighboring indentation and fit the stone face piece right into the empty left part of the stone face waiting for it. Then, take the northwest exit out (if Felix appears to drop down from the ceiling again at this point, ignore this inconsequential visual glitch) and proceed east past a stairwell until you get to the west end of the "sand intersection." Once you remotely Move the earth pillar right onto its neighboring ground indentation, your work in the west wing of the dungeon is complete, so you must return to the "hall-of-faces hub"; while you can do this by returning to the "late sandfall chamber" and taking its lower exit out so that you eventually head back south through the center face of the hall-of-faces hub, it may be simpler to just cast Retreat to reach there.
Exploring the "east wing"

From the "hall-of-faces hub," head through the lower-right exit and follow along with Sand until you go upstairs one flight. Behind the left of the three bushes in this fairly small area is a chest containing the Muni Robe artifact. As you follow along with the linear route, note the small 3x2 tile of sand a fair ways south of an incomplete stone head. Hop left of the head, climb the vines, and head up the stairwell west of the head, and you will soon reach the south end of the "sand intersection," which you can now pass with the Sand Psynergy thanks to the earth pillar you previously moved out of the way. Before heading further east and southeast, blow away the left of the two bushes with Whirlwind to reach a chest containing a Sylph Feather.
You will end up in a similar rising-sand-level puzzle room as what you handled previously, but since the sand will now rise twice as fast, you have much less time to run to the small pillar's floor switch before it gets submerged in sand. Follow along south and west with the next halls, blowing away the first wall bush you see so that you can access a chest containing a Potion. Follow along with the lengthy, linear, winding route until you reach a dead-end where you can move a stone face piece left onto the exposed right portion of the stone face beyond the 3x2 sand tile seen previously; the statue's eyes will turn green. Since your objective will now be to get in front of this face, casting Retreat is highly advised because it will let you leave through the hall-of-faces hub's lower-right exit again and reach the bottom of the narrow track with the 3x2 sand tile.
If you use the above-described Retreat method to return to this narrow, vertical track from the south end, the camera will move to show the green face suddenly moving south, and you will have limited time to scramble to the 3x2 sand tile and cast Sand in time to let the stone face pass over you. (On the other hand, if after you complete this face you make the laborious backtrack all the way back so that you return to the narrow track area from the northwest end, then as soon as you hop right back in front of the face, the face will immediately start pushing you south. Cast Sand as the face pushes you south over the 3x2 sand tile.) Once you rematerialize, head up to find that the face was blocking a now-exposed sand trail leading under the wall; use Sand to travel north through it.

Follow along up multiple flights of stairs; when you pass by an earth pillar covering up sandy ground, you can move the pillar out of the way if you wish, but that simply lets you back into the west part of the "sand intersection" from earlier. Instead, head south and cast Reveal near a square arrangement of differently colored blocks so that you expose a pit in the center of the square, and Move the disjointed face piece so that it falls into the pit. Go downstairs and fit the face piece into the open space waiting for it to complete the sand-spewing stone face in the "late sandfall chamber."
Now, you can cast Retreat to return to the hall-of-faces hub and head through the north-center exit to return to the south portion of the late sandfall chamber. Alternatively, from the right side of the late sandfall chamber face you just completed, you can go back upstairs and use the sand shortcut nearby to go west from the sand intersection to make it into the west portion of the late sandfall chamber. Whichever way you chose to get here, you can now cast Sand at the bottom of the new sandfall to slowly climb up its surface. This brings you up the stairs east of the stone face, and you will be brought through a linear route that involves casting Sand to travel up another long sandfall. This leads you to the pinnacle of Ankohl Ruins, where the Left Prong waits to be picked up. You are done with Ankohl Ruins, so you can immediately cast Retreat one last time to depart for the overworld map.
Enemies
| Bestiary of Ankohl Ruins | ||||||||||
| Monster Name | LVL | HP | ATK | DEF | AGI | EXP | Coins | Weakness | Drop | Drop Rate |
| Dinox | 27 | 172 | 264 | 82 | 116 | 239 | 166 | 1/16 | ||
| Harridan | 27 | 231 | 261 | 66 | 118 | 150 | 164 | 1/32 | ||
| Living Armor | 27 | 201 | 266 | 99 | 90 | 320 | 205 | 1/128 | ||
| Minotaurus | 27 | 268 | 276 | 84 | 123 | 318 | 207 | 1/64 | ||
| Squirrelfang | 27 | 130 | 229 | 59 | 168 | 176 | 131 | 1/32 | ||
| Wood Walker | 25 | 230 | 213 | 75 | 94 | 242 | 201 | 1/16 | ||
Enemy Formations
- Group 1: Squirrelfang x1-2
- Group 2: Dinox x1-2
- Group 3: Woodwalker x1, Squirrelfang x1-2
- Group 4: Minotaurus x1, Squirrelfang x0-2
- Group 5: Minotaurus x1, Dinox x0-2
- Group 6: Harridan x1-2
- Group 7: Living Armor x1, Minotaurus x1
- Group 8: Living Armor x1-3
Collectibles
The following three chests are hidden behind the other, initially complete stone heads lining the starting hallway:
 210 Coins: In a chest behind the second head from the left in the hub hallway with seven stone head statues.
 Crystal Powder: In a chest behind the leftmost head in the hub hallway with seven stone head statues.
 Nut: In a chest in a room connected to the hidden entrances behind the leftmost stone head and the second stone head from the right in the hub hallway.
The following four treasures are found throughout the "west wing" (as in, the portion of the dungeon accessed by exiting the hub hall through its lower-left exit):
- 365 Coins: In a chest at the bottom end of a hall reached by taking the left fork from the top end of the hall.
 Power Bread: In an easy-to-get chest next to a pool of sand.
 Thanatos Mace: In a chest in an enclosed small portion of a larger room, reached by using Sand to travel under walls via a sand trail.
 Vial: In a chest in a hallway, behind an earth pillar which should be pushed out of the way to open up a traversable Sand trail.
The final four treasures can be found during and after playing through the dungeon's "east wing":
 Muni Robe: In a chest in a small room behind a Whirlwind-able bush.
 Potion: In a chest in a room behind one of three Whirlwind-able bushes in one particular hallway.
 Sylph Feather: In a chest in a room behind a Whirlwind-able bush that's shortly after a sand trail you opened up near the end of the west wing run.
 Left Prong: This key item, at the very peak of the dungeon, is the target treasure and main objective of Ankohl Ruins.
History
The Ankohl Ruins is an ancient tower located on the coast of southern Angara a short ways east of the modern-day pirate village of Champa. The tower was built by the Champa's ancient ancestors, the Ankohl culture, which may have figured into the events of Weyard's ancient past. The Ankohl were masters of the art of forging items from metal and were apparently aligned with the Venus element, as indicated by the many sand-spewing statues and mechanisms still active in the tower itself. The tower is also covered in overgrown plants.
The degraded remains of the tower had only been partially explored by the Champa prior to the beginning of The Lost Age, and they were able to make off with lots of treasures in chests near the entrance. The remainder of the tower's confines, however, can only be reached by Adepts with specific sand-based Psynergy abilities such as those granted within the heart of Gaia Rock. Lying at the peak of the tower, apparently undisturbed since the ancient era, is one of the prongs to a venerated weapon known as the Trident of Ankohl; it is unknown what it implies that the other two prongs currently reside within two similarly structured tower-like dungeons situated far across Weyard to the south, the Shrine of the Sea God in Indra and Tundaria Tower in the eponymous continent at the south edge of the world.
Should Obaba, the Champa village matriarch and the last currently living individual who retains knowledge of the Ankohl's crafting techniques, be allowed to cast all three prongs into an ancient, gaping forge left behind by the Ankohl at the mountains of Champa itself, the Trident will reforge itself through unseen processes mysterious even to her. This weapon is said to allow its wielder to triumph over any sea monster, and in truth, it is the only way that a certain demigod-like creature named Poseidon can be harmed. It can only be speculated what connection the Ankohl culture had with the ancient society of Lemuria far out in the Eastern Sea that a specific weapon created by the Ankohl would seem so specialized in defeating an entity so heavily associated with Lemuria's history.
In The Lost Age, Felix explores the Eastern Sea in search of the power needed to safely make the treacherous journey into the Sea of Time and reach Lemuria, and he ends up exploring Ankohl Ruins, Shrine of the Sea God, and Tundaria Tower and collecting all three of the Trident's prongs. After they convince Obaba to reforge the Trident for them, the Adepts bring this weapon into the Sea of Time and lay Poseidon low with it.
Trivia

- Before Briggs returns to Champa later in the game, the item shopkeeper states that the expensive artifacts she is selling were acquired from a life-threatening exploration venture into Ankohl Ruins she took part in at some point back. This would seem to be corroborated by the empty treasure chests near the entrance to the dungeon, so it can be seen to be implied that the artifacts in Champa's item menu — a Demonic Staff, a Blessed Robe, and a Potion — were among the treasures in these chests.
- In The Lost Age, Ankohl Ruins and the forest surrounding it are located at a point in southern Angara that would have been fully visible to Isaac's party in the first Golden Sun if they were to travel as far to the southwest from Xian as they could, park themselves at the pictured river, and zoom out the player's view of the overworld by holding the L shoulder button. In the first game, that area is shown as a completely featureless green field near a beach, and the dungeon and forest were inserted into that part of the overworld in the second game.
- Given Ankohl Ruin's position between Champa to the west and Xian to the east, it seems likely that Feizhi would have passed close to this structure on her way to Champa for her possible meeting with Felix's party in The Lost Age.
Glitches
- Late in the party's exploration of the dungeon's west wing, you will slide into a black pit and drop into an open chamber with both an earth pillar to your left and a piece of a stone face to your right. The first time you leave this chamber via either of the left doors visible to you, a minor visual glitch will likely take place in which Felix will appear to drop off the ceiling in the next room the same way he had just dropped from the ceiling into the large chamber. This can be made to happen repeatedly by sliding down that pit repeatedly, and Felix can also appear to fall from the ceiling if the party completes a battle before changing rooms. This is apparently a result of an internal "fall-from-ceiling" flag failing to switch off after falling into the pit and only properly switching off once a subsequent screen transition takes place.
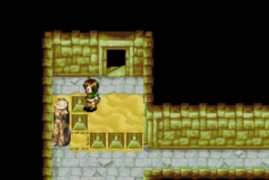
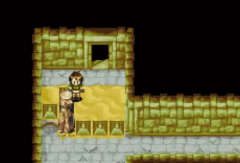
- In a rather powerful and easy-to-perform sequence break, it is possible to skip playing through most of the east half of the dungeon and get to the goal at the top of the tower much quicker. Near the end of your exploration of the west wing, after fitting the left stone face piece into the "late sandfall head" in a large chamber, you would normally go up and remotely move an earth pillar off to the right to free up a "sand intersection" for later use. If you go up the stairs left of the two bushes to your left, you will find a sand-based shortcut blocked off by its own earth pillar. If you cast Sand and position yourself to the left at just the right distance, it is possible to materialize with Felix's sprite partially overlapping with the blocks to his left. This will allow him to cast Move downward and latch onto the earth pillar so that he can shift it one space left from his position north, letting him get directly to the Reveal-based puzzle that will let him finish off the "late sandfall head" very quickly. You can then go back through the shortcut you just made so you can return to the chamber and make use of that sandfall, which will lead to the prong.
- Another earth pillar that can be shifted off to the side from an unintended angle is the aforementioned "sand intersection," which you can reach by playing through the east wing. By exiting the Sand state while standing slightly over the blocks to Felix's left under the earth pillar, Felix can remotely Move the pillar right, which will allow you to play through the east wing and eventually fit the right stone face piece into the "late sandfall head" in the big chamber first. Then, you can take the sand shortcut exploited in the above paragraph to return to the left part of the same chamber, where you can complete the stone head with the left piece and immediately make use of its new sandfall to get to the prong. In other words, exploiting the shortcut described in the first paragraph (reached through playing through the west wing) can let you mostly skip the east wing, whereas exploiting the shortcut mentioned in this paragraph (reached through playing through the east wing early) can let you mostly skip the west wing.
-
 Moving this pillar aside from this angle lets Felix skip most of the east wing after playing through the west wing.
 -
 Moving this pillar aside from this angle lets Felix skip most of the west wing after playing through the east wing first.
 -
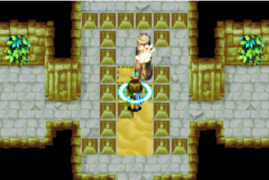
 An animated demonstration of the correct positioning Felix must assume to pull off this exploit.


Cultural references

The Ankohl Ruins appear to reference the real-world Angkor ruins, the remnants of a civilization located in modern-day Cambodia. Ankohl Ruins' name, architectural style, and placement in the world of Weyard all closely parallel those facets of the Angkor ruins, right down to the stone heads lining the walls, the design of the doorways, and the brickwork. Furthermore, the vegetation growing throughout Ankohl Ruins resembles what grows throughout the real-world ruins. Finally, since Xian is generally thought to be the Golden Sun setting's parallel to real-world China, the locations of Champa and the Ankohl Ruins relative to Xian are similar to how Cambodia and the Angkor ruins are south of China.