Tundaria Tower

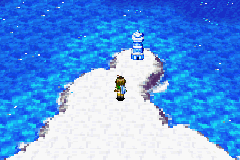
Tundaria Tower (サウスアイランドの塔, South Island's Tower) is a dungeon in Golden Sun: The Lost Age. Located on Tundaria at the southern edge of the world of Weyard, it is the sole defining location on the continent. It is one of several dungeons that can be reached while sailing the Eastern Sea throughout the middle of The Lost Age, but it can only be accessed after gaining the Parch Psynergy from Aqua Rock (and completing it also requires the Reveal Psynergy from Air's Rock, if that dungeon was passed over during the party's time on Osenia earlier in the game).
The tower's rewards are both the Burst Brooch utility Psynergy item and the Center Prong — one of the three components of the Trident of Ankohl, which needs to be reforged at Champa so that the boss inside the Sea of Time blocking the way to Lemuria can be stripped of its invincibility. Furthermore, the Burst Psynergy will be needed to destroy the rock pinning down the broken mast of the sailing ship at Alhafra, which is a step needed to unlock the service at Champa that will reforge the Trident.
Tundaria Tower is given little context beyond an NPC in East Tundaria Islet pondering who across Weyard would have seen fit to construct a strange tower in the middle of a desolate, frozen wasteland as far removed from civilization as possible. It is, however, one of three similar towers that serve as resting places for three prongs of the Trident of Ankohl, the only weapon that can slay Poseidon near the secluded society of Lemuria. The other two are Ankohl Ruins at the south coast of the northern continent of Angara and the Shrine of the Sea God at the island continent of Indra. How these locations and Lemuria might have related to each other in the world's ancient past can only be speculated on.
Walkthrough
Though Tundaria Tower is positioned as one of the "major" dungeons in the Eastern Sea portion of The Lost Age, it takes significantly less time to clear than the likes of Aqua Rock and Ankohl Ruins. If you head toward it right away, however, you will be blocked off at the main lobby by a pair of pools that currently submerge doors leading east and west, and a room just above that will tantalize you with the Center Prong visibly encased in a mass of cracked ice. You will be required to complete Aqua Rock and add Parch to your Psynergy repertoire first, which will allow you to permanently drain the two pools. Completing the tower, meanwhile, will eventually require the Reveal Psynergy earned at Air's Rock, a dungeon the player is capable of temporarily skipping over until some time into the Eastern Sea segment. The bestiary of random monsters fought in Tundaria Tower, which is mostly shared with Ankohl Ruins, reflects that this is one of the later dungeons to explore in the Eastern Sea.
The route beyond the west formerly-submerged door will block you from progressing with a cracked wall, so head through the east door, then take the south branch and follow along until you climb up stairs to the northeast. You will end up at the center-east end of the second floor, with branches north and south to your left. Take the south fork and step left onto the frictionless ice puzzle, and slide down, left, up, right, up, and right to reach the red chest containing a Mint. You cannot reach the center ladder from this side, so slide back left, down, right, up, right, down, and right to return to the east fork.
Head north from the fork to find a frictionless ice trail leading left — but head left along the solid ground running parallel above that first to get to a chest with 365 Coins. When you slide left along the ice, you will drop left along a one-way route west. Follow the route through this floor counter-clockwise until you reach the west end of the same frictionless ice puzzle at the bottom. Step right onto the ice, then slide up, left, down, right, up, and left to reach the ladder at the center of the room. Follow along upstairs to the third floor.
You are now in an area with three separate sets of stairwells heading further up into different parts of the fourth floor. Take the west stairwell up and cast Pound to get past a lone light-blue ice stake to reach a puzzle room with three similar stakes both blocking the path to the visible chest above and allowing you to hop east to west across them to another chest. While the chest on the lower level contains a Crystal Powder, the chest on the upper level contains a Hard Nut, and getting to this chest first will mean that it will not matter which of the blue stakes you then Pound into the ground for the lower chest. That said, even if you go for the Crystal Powder chest first, Pounding only the left stake will ensure that you can then get to the Hard Nut chest without initiating a puzzle reset by leaving and reentering the room.
Return to the area with the three staircases, and now head up through the center stairwell at the bottom. You will slide south and automatically land back in a part of the third floor in the center of a frictionless ice maze with a Mars Djinni visible to your right. Step left onto the ice, then slide up, right, up, left, down, right, up, and right to collide into the Mars Djinni. Slide further right up to its face and initiate a battle with it to try to add it to your collection. Leaving the room off its northwest end brings you to the chamber with the three stairs once more, and now head up through the right staircase, and follow along the linear trail clockwise until you reach another staircase leading to the fifth floor.

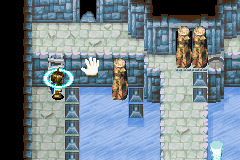
You will eventually be led to a puzzle chamber where the objective is to make it out of the black doorway concealed by two earth pillars in the upper center. Stand underneath the lone earth pillar in the lower-left frictionless ice "pool" and remotely cast Move on it to make it slide to the left, then make it slide up, and then make it slide right. For the right chamber where there are three ice stakes at the bottom, remotely Pound the center and right stakes into the ground, then remotely Move the upper-right ice pillar down, then left so that it stops against the left ice stake, and finally up. You can now climb and walk onto the top of that earth pillar; standing atop it, remotely Move the right of the two center pillars one tile right onto the indentation in the ground. Climb back down and retrace your steps back to the northwest corner, and hop right from the left earth pillar so that you can push the last center earth pillar out of the way and head into the black doorway behind it.
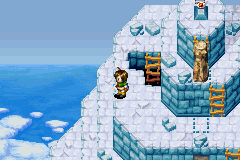
Follow along with the linear route until you get to what appears to be an ice wall showing Felix's reflection. What appears to be a ring-shaped arrangement of blocks on the ground indicates that you must cast Reveal on it, which lets you pass through a hidden doorway in the wall. Climb up the wall ladder behind the ice wall to reach the pinnacle of Tundaria Tower; climb up to the right of the earth pillar and cast Move to drop it down so that you can reach the Burst Brooch and pick it off its pedestal. The Retreat Psynergy does not work on this particular screen, so you will have to climb down to the cracked brown rock covering the lower doorway and cast your new Burst Psynergy to blow it open. As soon as you step back inside, you are free to cast Retreat to return to the snowy exterior screen just outside the base of Tundaria Tower.
Before leaving, reenter the base of the tower and return to the room with the ice-encased Center Prong, and cast Burst to blow the ice open and claim the prong. Now, you can head through the west door originally submerged in water and follow along south until you reach a reflective wall with a crack; blowing this open creates a doorway to a hallway. Taking the visible exit to your southeast brings you to two chests containing a Sylph Feather and a Lucky Medal. Returning to the hall and hopping to the east brings you to the final two treasure chests: a Vial and the Lightning Sword. You have now looted everything the tower has to offer, so cast Retreat again to facilitate your departure.
Enemies
| Bestiary of Tundaria Tower | ||||||||||
| Monster Name | LVL | HP | ATK | DEF | AGI | EXP | Coins | Weakness | Drop | Drop Rate |
| Dinox | 27 | 172 | 264 | 82 | 116 | 239 | 166 | 1/16 | ||
| Harridan | 27 | 231 | 261 | 66 | 118 | 150 | 164 | 1/32 | ||
| Living Armor | 27 | 201 | 266 | 99 | 90 | 320 | 205 | 1/128 | ||
| Magicore | 28 | 321 | 253 | 74 | 109 | 169 | 208 | 1/128 | ||
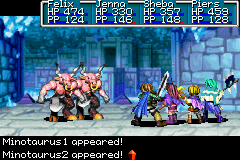
| Minotaurus | 27 | 268 | 276 | 84 | 123 | 318 | 207 | 1/64 | ||
| Needle Egg | 28 | 119 | 234 | 94 | 147 | 214 | 110 | 1/16 | ||
| Squirrelfang | 27 | 130 | 229 | 59 | 168 | 176 | 131 | 1/32 | ||
| Stone Soldier | 28 | 179 | 241 | 105 | 104 | 98 | 98 | 1/32 | ||
| Mars Djinni (Reflux) (unique) | 28 | 756 | 231 | 68 | 199 | 794 | 563 | N/A | ||
Enemy Formations
- Group 1: Squirrelfang x1-3
- Group 2: Needle Egg x1-3
- Group 3: Needle Egg x1-2, Squirrelfang x0-2
- Group 4: Dinox x1-2, Squirrelfang x0-1
- Group 5: Minotaurus x1-2
- Group 6: Living Armor x1-2, Harridan x0-1
- Group 7: Magicore x1, Squirrelfang x0-2
- Group 8: Stone Soldier x1-2, Needle Egg x0-1
Collectibles
 Mint: Found in a chest near a sliding ice area.
 365 Coins: Found in a chest above a horizontal sliding ice path.
 Crystal Powder: Found in a chest in a room with the three Pound-able ice pillars.
 Hard Nut: Found in a chest in a room with the three Pound-able ice pillars.
 Mars Djinni Reflux: A Mars Djinni is found and battled in the large sliding ice room. It must be pushed off the ice to start the battle.
 Burst Brooch: Found on the top of Tundaria Tower. This is a utility Psynergy item granting the Burst Psynergy, which can destroy cracked objects.
 Center Prong: Found encased in a cracked slab of ice on the base floor that can be destroyed by the Burst Psynergy. This key item is used in Champa along with the other two prongs to forge the Trident of Ankohl.
 Sylph Feather: Found in one of the four chests in a room accessible by the Burst Psynergy.
 Lucky Medal: Found in one of the four chests in a room accessible by the Burst Psynergy.
 Vial: Found in one of the four chests in a room accessible by the Burst Psynergy.
 Lightning Sword: Found in one of the four chests in a room accessible by the Burst Psynergy.

