Treasure Isle
Treasure Isle (大イースト海北の宝島, N Great East Sea's Treasure Island) is an optional dungeon in Golden Sun: The Lost Age. Located at the northeast corner of the Eastern Sea, it effectively comprises two small dungeons on separate floors. Once you have received the Grind Psynergy in Lemuria at the end of the Eastern Sea segment of the game, the upper floor can be explored for several worthwhile treasures. Once the reunion has taken place late in the game and the Lift Psynergy from the first Golden Sun becomes available, the lower floor can be explored, where the difficulty reaches that of other optional late-game dungeons like Yampi Desert Cave and Islet Cave. An especially tricky optional boss, Star Magician, guards the summon tablet for Azul.
Treasure Isle is given little context beyond being known in some circles to contain alleged "ancient pirate treasure". Just prior to the start of The Lost Age, the dread pirate Briggs had discovered the island and made off with whatever loot was conveniently placed near the entrance, but ancient mechanisms rendered other chests inaccessible to them. Only Felix's party can possess the Psynergy needed to delve further into the island's network and claim the rest of its treasures.
Walkthrough
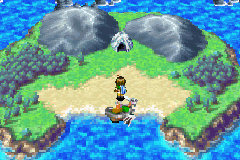
Treasure Isle can be reached as soon as the party gains access to the Lemurian Ship and starts sailing the Eastern Sea with it. It is located at the northeast corner of Weyard, and it appears to be surrounded by rocks in the water, but carefully rounding these rocks will reveal a gap that will let the ship sail to a beach in front of the cave icon. The random monsters fought on the overworld just outside this cave are the more difficult random monsters that can be fought throughout landmasses in the Western Sea much later in the game, giving the party the opportunity to fight these monsters much earlier in the game's campaign. Treasure Isle becomes worth exploring for its upper floor once you have gotten the Grindstone in Lemuria, and its lower floor becomes explorable once Felix's party has been expanded and the Lifting Gem is added to the inventory.
Upper floor
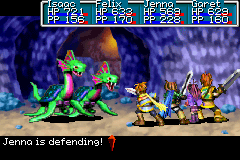
If Treasure Isle is entered before the party has reached Lemuria, only a limited portion of the upper floor can be explored. Even so, there is some value in doing so because the random monsters fought in here includes the Earth Golem and Turtle Dragon, which can rarely drop the Giant Axe and Blessed Mace, respectively. In the first area you enter, there are four doorways, three of which are located near earth pillars that have already been pushed off to the side. Behind the two doors near the two earth pillars to the left are small rooms containing chests that are revealed to be empty when opened, representing that Briggs' pirate crew had already taken their contents. Oddly considering this premise, the chest room in the open doorway at the far left end of this area contains chests that have not been looted, containing 161 Coins and a Lucky Medal.
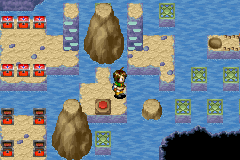
Head north into a water-filled chamber with six more chests to your left that have also had their contents taken by the pirates. When you hop north, you will have no choice but to land on a red button on the ground, which makes four giant earth spires rise out of the water around you, blocking you off from reaching the six chests to the northwest or heading east. If you have gotten the Grind Psynergy, do NOT use it on the giant spire above you because you will prevent yourself from reaching the northwest six chests anyway. That spire must be left raised for when you reenter this chamber through the doorway at the northeast corner of this chamber, so instead cast Grind on the spire to your right to proceed out of the southeast exit.
You enter the south watery chamber, where you can see a tightrope crossing above an enclosed area where an earth pillar is standing right next to a red floor switch. Follow along the counter-clockwise route on the ground until you hop south underneath the tightrope to reach the earth pillar, and move it one tile down and one tile right without touching the red floor switch — though if you do, you can just cast Grind to lower the raised earth spire that now blocks your way back. Position yourself directly south of the earth pillar on the other side of the wall of small rocks and remotely cast Move to move the pillar north onto the red tile above it, which will make the earth pillar rise without trapping you north of it. Now climb the wall ladder left of this space and cross the right rope, and hop across the raised earth spire to reach the next room.
Now in the east, watery chamber of this floor, hopping onto the red floor switch will make three earth spires rise perpendicular to you. Grinding the right earth pillar back down is all you need to complete this chamber; once you hop north of this earth pillar, climb the wall ladder and walk south across the tight rope so you can hop left across the other two spires and reach the chest containing the Jester's Armlet. Climb back down and remotely Move the earth pillar left to open the way north out of the chamber.
You will end up at the north area of the upper floor, consisting of twisting, dirt-covered hallways with multiple branches. Take the south branch, then take the northwest branch to reach a chest that will reveal itself to be a Mimic when fought; it will drop a Power Bread when felled. Then, head south to return to the west, water-filled chamber through its northeast doorway, and remotely Move the earth pillar onto the indentation on its left. Hop west; if you made sure to leave the north earth spire raised, you can climb the wall ladder pillar and hop west across it to reach the six chests. They contain 911 Coins, a Psy Crystal, a Star Dust, a Sylph Feather, a Cookie, and a Rusty Axe that will be reforged into the Viking Axe once brought back to Yallam.
If Isaac's party has not joined Felix's, there is no point in going downstairs and reaching a dead-end blocked off by a round boulder that will require the Lift Psynergy, so leave Treasure Isle either by casting Retreat or by casting Grind on the earth spire next to the six chests so you can hop back south. Be warned, however, that when you come back to Treasure Isle near the end of the game, the earth pillar in this west water chamber will not actually save its position on the indentation on the ground because of a programming oversight. The intent of the level design suggests that you would only have had to return to this chamber, raise the four earth pillars, Grind down the north pillar, and hop northeast past it to reach the dirt-covered hallways with the stairwell leading downstairs. In practice, you will have to proceed through the other two watery puzzle chambers all over again to return to the north hallways. Once you've returned there, take the north branch to reach the stairs behind the area where you fought the Mimic.
Lower floor
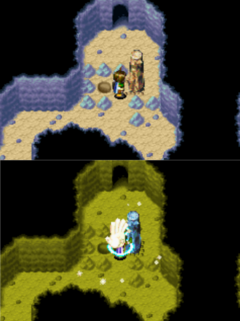
Once you go downstairs, the random encounters with the stronger monsters of Treasure Isle only begin once you cast Lift on the round boulder blocking your path. Follow along west past the incomplete earth pillar shortcut and pick up the chest's contents: the powerful Iris Robe. Follow along south and in a clockwise fashion, casting Lift on another round boulder blocking your way north.
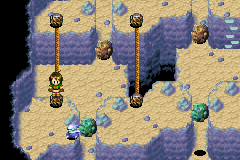
You are now in a puzzle chamber that comes across as a larger-scale version of a puzzle in Shaman Village Cave, where you have to Lift the right configuration of the six boulders lying on the ground between the raised platforms. Lifting the lower central boulder in front of you is all you need to do to access both optional collectibles in this room. Climb up the wall ladder ahead of you, hop right, and walk down the right tightrope to get to the Fire Brand chest. Then, hop left from the wall ladder platform, jump onto the tied post making up the north end of the second-to-leftmost tightrope, and jump left off that so you can hop left onto the platform with the leftmost tightrope. Follow that down to the Jupiter Djinni, which will not attempt to flee across the open space right of it (unlike how the Djnni in the Shaman Village Cave puzzle behaved). Defeat in battle to add the Jupiter Djinni Gale to your collection.
You will have to perform a puzzle reset by leaving and reentering the chamber. Now, Lift the lower-left boulder, then Lift the upper-left boulder, and hop east twice to Lift the upper-right boulder. Climb the wall ladder near the still-grounded upper-center boulder, hop left over it, walk down the tightrope to your left, and follow along east until you climb down underneath the Fire Brand chest. At the branch leading through doorways north and south, head south first to push the previously encountered earth pillar into its indentation to open a shortcut (which, thankfully, stays open unlike the earth pillars in the floor above). It can be noted that a viable alternative method of progressing through this puzzle chamber would be to carry out this solution first to get past the chamber while ignoring the Djinni and weapon collectibles, then perform a puzzle reset, then climb back up onto the raised platforms from the east end so that those two collectibles can be easily gathered while all six boulders remain grounded.
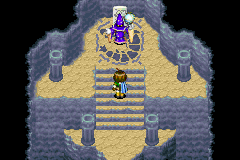
Head north into a branching trail of dirt-covered hallways. When you reach a branch with two hallways oriented to the north, the left branch would lead to a dead-end in most cases. However, if Isaac joined your party without all seven of the first game's Venus Djinn in his party's Djinn collection, the game's "make-up" Venus Djinni will be standing at the end of this dead-end, which will join without a fight. At any rate, follow along with the right branch to reach the boss chamber at the end, where the battle with the difficult Star Magician optional boss will take place once you approach it on the stairs leading up to it. A case can be made that this boss is harder than the optional bosses Valukar and Sentinel, so you can leave this boss alone for the time being and come back when the party is sufficiently built up. Once you win against this boss, you can collect the Azul summon tablet. Casting Retreat here will bring you back to the start of Treasure Isle's upper floor.
Enemies
| Bestiary of Treasure Isle (Overworld) | ||||||||||
| Monster Name | LVL | HP | ATK | DEF | AGI | EXP | Coins | Weakness | Drop | Drop Rate |
| Pteranodon | 31 | 242 | 291 | 100 | 166 | 341 | 174 | 1/16 | ||
| Slayer | 31 | 220 | 300 | 90 | 158 | 344 | 254 | 1/32 | ||
| Talon Runner | 31 | 228 | 303 | 88 | 159 | 367 | 215 | 1/32 | ||
| Wargold | 31 | 202 | 303 | 78 | 181 | 321 | 226 | 1/16 | ||
| Wolfkin | 31 | 213 | 309 | 89 | 174 | 337 | 219 | 1/16 | ||
| Bestiary of Treasure Isle (Pre-Reunion) | ||||||||||
| Monster Name | LVL | HP | ATK | DEF | AGI | EXP | Coins | Weakness | Drop | Drop Rate |
| Cannibal Ghoul | 31 | 249 | 274 | 82 | 80 | 194 | 160 | 1/32 | ||
| Earth Golem | 31 | 298 | 299 | 114 | 70 | 218 | 183 | 1/128 | ||
| Harridan | 27 | 231 | 261 | 66 | 118 | 150 | 164 | 1/32 | ||
| Horned Ghost | 31 | 236 | 268 | 78 | 116 | 199 | 116 | 1/32 | ||
| Stone Soldier | 28 | 179 | 241 | 105 | 104 | 98 | 98 | 1/32 | ||
| Turtle Dragon | 30 | 340 | 305 | 100 | 117 | 424 | 251 | 1/128 | ||
| Mimic (unique) | 34 | 879 | 333 | 103 | 196 | 1336 | 677 | 1/1 | ||
Enemy Formations (Pre-Reunion Area)
- Group 1: Harridan x1-2
- Group 2: Turtle Dragon x2
- Group 3: Stone Soldier x1-2
- Group 4: Horned Ghost x1, Cannibal Ghoul x0-1
- Group 5: Harridan x1, Turtle Dragon x0-1
- Group 6: Earth Golem x1, Cannibal Ghoul x0-1
- Group 7: Earth Golem x1, Stone Soldier x0-1
| Bestiary of Treasure Isle (Post-Reunion) | ||||||||||
| Monster Name | LVL | HP | ATK | DEF | AGI | EXP | Coins | Weakness | Drop | Drop Rate |
| Gillman Lord | 36 | 284 | 456 | 136 | 174 | 459 | 257 | 1/64 | ||
| Great Seagull | 36 | 266 | 411 | 93 | 206 | 363 | 211 | 1/64 | ||
| Ocean Dragon | 36 | 473 | 478 | 154 | 143 | 590 | 307 | 1/128 | ||
| Puppet Warrior | 36 | 310 | 469 | 180 | 125 | 555 | 283 | 1/64 | ||
| Pyrodra | 36 | 384 | 451 | 125 | 125 | 568 | 387 | 1/64 | ||
| Sea Hedgehog | 36 | 177 | 402 | 160 | 188 | 319 | 145 | 1/32 | ||
| Jupiter Djinni (Gale) (unique) | 36 | 980 | 309 | 97 | 277 | 1197 | 756 | N/A | ||
| Star Magician (boss) | 46 | 7486 | 460 | 139 | 268 | 7866 | 5566 | N/A | ||
| Thunder Ball (boss) | 46 | 280 | 329 | 123 | 219 | 296 | 243 | N/A | ||
| Refresh Ball (boss) | 46 | 360 | 317 | 124 | 136 | 448 | 278 | N/A | ||
| Guardian Ball (boss) | 46 | 520 | 317 | 127 | 292 | 439 | 289 | N/A | ||
| Anger Ball (boss) | 46 | 460 | 357 | 125 | 173 | 387 | 30 | N/A | ||
Enemy Formations (Post-Reunion Area)
- Group 1: Sea Hedgehog x1-3
- Group 2: Great Seagull x1-2, Sea Hedgehog x0-1
- Group 3: Gillman Lord x1, Puppet Warrior x0-2
- Group 4: Puppet Warrior x1-3
- Group 5: Pyrodra x1, Great Seagull x0-2
- Group 6: Pyrodra x1, Sea Hedgehog x0-1
- Group 7: Ocean Dragon x1, Pyrodra x1
- Group 8: Ocean Dragon x2
Collectibles
Treasure Isle has loads of treasure chests, but all but two of the ones immediately presented to the player are revealed to be empty; the in-universe explanation for this is that Briggs and his pirate crew had already plundered their contents prior to the start of The Lost Age. In an odd detail that would seem to contradict the scenario, the two chests at the starting hall on the upper floor still retain their contents despite being all the easier for the pirates to access than the ones originally hidden behind earth pillars:
 61 Coins: In the left of the two chests in the left-most sub-chamber of the entrance hall.
 Lucky Medal: In the right of the two chests in the left-most sub-chamber of the entrance hall.
Once the party has visited Lemuria about two thirds through the game, the remainder of the dungeon's upper floor can be explored with the help of the Grind Psynergy. These seven chests are filled with contents that Briggs obviously could not reach:
 Jester's Armlet: In the lone chest in one watery room to the east with three Grind pillars that can be raised. Reached by raising all the pillars in the room, and then casting Grind on the rightmost pillar.
 911 Coins: In the bottom left of the six chests in the first "main" rooom.
 Cookie: In the bottom right of the six chests in the first "main" room.
 Psy Crystal: In the bottom center of the six chests in the first "main" room.
 Rusty Axe: In the top center of the six chests in the first "main" room. Is reforged into the Viking Axe at Yallam.
 Star Dust: In the top right of the six chests in the first "main" room.
 Sylph Feather: In the top left of the six chests in the first "main" room.
Finally, in the lower floor of Treasure Isle, which requires Isaac's party and the Lift Psynergy to access, these especially significant collectibles await:
 Iris Robe: In the chest in the room where you first enter the deeper part of the dungeon.
 Gale: In the room with Lift-able boulders in the style of a similar puzzle in Shaman Village Cave. Both this Djinni and the chest in this room can be collected just by Lifting the lower center boulder. Gale must be battled to be acquired.
 Fire Brand: In the chest in the room with Lift-able boulders in the style of a similar puzzle in Shaman Village Cave. Both this chest and the Jupiter Djinni in this room can by collected just by Lifting the lower center boulder.
 A Venus Djinni may be found here near the entrance to the final room, depending on whether Isaac's party has joined Felix with less than all 7 of the first Golden Sun game's Venus Djinn in his party's inventory. This will be one of the missing Venus Djinn from the first game making a reappearance for the party in The Lost Age to collect. You do not need to engage it in combat in order to obtain it.
 Azul: This Summon tablet lies at the final room of the dungeon, guarded by the optional boss Star Magician. Essentially, the dungeon's "main" goal and reward, following one of the main optional "superboss" battles of the game.
Trivia
- An exploitable oversight with the game's Move-related collision detection allows the party to skip the primary puzzle chamber in the lower floor of Treasure Isle. As you pass by the earth pillar east of the Iris Robe chest for the first time, you can position Felix at the exact pixels left-and-below the earth pillar so that casting Move in an eastward direction will cause the Psynergy hand to latch onto the pillar — but Felix himself can still be far enough below the tile to the left of the pillar that the game considers him to be occupying the tile underneath. This allows the earth pillar to be shifted one tile left anyway and fitted onto the ground indentation from south of the pillar instead of north. This lets you progress north into the hallways leading up to the Star Magician right away, but the real power of this exploit is that you can now climb up the puzzle chamber's "exit wall ladder" and traverse the raised gaps and tightropes to collect the Jupiter Djinni Gale and the Fire Brand without needing any of the six boulders floating.
