Psynergy Training Grounds

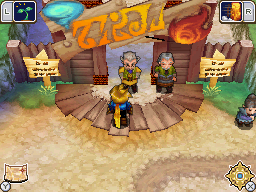
The Psynergy Training Grounds (エナジートライニング場 Energy Training Grounds) are a series of four large areas in Patcher's Place that serve as the second general dungeon-style area in Golden Sun: Dark Dawn. Matthew, Tyrell, and Karis are required to come here and complete these trials in order to get the Gate Card for the Konpa Ruins, and progress with the game.
General
The Psynergy Training Grounds essentially serve multiple purposes. It allows young Adepts to practice and hone their abilities, as well as learn the history behind the journey of the now infamous Warriors of Vale. It was created sometime after the Golden Sun event, and presents the journey in a theme park environment.
The man-made obstacles throughout the grounds have been designed to be throwbacks to the classic scenarios and battles the original Warriors of Vale underwent in Golden Sun and The Lost Age, with each of the four areas representing the journey to its Elemental Lighthouse. In all the areas the rate at which running around restores Psynergy Points is much higher. In addition, there are many signs which explain various bits of history regarding the journey; in some cases, these signs are the only mention of certain Encyclopedia entries.
The first trial requires the player to complete 4 obstacle courses, with a time limit of ten minutes for each section. Each area features two boss challenges, which are essentially wooden representations of certain bosses encountered in the previous games; in order to progress, most bosses must be "defeated" by burning them using Fireball. The Mercury Area's bosses represents Isaac's battles with Tret and Saturos, while The Venus area shows his battle with the Kraken, and the battle atop the Lighthouse against Saturos and Menardi. The Jupiter Area showcases Felix's battles with Poseidon and his battle atop the lighthouse against Karst and Agatio. The final area, Mars, showcases the combined party's battle against Karst and Agatio as well as a final boss, which varies slightly depending on the run.
During the area's first run, the final boss is a standard boss battle against the Dim Dragon, a scaled down, wooden and mechanical representation of the Doom Dragon. Defeating the Dim Dragon allows the player to gain the Gate Card.
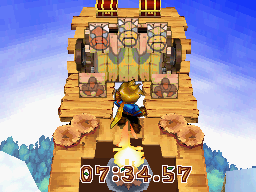
After completing the challenge, a harder version becomes available, allowing the player to complete the same courses with stricter time limits and a tougher boss, the Dim Dragon Plus. In the harder challenge, the player is allowed 2 minutes to complete the Mercury area, 3 minutes to complete the Venus area, 4 minutes to complete the Jupiter area, and 3 minutes to complete the Mars area. Completing the harder challenge allows Matthew to retry any area in order to improve his time without having to complete the whole challenge.
Walkthrough
Mercury Area
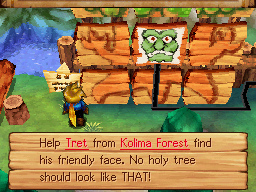
After gaining admittance into the Training Grounds, walk straight ahead and face the poster of the blue Slime across the water, and cast the Fireball Psynergy to burn it and lower the drawbridge to the right. Beyond that are three rollable logs: roll the upper vertical log right, and while standing anywhere near the vertical earth pillar below the horizontal log, cast the Move Psynergy and move it one space to the right. Then roll the lower left log right, and the horizontal log up. At the area at the large billboard of Tret, climb up the tree and burn Tret's face with the Fireball Psynergy to drop the next drawbridge. Past that are three water spouts that shoot up in a pattern, flanked by two earth pillars. Move the left pillar one space right and the right pillar one space left, and ride the central water spout up to the top of the blue tower (representing Mercury Lighthouse). Go up to the moving billboard painted with a chibi image of Saturos and burn it with Fireball (representing the original party's victory over Saturos at the top of Mercury Lighthouse).
Venus Area
The first puzzle here is a mine cart track setup similar to those in Altin Peak. There are four forks in the tracks, above each of which is a red arrow sign with a pinwheel at the base - casting the Whirlwind Psynergy at these pinwheels switches the fork into the other direction. Use Whirlwind to switch the top fork and the two bottom forks, excluding the second fork from the top, and ride the mine cart. When you get off, hop southwest and cast Fireball at each of the three moving billboard targets representing the Kraken, making a square platform below you rise out of the water. Use it to hop west and traverse a short hopping maze atop wooden pillars. At the base of the hazel tower at the end (representing Venus Lighthouse), cast Growth on the plant to let yourself climb up to the top, and cast Fireball twice to burn the two moving billboards of Saturos and Menardi (representing the original party's victory over the two atop Venus Lighthouse).
Jupiter Area
Climb the short stairs onto the wooden post and cast Whirlwind at the pinwheel above to make the billboard painted with the Gabomba Statue stick out its tongue, which lets you hop right. You'll find spinning fans in between Move-able earth pillars that will blow you off if you try to cross them. Move each of the three earth pillars one space left so you can go under them to the other side. In the next area, hop down to the crates floating in square-shaped courses, which you can hop across to reach three earth pillars scattered across. Move each of the three earth pillars onto the darkened tile of ground next to it to release the trident symbol tiles, and when all such tiles are open, the fountains at the top of the area will be removed. Now, you can hop over to the platform with the trident image on it and cast Fireball three times to burn the billboards with pieces of Poseidon drawn on it. (This represents how Felix, in The Lost Age, assembled the three pieces of the Trident of Ankohl to remove Poseidon's invulnerability.) In the last area at the right, stand on the grate below the purple tower (representing Jupiter Lighthouse) and cast Whirlwind on the giant pinwheel in front of you, and you will be blown up to the tower's top. Cast Fireball twice to burn the two moving billboards painted with Karst and Agatio (glorifying the Warriors of Vale's battle against these two at the top of Jupiter Lighthouse, whether they had actually defeated them or not).
Mars Area
There are many Frosted pillars that can be burned down with the Fireball Psynergy, but after melting down the first one that blocks your path so you can hop over its puddle, all you need to burn down are the three pillars holding up portions of a series of crates that have a red dragon's head painted on it. Burn the lower two ice pillars from the ground level, push the left vertical log left, climb up the small brown stairwell, and from there burn the upper left pillar to make the dragon's head image uniform. From where you are standing, cross behind the log pillar and roll it right so it falls into the water. Hop across the log pillar, and Whirlwind the nearby pinwheel to make a stairwell appear. Climb it and follow the linear path until you find a puzzle similar to one in the original Mars Lighthouse where jets of fire blow you off the path and knock you back down below. The only way to cross is to Move the earth pillar in front of each flame jet so that you can cross it one at a time. (The left and center flame jets rise up and down to let you pass without the earth pillar, but that is moot because the right flame jet will always be in your way otherwise.) Past that is an arrangement of climbable pillars with tightropes attached between them. The two tightropes and the ground are three separate levels of elevation - each of which you must stand on to burn three differently elevated frost pillars above. Once you're finished, go right to find an elevated flame jet that moves left and right, and a plant sprout below that. The idea is to use Growth on it and climb it before the flame jet burns it. Once that is done, summit the red tower (representing Mars Lighthouse), and burn the two billboards of Karst and Agatio (representing how they were fought again in the last lighthouse, though in different forms). As soon as that is done, the boss battle with the mechanized Dim Dragon ensues, representing the final opponent the Warriors of Vale fought in The Lost Age, the Doom Dragon. Defeat it. After the battle, you are allowed one of two chests to open, and it doesn't matter which one you pick, because you will always get the Gate Card. Nonetheless, the other chest will contain a Water of Life if you redo the course, and an enhanced form of the boss, Dim Dragon Plus, will be fought in order to earn it.
| Bestiary | ||||||||||
| Monster Name | LVL | HP | ATK | DEF | AGI | EXP | Coins | Weakness | Drop | Drop Rate |
| Dim Dragon (boss) | 5 | 320 | 44 | 12 | 13 | 179 | 60 | 1/1 | ||
| Dim Dragon Plus (boss) | 5 | 500 | 49 | 12 | 13 | 267 | 80 | 1/1 | ||
Trivia
A modified form of the first Mercury Area was featured in the playable floor demo at E3 2010, in which several Djinn guide you through how to "help" them out of their various predicaments.


