Golden Sun: Dark Dawn/Tricks, glitches, and other minutiae
A collection of details concerning Golden Sun: Dark Dawn that players often find intriguing. Also see Golden Sun/Tricks, glitches, and other minutiae and Golden Sun: The Lost Age/Tricks, glitches, and other minutiae.
Tricks
Fight later enemies earlier
- From Kaocho, head to the small forest area south-east of the town and walk along the edge of the mountain. Occasionally you will fight Rat Warriors, monsters you would normally fight later.
- After the Grave Eclipse has occurred, dock in Tonfon and walk along the bottom of the Endless Wall. You will be able to fight enemies from the Endless Wall, and the background battle scene will show the Endless Wall.
Reduce the amount of encounters
In Dark Dawn, each time you transition from one room to another the step counter that determines when you get an encounter is reset. This in fact happens any time there is a screen transition at all. There are two ways that this can be abused to reset your step counter:
- Reading the Sun Saga will cause a screen transition and reset the step counter. In particular, it is possible to read the Sun Saga in the overworld and in towns (like Ayuthay and eclipse world Belinsk where there are encounters).
- Saving and reloading the game will cause a screen transition that will reset your step counter. This is useful in dungeons where reading the Sun Saga is impossible.
Glitches
Fall through the Endless Wall to reach unreachable areas
Late in the game, when traveling the Endless Wall towards the Apollo Ascent, stand on the line dividing the vertical road to Apollo Sanctum from the horizontal road at the T intersection, and position yourself exactly until Matthew's shadow seems to disappear and the horizontal road appears to overlap his feet slightly. Either read the Sun Saga or save here and reload the game file, and Matthew should appear to immediately drop through the ground and fall a fair distance into the black abyss below the game world. You can now walk under the road and bypass various natural obstacles that prevent you from accessing certain areas late-game in normal play. It is easy to find yourself glitching back onto solid ground while walking underneath land, but it is possible to get into areas normally blocked off by points-of-no-return and find Djinn you missed this way.
Out of Bounds Techniques
In addition to the Endless Wall glitch, there are many methods by which Matthew reach areas out of bounds. There are two main ways to do this; the first is that almost all bridges in Dark Dawn can be clipped off of allowing the player near unlimited overworld movement, the second is by using certain geometric configurations within dungeons / towns to force Matthew out of bounds by holding certain angles with the stylus. A comprehensive breakdown of many out of bounds techniques in order for the player to recover almost all permanently missable content can be found here.
Permanently replace a Djinni with a glitched version
Upon Giving a party member's rightmost Djinni in the Djinn Menu to a party member holding less Djinn overall (as opposed to Trading for it) by dragging it into an empty space with the DS' stylus, pressing against the DS' touch screen with the stylus immediately after pressing A to pass the confirmation prompt should cause a glitched Djinni icon to remain "picked up" by the cursor, separately from the Djinni that was just moved. While this will disappear harmlessly in most cases once let go, dropping this icon onto another Djinni on the menu will permanently replace that Djinni with what the game will consider to be a Jupiter Djinni named "Moloch" (inheriting both the name of the Moloch summon and its "The sacred ice monster" text description). Compared to any other Djinni, this glitched Djinni will give massive bonuses to HP, Defense, and Agility while Set — but while it can safely be used for Summons that require multiple Djinn, attempting to summon its corresponding model via the basic Jupiter summon sequence will crash the game. Many more details are explained here.
Cast Whirlwind with items

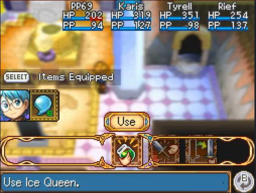
Due to a programming oversight, any item which has an index that ends in 0x4 can be used to simulate Whirlwind. Simply position Matthew next to the object that you wish to cast Whirlwind on, open the item menu, navigate to one of the following items, and the option to "Use" the item will be present. Selecting this option will simulate a Whirlwind. The following items end in 0x4: Claymore, Hunter's Sword, Battle Axe, Thanatos Mace, Clotho's Distaff, Berserker Claw, Xylion Armor, Sanan Dress, Mirrored Shield, Leda's Bracelet, Knight's Helm, Silver Circlet, Lady Moon's Ring, Antidote, Gunpowder Bomb, Glyph Book, Echo Gem, Ice Queen.
Attack your own characters
By leveraging the fact that the battle menu accepts Stylus and D-pad inputs it is possible to trigger some unintended battle mechanics, including the ability to target your own party with damaging abilities. There are two places to use the glitch and two methods to do the glitch.
- The glitch can be used with the normal "Attack" command
- The glitch can be used with a damaging psynergy item from the item menu, like a Bramble Seed
There are two ways to do the glitch, depending on whether you have quick-select enabled as an option. We will assume you are doing the glitch with the Attack command:
- Without quick select, press the stylus on the "Psynergy" option and exactly one frame later press Left on the D-pad.
- With quick select, press the stylus on the "Psynergy" option at exactly the same time as pressing Left on the D-pad.
If successful the battle cursor will be targeting your party. For using this glitch with items the situation is exactly the same, except the psynergy item needs to be the item next to the one you want to use in your inventory list (wrapping the menu back to the start by pressing Right is okay). For most items this will have no effect, however if the item bestows psynergy to the user (like Sand Prince) the psynergy bestowed by the item can be cast on your party.
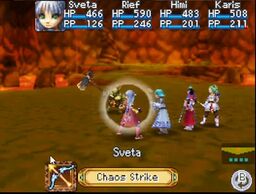
Using this glitch you can access some unused attack types. The type of attack used by this glitch is determined by whatever ability / summon your cursor was last on. For instance, if the cursor was last on the Iris summon, the Attack command will become Chaos Strike (which is an unused crit effected intended for bows).
This glitch has been dubbed "Command Swap" by the community. A full explanation of the glitch and its underlying mechanics can be found in this video.
Other minutiae
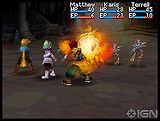
- A pre-release screenshot shows the party fighting what appears to be a group of Stone Soldiers, enemies from the previous games that are not present in Dark Dawn.
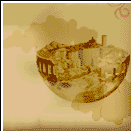
- A hidden image in the code that depicts some sort of crumbled ruins resting on top of a semi-sphere is apparently an image identifying the Anemos, seemingly representing the story of how the City of the Anemos rose up to become Weyard's moon.
- There are at least three unused portraits of existing characters in the game code: one of Sveta looking shocked and perking her ears straight up, one of Hou Zan looking tense and sweating, and one of Briggs looking deathly pale with his eyes closed.
- Four item icons and the items they are attached to are present in the game code that cannot be gotten in normal play. The first two are the icons for the Encyclopedia and Djinn Guide, suggesting these may have been planned as separate items at some point, while the bag of gold can safely be guessed to exist to represent when you find coins out of a chest. However, the round sun emblem is not seen in the game in any form. It is apparently coded as a Quest item, and cannot be dropped. All four of these items have blank inventory descriptions.
- The Insight Glass and Magma Orb cannot be acquired by the player in normal play, but have inventory icons regardless. If hacked into the inventory, the Insight Glass can be equipped and used to bestow Insight by any member of the party (instead of just Amiti), and unlike any other Psynergy item can be dropped or sold for 0 Coins.
- If the player travels to the Iceberg Outpost and rescues Ryu Kou and Hou Ju before finding the Echo Gem in Tonfon, the sidequest regarding the Echo Gem will simply be deactivated, and the item will be moved from Lady Hinechou's room of Tonfon palace to the artifact section of the item shop.
- Even if the Glyph Book is skipped or thrown away by use of an movement or inventory hack through an external exploit device (such as an Action Replay), Matthew will still be able to read any of the glyphs throughout Weyard like normal, as if he had the book.
- Atop the Konpa Ruins there is a puddle that the player is normally never prepared to freeze: when progressing through the ruins the player does not have Cold Snap, and by the time they do get Cold Snap the ruins have already been blocked off. However, through use of the Endless Wall glitch, or an inventory or movement hack, they can reach the puddle with Cold Snap in their possession. Yet they will find that Cold Snap does not work on the puddle at all. Therefore, they won't be able to create the platform needed to reach the vine down to the Konpa Cave from there.
- In the room of the Belinsk Ruins with the Mercury Djinni Spout, there is a statue that the player can use Slap on to progress through the ruins. However, in the room behind the statue there is a stand that the player is normally never prepared to use; when they can first reach this area the player does not have the Magma Shard needed to activate the stand, and by the time the player can return later in the story they will have already used up all of their Magma Shards, with Hou Zan and Ryu Kou having already left their Magma Shard on the stand instead. Despite being completely inaccessible during normal play, the pedestal is fully functional and will allow the party to proceed if a magma shard is placed on it.
- There are numerous abnormalities that can largely only be encountered by usage of a walk through walls hack (in some cases, the Endless Wall glitch works as well):
- At the very start of the game at the Lookout Cabin there is a Travel Log titled "Stop Tyrell from flying!", with the description "Tyrell has taken the soarwing and wants to fly away. Stop him before he breaks it.", that cannot be viewed in a normal playthrough. The reason it cannot be viewed is because the player only receives the Travel Log from Karis after Tyrell has already flown away with the Soarwing. In order to bypass this and view the Travel Log, the player must use a walk through walls hack to leave the starting area, unlocking the Travel Log and the ability to save the game early, Upon saving the game, the normally hidden Travel Log written into view.
- Tyrell can be spoken to by the player directly when on the Lookout Cabin's roof, before he flies away, through use of a walk through walls hack. He will respond: "THIS MESSAGE SHOULD NOT BE DISPLAYED."
- The normally unreachable east half of Carver's Camp features a house which can be entered and has a fully coded interior. One of the pots in the house even (sometimes) contains a single Lucky Pepper, one that cannot be acquired in normal play. When the oven and cupboard here are inspected, the message "It is translating." will be shown. To the left of the house is a log that can be rolled further west, onto a wooden ledge hanging over the camp's chasm, allowing the player to get closer to the camp's Psynergy Vortex. Attempting to leave the camp through its east exit will simply return the player back to this same area of the camp; the only way to escape the area is if the player uses a walk through walls hack via an external exploit device (such as an Action Replay) to travel across the camp's chasm, and leave through the camp's south or west exit. Many of these details suggest that this area may have been initially planned to be accessible, but dropped later on in development. Full visual details here.
- The exit of the Konpa Cave that Kraden and Nowell left through can be reached through use of a walk through walls hack. However, going through this exit will simply return the player to this same area of the cave. This area also features a puddle and a vine; Cold Snap will not work on the puddle, but the player will be able to climb up and down the vine just fine, and can climb up it through an exit in the ceiling of the cave to emerge on top of the Konpa Ruins, near the unfreezable puddle.
- The waterfalls of Kaocho, the Kolima Junction, and the Apollo Ascent can be heard more loudly the closer the player is to them; their maximum volume can only be heard with use of a walk through walls hack to get as close as possible to the waterfalls.
- The Kaocho Palace normally cannot ever be revisited after the player has been thrown out by King Wo. But reentry can be achieved through use of a walk through walls hack. If the player attempts to return to the throne room however, two palace guards will move to block off the front of the stairway. When spoken to, the guard on the left responds: "King Wo is always busy. I never get an audience with him!", while the guard on the right responds: "Nobody has come this way. They all just vanished from the castle." The guards do not have any Spirit Sense thoughts.
- In the non-Dream version Border Town, the west side of the town can only be reached with use of a walk through walls hack. The entrances to the west side of the border do not work, and the normally unseen houses in this area are completely broken down and cannot be entered. Growth will not work on the vine in this version of the town either. However, the west exit works fine, and ejects the player to the normally inaccessible area of the World Map between Border Town and Carver's Camp.
- The normal exits of Belinsk do not work after the Grave Eclipse has begun, even if accessed through a walk through walls hack.
- The Iceberg Outpost, Harun Channel, Endless Wall, Apollo Ascent, and village of Champa normally cannot be visited until after the Grave Eclipse's shadows have hung over them. However, through use of a walk through walls hack, the player can visit them early, and will feature bright skies clear of the Eclipse's shadows. The music played in a non-Eclipsed Champa will be that of Carver's Camp and Border Town, instead of its sad post-Eclipse music.


