Iceberg Outpost

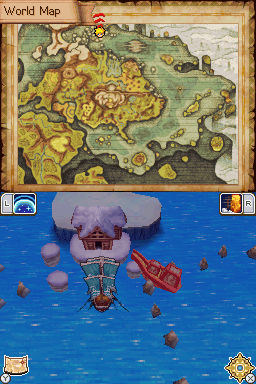
Iceberg Outpost (流氷島, Ice Island) is a location in Golden Sun: Dark Dawn. It is located far to the west of Harun Village, beyond the thick cloudy region hiding Lost Ship and north of the center of Angara.
Walkthrough
Iceberg Outpost technically becomes accessible as soon as the sailing ship is acquired late in Dark Dawn, for the ship can be sailed way into its secluded spot in the explorable world's sea, north of Angara and nestled among the ice floes shown on the map screen to stretch out east from the snowy northwest part of the land. However, an obstacle placed right at the entrance can only be passed by recruiting Himi in Yamata City and using her Search Psynergy on the spot in the water with a purple glittering effect. The story officially directs you here once you have spoken with the emperor at Tonfon and have gotten the Echo Gem from the palace, which will cause your icon on the map screen to maintain a pointer locked onto this location's direction until you complete this location.

The mandatory step to take here is to enter the building's main door, roll the sole vertical log right, roll the bottom horizontal log south, and then move the wooden dresser at least one space to the right. The moment you step through the door, a cutscene will take over that will eventually deposit you back outside, with the Umbra Map key item added to your Adepts' collective inventory. The moment you step back out into the overworld, the world map will display a set of red circles or crosses to chart which pieces of the story-imperative Umbra Gear have been acquired and which still remain.
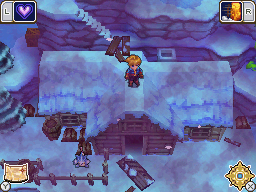
Before leaving, hop east and north along the snowy platforms next to the house and climb a tree up to where you can cast Growth on a sapling to create a vine. Climb the tree to your right to step next to the Grip spire, and use Grip on the other spire west of that to reach the chest containing a Mythril Silver. Grip your way back and climb down the tree, and now wrap around counter-clockwise through the snowy cliff-like landscape to step onto the roof. Slide down the west part of the roof to land next to the Mercury Djinni Rime, which will join without a fight, and then climb the nearby tree to reach the inconspicuous wooden create above and retrieve a Lucky Pepper from it. Cast Grip on the spire west of yourself to return to the starting area. Now make your way all the way back to the roof, and this time jump into the chimney to enter the house through the fireplace, depositing you right next to the chest with the Minerva Helm. To leave, push the upper horizontal log up and push the sole vertical log right.
Collectibles
 Rime: Located just outside the house, in an area only accessible by sliding down the roof.
 Mythril Silver: Located in a chest in a piece of land above the house.
 Minerva Helm: Located in a chest inside the house. Can be accessed by sliding down the chimney of the house.
 Umbra Map: Obtained from the cutscene that transpires upon entering the door behind the dresser inside the house.
 Lucky Pepper: Found in a wooden crate just above the tree left of the house, which can be reached right after landing next to the Mercury Djinni Rime.
Story
After the start of the Grave Eclipse, Ryu Kou, Hou Ju, and Hou Zan manage to escape on a Sanan ship. During the ensuing storm, the ship crashes near a small outpost, though Ryu Kou, Hou Ju, and Hou Zan survive. The three take refuge in a small room in the house. Monsters empowered by the Grave Eclipse attack, but Hou Zan is able to fend them off with his martial arts skills. However, he only wounds one, and is fatally injured.
Later on, Matthew and his party of Adepts track the three Sanans down by following the signal from an Echo Gem in Hou Ju's possession, which reacts to an identical gem taken by Matthew from Tonfon. They initially find the sunken ship, but discover that the ship's crew has died. After exploring the nearby house, the Adepts find Ryu Kou and Hou Ju hovering over Hou Zan. After recounting the groups adventures, Hou Zan dies of his injuries, and is buried just outside the house, with Hou Ju's Echo Gem serving as a grave marker. After obtaining the Umbra Map needed for their quest, Matthew's party escorts Ryu Kou and Hou Ju back to Tonfon.
| Minor Locations |
|---|
| Minor Locations in Golden Sun |
| Alpine Crossing • Bilibin Barricade • Gondowan Passage • Fuchin Temple • Kalay Docks • Kalay Tunnel • Kolima Bridge • Kolima Tunnel • Lama Temple • Tolbi Docks • Tolbi-bound Ship |
| Minor Locations in Golden Sun: The Lost Age |
| Alhafran Cave • Ancient Lemuria • Atteka Inlet • E Tundaria Islet • East Indra Shore • Gondowan Settlement • Hesperia Settlement • Idejima • Kalt Island • N Osenia Islet • Osenia Cliffs • SE Angara Islet • Sea of Time Islet • SW Atteka Islet • West Indra Islet Summon Caverns: Angara Cavern • Atteka Cavern • Indra Cavern • Osenia Cavern |
| Minor Locations in Golden Sun: Dark Dawn |
| Konpa Gate • Clouds of Passaj • Saha Cistern • Kolima Junction • Iceberg Outpost Summon Caverns: Carver's Lumberyard • Konpa Shrine • North Wall Shrine • Border Town Mine |