Clouds of Passaj

The Clouds of Passaj (雲の回廊, Clouds' Corridor) is a passage from Passaj to Craggy Peak Ruins. It serves as a dungeon in Golden Sun: Dark Dawn. Once exited, it cannot be returned to by any means, although there is little reason to return.
Appearance
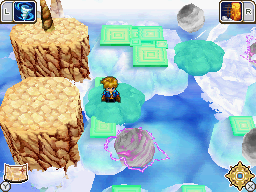
The Clouds of Passaj get their name from the many clouds that make up the path. Some clouds are made of Zol allowing them to be moved by the wind. Other clouds hold Zol blocks, creating a solid walking path. Along the route are grey vortexes, which are shown to spark with energy. Hitting one of these vortexes causes the player to drop onto a rocky plateau. The player can return to the main passageway by using Growth to create vines for climbing.
History
In ancient times, the Clouds of Passaj were an important passageway that the Jenei used to travel between their home on Craggy Peak to the town of Passaj. Access to the passage was controlled by the Alchemy Forge, which had been built thought the joint efforts of the Jenei, and the Exathi, skilled craftsmen who resided in Passaj. However, once Alchemy was sealed away, the Alchemy Forge became inactive, rendering the passage inaccessible. By present times, the passageway was merely a legend. Thirty years after the Golden Sun event, the passageway once again became accessible, thanks to Matthew's group restarting the Forge.
Walkthrough

Use the zol blocks here to move forward and jump onto the next cloud. Use Whirlwind to shoot yourself right and down. Move right and use the rotating platforms here to continue.
Use the cloud to shoot yourself to the left and jump on the land. Use Grip on the pillar to the north to continue. Get on the cloud here and right, zapping yourself in a thunderhead. You will drop to a lower level. Use Whirlwind on the flowers to get a Nut. Use Growth to climb back up to the upper level, and use Grip again on the pillar to the north. Get back on the cloud and this time goo down, then right, then up to hit a giant air current which will shoot you to the next screen.
Here use the platform on the right to continue and make you way forward. Get on the next rotating platform and jump off to the north to get to another one to the east. Jump off and follow the linear path to the next screen. Use the Psynergy Stone if you need to.
This next section has rotating vortexes that you need to avoid, which is fairly easy to do if you just wait to cast whirlwind after it passes. If you do happen to hit one, you'll be sent downwards to another lower section where you need to use Growth again on another plant to return to the upper area.
Keep following the path and you'll eventually see the next air draft. You can hit the vortexes here to drop down and then cast whirlwind on the flowers there for a Herb, but it's not really worth it if you don't want it.
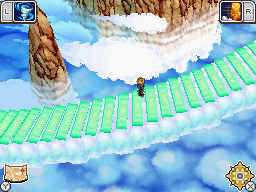
Continue on to reach a long section of zol stairs, which continues into an unmarked section of the overworld. After reaching the top, you'll finally arrive at the Craggy Peak Ruins.
| Minor Locations |
|---|
| Minor Locations in Golden Sun |
| Alpine Crossing • Bilibin Barricade • Gondowan Passage • Fuchin Temple • Kalay Docks • Kalay Tunnel • Kolima Bridge • Kolima Tunnel • Lama Temple • Tolbi Docks • Tolbi-bound Ship |
| Minor Locations in Golden Sun: The Lost Age |
| Alhafran Cave • Ancient Lemuria • Atteka Inlet • E Tundaria Islet • East Indra Shore • Gondowan Settlement • Hesperia Settlement • Idejima • Kalt Island • N Osenia Islet • Osenia Cliffs • SE Angara Islet • Sea of Time Islet • SW Atteka Islet • West Indra Islet Summon Caverns: Angara Cavern • Atteka Cavern • Indra Cavern • Osenia Cavern |
| Minor Locations in Golden Sun: Dark Dawn |
| Konpa Gate • Clouds of Passaj • Saha Cistern • Kolima Junction • Iceberg Outpost Summon Caverns: Carver's Lumberyard • Konpa Shrine • North Wall Shrine • Border Town Mine |