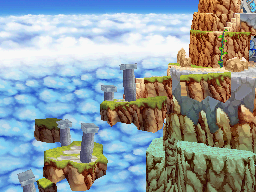
Craggy Peak Ruins
The Craggy Peak Ruins (とんがり山遺跡, Sharp Point Mountain Ruins) is a dungeon in Golden Sun: Dark Dawn. It is located on the Craggy Peak at Khiren Mountains and serves as the midway point between Passaj and Te Rya Village. It can only reached by ascending Clouds of Passaj after reversing the flow of the Alchemy Forge. Inside the ruins is a relatively large dungeon with simple puzzles based in rooms based on the Zodiac symbols.
Background and Story
The Craggy Peak Ruins were once the home of the Neox, a tribe of Jenei, or ancient Adepts. In ancient times, the Neox were known to travel to and from the home via a cloud passageway, that led to the home of their allies, the Exathi in their home of Passaj. Access to the Ruins were controlled via the Alchemy Forge, a machine that created the cloud passage using the mineral Zol as well as Mars and Mercury psynergy. When the Neox died out, the Craggy Peak Ruins were deserted; in addition, the Alchemy Forge was rendered inactive.
In the years that passed, the Neox home fell into legend. Later on, Matthew's party would activate the Alchemy Forge, in an attempt to access the Ruins, as they were part of the only available way to cross the Khiren Mountains. After realizing the ruins were deserted, Matthew's party would explore the ruins and solve its puzzles. Eventually, the Adepts were able create a pathway from Craggy Peak to the valley below, allowing them to continue on their journey to Morgal.
Walkthrough
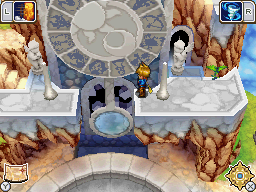
At the end of your trip through the Clouds of Passaj, you are deposited at the peak of Craggy Peak, and the way back will disappear. Inspect the area; standing in front of the round mirror attached to the ancient pendulum will show a reflection of a centaur statue, which will come into play much later. There is a Wise One statue to the right, but the important thing here is the plant at the west end of the peak - cast Growth on this plant, climb it, and stand to the right of a gray spire to the left of the clock. Cast Grip on the opposite-facing spire, then cast Move to move the angel statue out of the way of the door. (The growable plant right of the statue leads to a Glyph tablet that is not important.) Inside, stand in front of the fan and cast Whirlwind on it to make a gray spire appear outside. Go back out and Grip and climb your way back to the ground level, then cast Grip on this new spire to rotate a circular portion of ground. A small gray bridge appears that lets you stand on the circle, which is an elevator into the dungeon below.
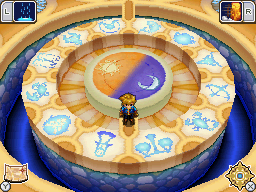
Craggy Peak is a dungeon fully modeled after the Zodiac, with each astrological sign receiving its own puzzle-room and a hallway leading to that room. The central, circular room inside Craggy Peak that your elevator lowers into is a hub that connects to these twelve hallways all at once. From your starting point, the twelve astrological signs and their corresponding entrance doors start at the top left and work their way counterclockwise around your elevator to the top right, and they are in the appropriate order: Aries (The Ram), Taurus (The Bull), Gemini (The Twins), Cancer (The Crab), Leo (The Lion), Virgo (The Maiden), Libra (The Scales), Scorpio (The Scorpion), Sagittarius (The Centaur Archer), Capricorn (The Goat), Aquarius (The Water-Bearer), and Pisces (The Fish). At present, only two of the doors are open and have their respective symbols glow blue: Leo and Aquarius. Your objective is to go into every room and solve its respective puzzle, and each time a Zodiac symbol's puzzle is solved, other doors open up.
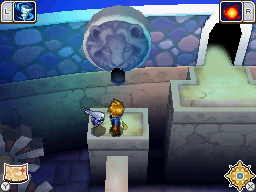
- Leo (The Lion): Go to the open door at the southwestern diagonal of the hub, and go through its hallway to a room where a glyph tablet reads "ONLY FLAME CAN SATE THE LION'S HUNGER." Face the lion head statue and cast Fireball on it, which opens the Gemini room in the hub. Go back to the hub.
- Gemini (The Twins): Go two doors right to the northern of the two doors at the west of the hub, and go through its hallway to a room where a glyph tablet reads "EACH TWIN SEEKS THE OTHER FOR COMFORT." Whenever you move one of the two blue statues, the other statue moves accordingly - they will both move up and down in tandem, but when one statue is moved to the left the other moves right. Move the left statue two spaces up, three spaces left, one space down, two spaces left, two spaces up, one space right, two spaces up, two spaces right, one space down, two spaces right, three spaces up, and one space right. The two statues will join together. Go back to the hub.
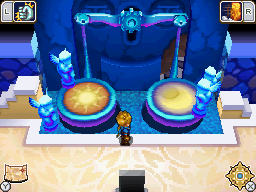
- Aquarius (The Water-Bearer): Go four doors right to the door at the northeastern diagonal. In this hallway, stand at the white ground to the left of the dark, circular portion with a gray spire on it, and cast Grip to rotate it ninety degrees. It can now be crossed as a path north. At the north door, cast Fireball at the chest so that it falls to the ground. Enter the room where a glyph tablet reads "LIFT THE JUG HIGH AND RECEIVE THE BOUNTY OF RAIN." Cast the Douse Psynergy on the pot-holding statue. This opens up both the Virgo and Libra rooms in the hub. Go back down through the hallway, and once on the solid ground below the dark circular portion with the spire, Grip the spire again to rotate it ninety degrees back. This creates a path to the chest you dropped, and it contains the Spiked Armor. Go back to the hub.
- Libra (The Scales): Go four doors right to the eastern of the two bottom doors. In this hallway, hop onto the right of the scale mechanism, and it will bring you down to the ground level. Step left off the right scale and the left scale with the angel statue on it will lower back down, letting you pass into the room up north. The glyph tablet in this room reads "THE FOUR ANGELS MUST FIND BALANCE." Step onto the moon scale from the right, then cast Move to move one of the two angel statues at the right onto the moon scale (don't worry about how close to the scale's edge you may leave it). Now step onto the ground and step onto the elevated sun scale, bringing you all the way down, and Move one of the two left angels onto the sun scale. Now repeat this process: Step onto the moon scale, Move the other right angel statue left onto the moon scale, step off, step onto the sun scale, Move the other left angel statue right onto the sun scale, and step off. Having all four angels on the scales solves this puzzle, so return to the hub.
- Virgo (The Maiden): Go one door right to the western of the two bottom doors. In this hallway, another rotatable Grip spire reposes, and you are to hop onto the lone platform immediately left of the spire and Grip this spire, rotating it ninety degrees. This allows you to hop to the room above, where a glyph tablet reads "THE MAIDEN MUST FACE ALL WHO ENTER." Grip the spire next to the female statue to turn it around, then cast Growth on the plant that shows up. This will open the Aries room and the Pisces Room. Return to the hub.
- Aries (The Ram): Go five doors right to the western of the two top doors, and go through the hallway to its puzzle room. The glyph tablet here reads "THE RAM COWERS FROM THE FLAMES." In this puzzle, casting Fireball on a Ram panel submerges it, but toggles the state of each Ram panel to the left and right of it, so casting Fireball on the first Ram panel makes the two on either side of it rise up. Your objective is to have all five of the room's Ram panels submerged, so after having Fireballed the first Ram panel, Fireball the Ram panel to the right of that, then Fireball the rightmost Ram panel, and then Fireball the center Ram panel. Return to the hub.
- Pisces (The Fish): Go one door right to the eastern of the two top doors. In this hallway, stand to the right of the gray spire and Grip it to rotate it ninety degrees, causing a stairwell attached to the rotating portion to connect to the room above. Proceed up the stairs into the room where the glyph tablet reads "A HUNGRY FISH WILL CLIMB THE VERY RAIN TO REACH FOOD." Cast Douse on each of the two fish statues, causing the Cancer room and the Scorpio room to open up in the hub. Return to the hub.
- Cancer (The Crab): Go four doors left to the southern of the two doors at the west of the hub. In this hallway, first go to the northeast and Grip one of the spires next to the female statue to reveal a chest containing the Grievous Mace. Hop to the platform near the chest and Grip the gray spire, rotating the stairs so that you can get into the puzzle room. The glyph tablet here reads "THE CRAB CANNOT SWIM ANY LONGER." Cast the Arid Heat Psynergy on the water bowl, then return to the hub.
- Scorpio (The Scorpion): Go four doors left to the door at the southeastern diagonal. In the Scorpio hallway, go down the stairs and face the Grip spire from the left, and Grip it to rotate a platform above into place. Go back up the stairs and hop across this platform into the next room, where a glyph tablet reads "THE SCORPION BATTLES HIS ETERNAL FOE." This is a sliding block puzzle with Zol cubes, and you can inspect the warrior statue for the Vambrace. Push the upper right cube down and left, then push the upper left cube right, down, and left. With the three zol cubes packed together at the bottom, push the middle cube up, then push the scorpion cube right and up. This opens up both the Taurus and Capricorn rooms. Return to the hub.
- Capricorn (The Goat): Go two doors left to the northern of the two doors at the east end of the hub. The hallway here is simple, but Grip a spire at the northwestern corner to turn a female statue and reveal a chest that is a Mimic battle. Defeating this mimic gives you the Lure Cap. Now go into the puzzle room, where the glyph tablet reads "THE GOAT LEAVES NO TRACE BEHIND." This is easily the most involved puzzle in Craggy Peak Ruins because you are to move three statues with square, circular, and triangular bases onto their respective markings on the ground, without any of their trails overlapping. However, this puzzle's solution is straight-up given to a player that uses the Insight Psynergy here, for it will show exactly how each of the two side statues needs to be moved to their markings so that there is still an open path for the center statue to move into its marked. When you are done moving around, return to the hub.
- Taurus (The Bull): Go four doors left to the door at the northwestern diagonal. In the Taurus hallway, hop onto the lone platform that physically borders the right "arm" of a rotating portion with a stairwell, and cast Grip on the spire to your left to rotate the stairwell ninety degrees to the left. Now hop left and up, and rotate another stairwell so that it points north. Climb up this stairwell to the door, and cast Fireball on the Jupiter Djinni that is stuck in a lion head statue's mouth to make it drop. Now hop your way all the way to where the Djinni dropped, going across the first rotating portion you had rotated, and fight the Djinni to earn the Jupiter Djinni Doldrum. Now go into the puzzle room where the glyph tablet reads "A BULL WITHOUT HORNS MUST BURN WITH SHAME. WILL NO ONE COOL IT?" Position yourself facing one of the two empty horns of the bull head sculpture and cast Douse to fill both empty holes with water, then cast Cold Snap on the near puddle to turn it into an ice pillar. Go to where the other puddle is and turn that into an ice pillar, thus causing the two ice pillars to represent the bull's two horns. This opens up the final Sagitarrius room in the hub, so return to the hub.
- Sagitarrius (The Centaur Archer): Go five doors right to the southern of the two doors at the eastern end of the hub. In this hallway, position yourself left of the Grip spire and Grip it to rotate your path to the puzzle room in place. The glyph in this room reads "THE ARCHER'S DEADLIEST FOE IS HIMSELF." Cold Snap the puddle to the right of the Archer statue, then position yourself to the left of the spire that appears and Grip it, thus turning statue to face a reflection of itself in the now-frozen waterfall. This causes the mirror on the ancient pendulum back in the exterior portion to have a frozen arrow pierce through it. Return to the hub.
With all twelve Zodiac rooms completed, step back onto the elevator at the hub of the interior complex to return to the exterior peak of Craggy Peak ruins, then position yourself to the side of the now-shattered mirror-pendulum. Grip the frozen arrow from the side to set the pendulum in motion, prompting a series of floating pieces of land and ruins to assemble west of your position. Cross this new mid-air land bridge into the overworld map, the Khiren Glacier, where you have two paths branching between the North Wall Shrine and the next town, Te Rya Village.
Collectibles
Enemies
| Bestiary of Craggy Peak Ruins (Aquarius, Gemini, Leo, Libra, and Virgo Rooms) | ||||||||||
| Monster Name | LVL | HP | ATK | DEF | AGI | EXP | Coins | Weakness | Drop | Drop Rate |
| Bone Fighter | 18 | 195 | 206 | 61 | 95 | 219 | 110 | 1/16 | ||
| Dirge | 18 | 149 | 163 | 46 | 120 | 67 | 88 | 1/16 | ||
| Faery | 18 | 84 | 137 | 30 | 112 | 177 | 115 | 1/16 | ||
| Bestiary of Craggy Peak Ruins (Aries, Cancer, Pisces, Sagittarius, and Scorpio Rooms) | ||||||||||
| Monster Name | LVL | HP | ATK | DEF | AGI | EXP | Coins | Weakness | Drop | Drop Rate |
| Bone Fighter | 18 | 195 | 206 | 61 | 95 | 219 | 110 | 1/16 | ||
| Chimera | 18 | 286 | 193 | 55 | 94 | 608 | 176 | 1/16 | ||
| Dirge | 18 | 149 | 163 | 46 | 120 | 67 | 88 | 1/16 | ||
| Faery | 18 | 84 | 137 | 30 | 112 | 177 | 115 | 1/16 | ||
| Bestiary of Craggy Peak Ruins (Taurus Room) | ||||||||||
| Monster Name | LVL | HP | ATK | DEF | AGI | EXP | Coins | Weakness | Drop | Drop Rate |
| Bone Fighter | 18 | 195 | 206 | 61 | 95 | 219 | 110 | 1/16 | ||
| Chimera | 18 | 286 | 193 | 55 | 94 | 608 | 176 | 1/16 | ||
| Dirge | 18 | 149 | 163 | 46 | 120 | 67 | 88 | 1/16 | ||
| Faery | 18 | 84 | 137 | 30 | 112 | 177 | 115 | 1/16 | ||
| Jupiter Djinni (Doldrum) (unique) | 18 | 422 | 169 | 49 | 104 | 676 | 275 | N/A | ||
| Bestiary of Craggy Peak Ruins (Capricorn Room) | ||||||||||
| Monster Name | LVL | HP | ATK | DEF | AGI | EXP | Coins | Weakness | Drop | Drop Rate |
| Bone Fighter | 18 | 195 | 206 | 61 | 95 | 219 | 110 | 1/16 | ||
| Chimera | 18 | 286 | 193 | 55 | 94 | 608 | 176 | 1/16 | ||
| Dirge | 18 | 149 | 163 | 46 | 120 | 67 | 88 | 1/16 | ||
| Faery | 18 | 84 | 137 | 30 | 112 | 177 | 115 | 1/16 | ||
| Mimic (unique) | 18 | 504 | 154 | 40 | 104 | 1463 | 770 | 1/1 | ||
Enemy Formations
- Group 1: Bone Fighter x1-2
- Group 2: Chimera x1-2
- Group 3: Dirge x2
- Group 4: Faery x1-3
- Group 5: Chimera x1, Dirge x1-2
- Group 6: Chimera x1, Faery x1-2
- Group 7: Dirge x1, Bone Fighter x1-2
- Group 8: Dirge x1, Faery x1-2
Trivia
- Each constellation in the Zodiac is associated with one of the four classical elements. It's debatable whether or not Camelot was aware of this when designing the puzzles in this dungeon, as some of the puzzles involve the associated element while others opt for whatever is most logical for that constellation.
- Fire: Both the Leo and Aries puzzles require Fireballs.
- Earth: The Virgo puzzle requires both Grip and Growth. While the Capricorn puzzle can be solved without any Psynergy, the three statues can be moved using, well, Move.
- Water: Douse is used to solve the Pisces puzzle. The Cancer puzzle, on the other hand, requires Arid Heat; While this seems to be a contradiction, it's worth remembering that using Arid Heat drains water.
- Oddly enough, none of the Wind constellations need Jupiter Psynergy.
