Mercury Lighthouse
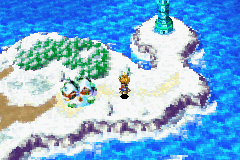
Mercury Lighthouse (マーキュリー灯台, Mercury Lighthouse), the Mercury-aligned of the Elemental Lighthouses, is a prominent storyline dungeon in Golden Sun. It is located in the wintry snow-covered northern region of the northern continent of Angara near the village of Imil, home of the ancient Mercury Clan dedicated to making sure the Lighthouse is never lit. Being the first of the four Lighthouses to be explored in the GBA duology, it is explored rather early in the game and is significantly more involved as a dungeon than anything that came before.
Technically, the player can travel to and complete this dungeon as soon as Goma Cave is cleared and Bilibin is reached, but the game expects an alternate route leading into the easier Kolima Forest dungeon-like area to be completed first. Mia permanently joins the party early in Mercury Lighthouse, and after a rather challenging boss battle at the top of the tower, the important Hermes' Water can be collected from the fountain at its base before departing back for Kolima Forest.
Walkthrough
If you have not yet seen the cutscene in the nearby village of Imil where Mia heals the old man in the large residence, coming here early will only allow you to inspect a glowing blue barrier covering the entrance. Coming here after that cutscene takes place will force you to talk to Mia in front of the entrance, which will now have a statue moved in front of it; casting the Move Psynergy to move it one tile left will enact a cutscene in which Mia brings up her Ply Psynergy, which she uses to dispel the barrier and enter on her own.
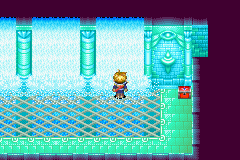
Follow Mia inside and fell the Lizard Man monster blocking her path, then follow through multiple screens and up the stairs in the large water-filled chamber. When you find her blocked by another statue, Move it one space left to drop it into the gap, and the cutscene that follows will add Mia to your party for the rest of the game. Head through the next door and past the waterfall-filled hallway. You should notice that in this dungeon, Mia recovers 4 PP at the end of every turn.
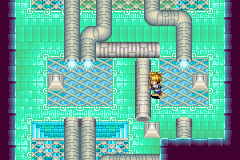
You will reach a maze-like room with a rolling pipe puzzle and a fortunate lack of random enemy encounters. Roll the vertical piece of pipe right to reconnect a pipe that causes watery jets to spew, and walking into the one below you forces you east. Walk under the ground east using the blue stairs and let yourself get pushed south by the southeast water jet, and follow along using another set of blue stairs until you reach the northeast corner of the room. Take the stairs left and roll the pipe piece back left to turn off the water jets. To get the Psy Crystal in the chest to the east, go east through the center blue stairs again. Regardless, head south past the now-inactive water jets underneath the disconnected pipe piece and take one more set of blue stairs to enter the next room.
You are in a hallway shaped like a massive "U". Hop across the crumbled piece of floor to your southeast so that you can hug the elevated perimeter of the room as you travel along west and north. At the northwest end of the "U", push the blue statue all the way onto the blue switch tile west of it to open the door north, then slide down the nearby wall slide and pass through to that door.
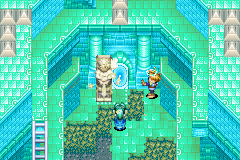
You will find a room with a lone pit to slide down into, which will drop you into a water-filled room at an earlier part of the dungeon in front of a giant statue that telepathically recites the same message as the inscription on the pillar at the south end of the room: He who honors the heart of the goddess shall stand at the center of all, like a swan in the center of a rippling pond. Hop from the isolated platform onto the hands of the statue and cast the Ply Psynergy; rather than bring up the interface for deciding which party member's HP to restore like normal, Ply will initiate a special effect where a fairy-like creature will be shown casting magic on the statue.
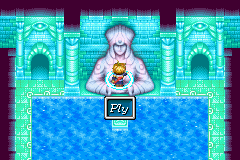
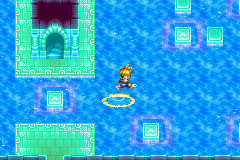
This permanently "activates" all specially marked platforms lying on the water throughout the dungeon that are just like the platform you landed on. Hopping back onto the platform south of you in the water will cause three "counting rings" to manifest above your head. You can now hop onto the water itself without falling through, and each time you land on the water, one of these rings will be expended. If you land on a water tile after having run out of stockpiled rings, you will be shown sinking into the water and respawning on the marked platform you most recently hopped off from, which will immediately resupply you with water-hopping rings. Use this to hop across the water, then head back through one of the two upper doors.
The segmented hallway above the giant statue room has a newly activated marked platform in the water off to the right, which lets you hop to the southeast corner of the hallway and walk south through the doorway. You will walk out through the left of three waterfalls covering a wall and end up in a room with a chest off to the right. This is the first instance in the game where a chest will reveal itself to be a type of monster called a Mimic and immediately battle you, and felling it drops a fairly valuable item; in this case, it drops a Water of Life. Before you leave, press against the middle of the right waterfall in this room to enter a secret room containing another chest, which you can easily water-hop to; it grants a strong piece of body armor called Psynergy Armor, which is one-of-a-kind in this game despite not counting as an Artifact. Walk back through the left waterfall and return to the center of the segmented hallway.
Return north to the very large, water-filled room and hop onto the now-active marked platform south of the stairwell that you took up previously. Hop three times east and one time south. If you wish to get a chest with a Sleep Bomb in it, hop three times north and one time east to another marked platform, then one time back west and three times north to another marked platform, then three times west to the chest, and use the marked platform near it to return to the area around the center stairs.
Regardless, you want to hop to the marked platform at the southeast corner; from here, hop four times north to a marked platform, then hop three times north and one time west to a marked platform, then hop one time east and three times north to the platform at the northeast corner of the area. Hop onto the marked platform left of it and hop three times west and one time south onto another marked platform, and hop onto the solid floor west of that and walk west and south. Hop onto the marked platform at the west end and hop south four times to make it to the west end of the segmented hallway, and hop further straight south.
You are now in another room with three waterfalls, and press up against the center waterfall to pass through. Go through the northeast door in the next room to reach a room with a rolling pipe puzzle. Roll the top horizontal pipe up, then the bottom horizontal pipe up, then the east vertical pipe west, to fill the previous room with water. Take the marked platform available to you to hop to the stairs at the northwest corner. Head up multiple flights of stairs, ignoring the floor switch near the door along the way, to reach a room with another rolling pipe puzzle; like the previous one, this does not have random encounters.
In this pipe room with a blue statue surrounding by water jets and a nearby hole, head to the northwest corner of the room and take the stairs under the pipework to the northeast corner, then head down. A vertical piece of the pipe can be rolled left, which will make a different water jet spew forth and push the blue statue left. Take the smaller blue stairs to your left so you can roll the same pipe back to the right, which will cause the water jet above the statue to shoot downward and push the statue two tiles down. Return to the east side of the room and roll the pipe to the left again, and now roll the horizontal piece of the pipe up above you downward. Roll the vertical pipe right so that it settles against the horizontal pipe, which causes the last water jet to push the blue statue into the hole east of itself. Go back downstairs and push the statue onto the blue floor switch to open the blue door.
The next stretch of hallways feature four statues along the wall that can be pushed aside; the third statue from the left conceals a doorway to a chest with a Nut. Follow along the cracked path south and then north along the east edge of the screen, then use Move to move the lone statue in the northeast corner off to the side so you can enter the pipe room above it. Push the horizontal pipe up north to make a water jet compress the wall off to the left so you can enter the door behind it; if you let yourself touch this water jet, you will be forced downward and will have to roll the pipe down and then back up. The next hallway features a long line of six waterfalls adorning the hall; walk through the fourth one from the right, which is the third one from the left, to find a hidden room containing the Mercury Djinni Sleet. This must be defeated to be added to your Djinn collection. Take the long waterfall hallway's southwest exit and follow along the linear, narrow route through several hallways.
When you reach yet another long room with six waterfalls lined up along the wall, pass through the rightmost waterfall to reach a room where you must cast Move to move the solitary statue above the broken floor one tile left so you can enter the stairwell behind it. After passing through one more winding hallway, you will step through one more waterfall into a final room with a rainbow, and a telepathic message states the following: He who honors the goddess of rainbows shall be guided to the heavens upon wings of fluid grace. This would be an ideal spot to save at because casting Ply directly on the blue statue in this room will summon the fairy once more and initiate a cutscene where your party members will ride the now-reversed waterfall to the aerie of Mercury Lighthouse.
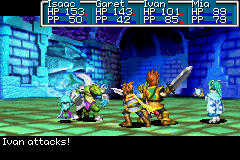
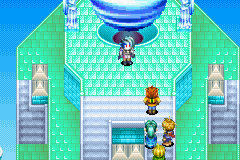
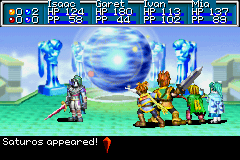
When your party wakes up, both Mia and Ivan will have their PP meters fully restored. Use this PP to have Mia restore the party's HP with Ply and the like, then use up the Psynergy Stone to fully refill the whole party's PP. Hop across the floating platforms to the main structure, where climbing up the stairwell underneath the swirling orb will initiate a cutscene that will force you into a rather challenging boss battle for this stage in the game. Defeating this boss will initiate more highly story-relevant cutscenes that will automatically bring you back to the base of Mercury Lighthouse.
The previously empty fountain outside Mercury Lighthouse's front entrance will now be filled with water, and several NPCs are now crowded around it. You must use the Empty Bottle from Imil while standing directly underneath the fountain and facing the part with the narrow, flowing stream of water to replace the bottle with Hermes' Water. (If you did not collect the bottle earlier, get it from the chest in the large central residence, or buy it back at the item shop's Artifacts menu if you either sold it or dropped it.) Uniquely, using Hermes' Water on yourself will fully restore one party member's HP (just like using a Potion) and turn itself back into the Empty Bottle, and it can be freely changed back into a full bottle of Hermes' Water at this fountain at any time. Since the bottle's critical plot-relevant function requires it to be used in Kolima Forest, keep the Hermes' Water in your inventory and do not use the bottle for yourself.
Enemies
| Bestiary of Mercury Lighthouse | ||||||||||
| Monster Name | LVL | HP | ATK | DEF | AGI | EXP | Coins | Weakness | Drop | Drop Rate |
| Cuttle | 10 | 80 | 96 | 22 | 36 | 27 | 49 | 1/32 | ||
| Ghoul | 9 | 99 | 93 | 20 | 16 | 34 | 42 | 1/16 | ||
| Gnome | 8 | 85 | 73 | 15 | 38 | 29 | 40 | 1/32 | ||
| Harpy | 10 | 105 | 104 | 25 | 46 | 38 | 53 | 1/16 | ||
| Lizard Man | 10 | 129 | 106 | 31 | 30 | 42 | 52 | 1/32 | ||
| Mauler | 9 | 109 | 99 | 27 | 24 | 37 | 45 | 1/32 | ||
| Ooze | 9 | 72 | 72 | 19 | 30 | 26 | 40 | 1/16 | ||
| Siren | 10 | 116 | 107 | 27 | 54 | 45 | 56 | 1/16 | ||
| Mimic (unique) | 13 | 468 | 120 | 33 | 51 | 164 | 178 | 1/1 | ||
| Mercury Djinni (Sleet) (unique) | 10 | 290 | 107 | 24 | 58 | 130 | 151 | N/A | N/A | |
| Saturos (boss) | 18 | 1200 | 113 | 35 | 51 | 331 | 800 | 1/1 | ||
Enemy Formations
- Group 1: Ooze x3-5
- Group 2: Cuttle x1-2, Ooze x0-2
- Group 3: Gnome x1-2, Ooze x0-2
- Group 4: Lizard Man x1, Cuttle x0-2
- Group 5: Mauler x2-3
- Group 6: Ghoul x2-3
- Group 7: Siren x1-3
- Group 8: Lizard Man x1-2, Harpy x0-1
- Group 9: Cuttle x2-3
- Group 10: Harpy x2-3
- Group 11: Siren x1, Harpy x1-2
Collectibles
 Psy Crystal: In a chest in the room with the first prominent layout to involve pipes and water jets; you must slightly detour east to it once you have turned the jets back off to open the way south.
 Psynergy Armor: Found in a chest in a room hidden behind a waterfall in the room where the Mimic is fought.
 Sleep Bomb: In a northwestern chest in the large, water-filled room with the many marked tiles that allow for hopping across the water.
 Nut: Found in a chest in a room with a pipe that will push aside a wall with a water jet once complete. Must be reached by moving aside one of the statues in the room south of this.
 Sleet: In a tiny, hidden room behind the third waterfall from the left in a long waterfall-filled hallway right after the room that contained the Nut. Press against the center of each waterfall to be certain you will enter the room.
History
The Mercury Lighthouse existed in Weyard's ancient past much like the other three Elemental Lighthouses as a source of its respective element in Psynergy and Alchemy. The structure is designed to work with the Elemental Star jewel of the Mercury element, the Mercury Star; if the Mercury Star, the container of the purified essence of the Mercury element, is cast down the well at the top of the Mercury Lighthouse, its essence would be channeled by the Lighthouse's internal mechanics and be placed atop the aerie as a spherical beacon emitting Mercury-based energy.
The location of the town of Imil was once the home of the Mercury Clan, who were the guardians of Mercury Lighthouse, and the modern-day residents have had legends passed down that the Lighthouse is to remain dormant. They also have the legend, however, that if the Lighthouse is lit once again, the empty fountain at its base will be perpetually filled with a mystical healing water referred to as the Water of Hermes, which has the power to stave off all illness and ensure physical health. As an Elemental Lighthouse, it may not be entered without the presence of a Mercury Adept with access to the healing Psynergy power of Ply, such as Adepts descended from the Mercury Clan bloodline.
In Golden Sun, sometime after the eruption of Mt. Aleph, a group of Adepts trying to light all the Lighthouses in the world with the Elemental Stars, led by the Mars Adept Saturos, arrive at Mercury Lighthouse, and the Mercury Adept Alex, one of two known remaining living descendants of the Mercury Clan, grants them entry inside. Alex has since decided to betray his bloodline oath of ensuring the Mercury Lighthouse remain unlit, seeking instead to have the power of Alchemy returned to the world because he considers it magnificent. Alex and Saturos set up obstacles behind them to block off entry, though, because Alex knows that the other known descendant of the Mercury Clan, Mia, also has the ability to enter Mercury Lighthouse and therefore potentially oppose them - and since the Lighthouse briefly glowed when Alex used his Mercury power to grant Saturos admittance, he knows she is sure to investigate.
Mia is unable to get past the statue that was set up by Alex to block the main entrance. Shortly afterward, however, the small group of young Adepts pursuing Saturos to prevent him from lighting the Elemental Lighthouses, led by Isaac, arrive and use their Psynergy to move the statue aside. Mia is tremendously taken aback to find that monsters from the outside world have since swarmed and take up residence, but when Isaac's group fights off the ravenous Lizard Man blocking her path, and later clears away more obstacles set up by Saturos, Mia and Isaac agree to join forces and climb through Mercury Lighthouse together.
Saturos and Alex's group reaches the Aerie of Mercury Lighthouse and cast the Mercury Star down the well of the Mercury Lighthouse, and soon, the swirling Mercury Beacon is alight. As they begin to leave, Isaac and Mia's group is suddenly transported up to the Aerie, and Saturos and Alex immediately hide behind the Mercury Beacon as Mia is devastated to find that she had failed the one duty placed upon her as an Adept. All of a sudden, they see the captives Jenna and Kraden being taken away from Mercury Lighthouse by Menardi and Felix, while Saturos makes his presence known and commends Isaac for having survived the eruption of Mt. Aleph. Saturos announces his intention to slay them all in battle and relieve the Mars Star in Isaac's possession by force, but suddenly realizes that due to his proximity to the Mercury-based influence of the Mercury Beacon, his Mars-based powers are inhibited. Nonetheless, he remains confident enough to engage the Adepts in a four-on-one battle.
Though Saturos proves to be a fierce and powerful warrior Adept even by himself with a cap on his power, the four Adepts eventually manage to best him in battle and render him barely able to stand. It is then that Alex, who was watching the battle from behind the beacon, makes his presence known, and Mia is thunderstruck. In response to his betrayal, Mia calls him mad, but Alex, stalling for time while Saturos gets his second wind, subtly attempts to convince Mia that a power such as Alchemy, reflected in how the Mercury Beacon allowed her to use Mercury Psynergy without depleting her reserves during the battle, is not something to just keep sealed away. Alex also explains in detail how and why the Mercury Beacon prevented Saturos from being able to use his full Mars-aligned powers. When Saturos is finally up, Alex uses his exclusive Warping Psynergy - a very advanced maneuver not even Mia knew Alex could use or can use herself - to bring himself and Saturos away from Mercury Lighthouse to rejoin Menardi and the others, but not before confirming Isaac still has the Mars Star with him.
A dispirited Mia resolves to prevent Alex and Saturos from lighting the rest of the Elemental Lighthouse Beacons and officially joins Isaac's traveling party of Adepts. When they ask her whether it is okay for her, as the town healer, to leave Imil, she assures them that it is all right now; she knows from the legends passed down that now the Water of Hermes is available through the newly flowing fountain at the base of the Lighthouse, and that the town will no longer fear epidemics and ill health from here on out. Indeed, people from Imil have already come to drink it, and all of the cold and flu epidemics that wracked the town before Mercury Lighthouse's activation are now gone. Mia and Isaac's group take the elevator down to the base and leave Mercury Lighthouse, resuming their quest in pursuit of Saturos.
At the end of Golden Sun: The Lost Age, all four Elemental Lighthouse Beacons are lit, which automatically triggers the process shared between Mercury Lighthouse and Mt. Aleph that brings the force of Alchemy back to the world. As though the Lighthouses are linked, they shoot beams of purified energy from their respective beacons and merge them in the airspace above Mt. Aleph, forming the Golden Sun. Prior to this, however, Mia's two young apprentices in Imil, Justin and Megan, are instructed by the Wise One to come to Mercury Lighthouse so that they may telepathically speak with Mia and her companions at the top of Mars Lighthouse long-distance. They tell her that the Wise One told them to tell the Adepts that when the Golden Sun forms, the energy that would be released by all the lighthouses simultaneously would make them quite dangerous, so Mia's group is to evacuate Mars Lighthouse posthaste.
Trivia
- The puzzle in the first third of Mercury Lighthouse where you have to cast the Ply Psynergy while standing on the goddess statue is somewhat notorious for its seemingly arbitrary solution connecting little to the vague clues that make purposefully landing on the solution difficult, especially for players of the English-language release. It may have been easier in the Japanese version, where the name for "Ply" could have been intended to suggest "Pray." The instructional riddle "He who honors the heart of the goddess shall stand at the center of all, like a swan in the center of a rippling pond" may suggest that the player is supposed to "honor" the goddess statue by "praying" to it (since praying to a deity intrinsically entails honoring said deity in various cultures). What is apparently supposed to suggest to the player that Ply can be directly cast on certain objects in the Lighthouse instead of its normal party-member-healing function is the easily overlooked scene at the start where Mia remotely casts Ply on the blue barrier at the tower's entrance to shut it off. Furthermore, what is apparently supposed to suggest that the player must jump directly onto the goddess statue's hands and in front of its chest/heart to cast Ply is the riddle's specification that it is the "heart of the goddess" that must specifically be "honored" with prayer. The only way "Ply" can make its own logical sense as a stand-in term for "Pray" for English-language players is if its common definition of "giving or offering something repeatedly" is interpreted as an act that honors the recipient.
- Late in the dungeon in Golden Sun, when you ride the inverted waterfall up to the aerie of Mercury Lighthouse, both Ivan and Mia's PP meters will be fully refilled despite the party being deposited next to a Psynergy Stone that would fully refill the party's PP anyway. This is a plot-related easter egg that foreshadows the symbiosis between elements that comes into play at Venus Lighthouse at the end of the game; because Jupiter and Mercury share a symbiotic relationship, the surge of Mercury-aligned energy let loose by the lighting of the Mercury beacon refills the Psynergy reserves of both Mercury Adepts like Mia and Jupiter Adepts like Ivan.
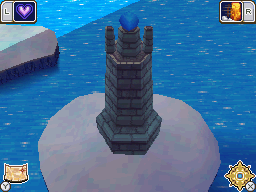
- After acquiring the sailing ship in Golden Sun: Dark Dawn and gaining access to the Eastern Sea surrounding the continent of Angara, Mercury Lighthouse can be seen by the player on the northernmost part of Angara and will likely be seen while searching for Iceberg Outpost. Though it cannot be visited because there is no place to dock the ship, this is the only Elemental Lighthouse that can be directly observed in-game over the course of Dark Dawn, a game taking place thirty years after the events of the GBA duology. As shown in the picture, it lies within the field of darkness associated with the destructive Grave Eclipse encompassing most of Angara. It is also the tower seen in the background beyond Mt. Aleph in the title screen of Dark Dawn.
