Shaman Village Cave

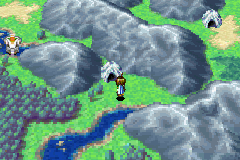
Shaman Village Cave (シャーマン村南西のどうくつ, SW Shaman Village's Cave) is a tiny "dungeon" in Golden Sun: The Lost Age. It functions as a mandatory route leading to Shaman Village enclosed within a ring of mountains in the center of Hesperia, and it must be traversed in both directions whenever the party needs to access Shaman Village prior to getting the ability to Teleport to Shaman Village directly at the end of the game.
On top of offering a Mercury Djinni that can be reached after completing the Jupiter Lighthouse dungeon, Shaman Village Cave is the only area in the game where you can fight Wild Gryphons, which rarely drop very useful Feathered Robes like they did in the first Golden Sun. Furthermore, following the reunion, the party can trigger an extra event that will award the Golden Shirt if the game file was enhanced with a password in which Isaac's party won the third round at the Colosso Finals.
Walkthrough

Shaman Village Cave is effectively the first mandatory location the player will need to visit when they first sail into the Western Sea because they will need to pass through it to reach Shaman Village, which is otherwise sealed off from the rest of the northwestern continent of Hesperia by a ring of mountains enclosing it. Shaman Village itself is where the Hover Jade Utility Psynergy item is earned, which is required to complete Jupiter Lighthouse in Atteka down south. The easiest way to get to the cave is to sail the ship into the dark blue lake at the lower-center of Hesperia, which can be reached by sailing through any of the three rivers connected to the lake; at the lake's northwest corner, two rivers branch out northward, and the short river that branches northeast leads directly to the cave.
Inside, the first area you come across branches into three separate exits leading north; the east exit is a direct shortcut to the exit leading back out into the overworld near Shaman Village, but the shortcut must first be permanently set up by dropping the earth pillar into the recess right of it. To get to the earth pillar from the upper left, clear the bush at the west end of the first area and climb up the ladder to the west exit, which brings you into a fully linear, clockwise route above and past the optional puzzle room. Once you push the pillar into the hole, you are free to use this shortcut to travel between Shaman Village and outer Hesperia; you do not currently have the Psynergy needed to solve the puzzle room itself, which is reached by heading through the center door at the three-way fork.
Subsequent visits
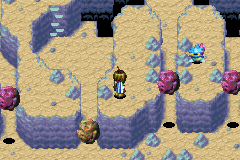
Following the reunion that takes place after Jupiter Lighthouse is completed, Isaac's party from the first Golden Sun will have joined Felix's party as additional party members, and they will bring with them the Lifting Gem that grants the Lift Psynergy. This is needed to interact with the round boulders that populate the puzzle room, so you can return to the puzzle room at any time to acquire the Mercury Djinni that stands atop the raised platforms.

There are four round boulders you can cast Lift on, and lifting the rightmost boulder so that you can reach and Lift the boulder just left of that will be needed to block off an escape route that the Mercury Djinni will otherwise take to avoid getting captured by you. Then, lift and pass underneath the leftmost boulder to reach an area where you can cast Frost to create an ice pillar out of a puddle and cast Whirlwind (or Gale) on the bush to expose the wall ladder behind it. Head southwest along the perimeter ledge so that you can hop east across the ice pillar. Once you hop east onto the Mercury Djinni's ledge, it will hop to the ledge right of it, and it will attempt to hop back west if you then chase it again; if you had Lifted the lower-right two boulders, the Djinni will find itself unable to do so, and you can engage it in a battle to earn it as the Mercury Djinni Eddy.
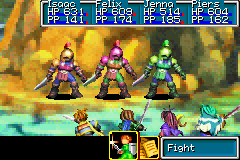
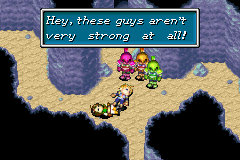
Separately from all this, the first time following the reunion with Isaac's party at Contigo following Jupiter Lighthouse that the party heads into the three-way fork at the south end of the cave, a bonus event will take place if data transfer that would allow for it had been applied before the reunion. In the first game, Isaac must have defeated Navampa, the the third and final of the three Colosso Gladiators he had to duel during the Colosso Finals. If this was the case, then all three Colosso Gladiators — including the previous opponents Satrage and Azart — will show up and accuse Isaac of having cheated his way to victory somehow. The three gladiators will engage your 8-member party in a battle that is very easy to win. Then, after you are railroaded into forgiving them, they will leave behind the Golden Shirt on the ground for you to pick up; this is a superior version of the Mythril Clothes that can be won at Contigo using Game Tickets.
Enemies
| Bestiary of Shaman Village Cave | ||||||||||
| Monster Name | LVL | HP | ATK | DEF | AGI | EXP | Coins | Weakness | Drop | Drop Rate |
| Pteranodon | 31 | 242 | 291 | 100 | 166 | 341 | 174 | 1/16 | ||
| Slayer | 31 | 220 | 300 | 90 | 158 | 344 | 254 | 1/32 | ||
| Talon Runner | 31 | 228 | 303 | 88 | 159 | 367 | 215 | 1/32 | ||
| Wargold | 31 | 202 | 303 | 78 | 181 | 321 | 226 | 1/16 | ||
| Wild Gryphon | 31 | 370 | 332 | 112 | 170 | 322 | 290 | 1/128 | ||
| Wolfkin | 31 | 213 | 309 | 89 | 174 | 337 | 219 | 1/16 | ||
| Mercury Djinni (Eddy) (unique) | 32 | 860 | 270 | 83 | 237 | 989 | 656 | N/A | ||
| Azart (unique) | 38 | 365 | 328 | 66 | 134 | 355 | 232 | N/A | ||
| Satrage (unique) | 38 | 485 | 342 | 74 | 145 | 378 | 249 | N/A | ||
| Navampa (unique) | 38 | 735 | 368 | 100 | 156 | 398 | 267 | N/A | ||
Enemy Formations
- Group 1: Talon Runner x1-2
- Group 2: Wargold x1, Wolfkin x0-2
- Group 3: Wargold x1, Pteranodon x0-2
- Group 4: Wolfkin x1, Wargold x0-2
- Group 5: Talon Runner x1-2, Pteranodon x1
- Group 6: Slayer x1, Wolfkin x0-2
- Group 7: Slayer x1, Wargold x0-2
- Group 8: Wild Gryphon x1
Collectibles
 Eddy: A Mercury Djinni that waits in the main, optional puzzle room, where it can only be reached by using the first game's Lift Psynergy to lift the right configuration of boulders surrounding it.
 Golden Shirt: If data transfer was used to enhance the second game with data from the first game in which Isaac defeated all three opponents during the Colosso Finals, an event will take place
Trivia

- The player would have to try very hard to lose the battle with the Colosso Gladiators; despite this, losing the battle causes a unique post-defeat cutscene in which the trio confirm among themselves that Isaac was cheating at Colosso. Whether you say Yes or No to that, the trio will park themselves at the three-way fork in Shaman Village Cave and promise to prevent the party from attending to their business in the cave, and the camera will pan down to Kraden standing in the narrow hallway below, emitting an ellipsis bubble, as the scene fades to black and the party returns to the last visited sanctum. When you return to the cave, the gladiators will be standing idly and blocking the party's route into the center doorway leading to the puzzle room (but you can still head through either of the other doorways to pass through Shaman Village Cave), and talking to them will immediately cause a rematch without any dialogue.
- This situation parallels the rematch with the Vault gang of thieves that takes place outside Madra if data was transferred out of a Golden Sun game file in which Isaac spoke to Vault's mayor later on in the game. That is also an extremely easy battle that nonetheless leads to a unique cutscene if the player somehow manages the feat of losing it. However, while that cutscene will force the party to permanently miss out on the Golden Boots that would otherwise be rewarded, the Colosso Gladiators can be rematched without limit until the player wins, and the Golden Shirt will always be available to win.
- Following the battle with the gladiators, when the party picks up the Golden Shirt off the ground, there is an extremely brief window where the player can press A and cause an instantaneous repeat of the Colosso Gladiator fight, and the same post-battle cutscene will take place and leave another Golden Shirt on the ground for you to pick up. This glitch can potentially be triggered multiple times, though it is not always reliable.