Kibombo Mountains

The Kibombo Mountains (ミング山脈, Mingu Mountain Range) constitute a dungeon-like location in Golden Sun: The Lost Age. In-universe, they are a fairly compact mountain range in southern Gondowan that separates the village of Kibombo north of it from the village of Naribwe south of it. In-game, the name refers to the pass through the mountains that is patrolled by Kibombo warriors seeking to block intruders from entering Kibombo's domain. The dungeon is notable for requiring the player to exercise stealth tactics to pass, which will be necessary to reach Kibombo and recruit Piers into the party.
In The Lost Age, Kibombo's aspiring witch doctor, Akafubu, sends out warriors into the neighboring continent of Indra to raid villages for a gemstone that can be used for his succession ceremony, and they come back with the Black Orb that happened to be kept at the town of Madra at the time. The Mercury Adept Piers follows the Kibombo into southern Gondowan so that he can retrieve his Black Orb from them, which he needs to use to commandeer his Psynergy-powered ship, and he successfully sneaks past the patrols at the pass through Kibombo Mountains. The traveling company of Adepts led by Felix, seeking to ally with Piers and acquire his ship, subsequently sneak through the pass on their way to Kibombo.
Walkthrough
When the boss fight against Briggs is cleared at Alhafra far away in Osenia, the party's next primary goal is to meet Piers at Kibombo, and passing from Osenia through Indra and then to south Gondowan requires passing through multiple locations. After passing through Gondowan Cliffs to touch down on Gondowan, the party can optionally visit the village of Naribwe south of Kibombo Mountains' two icons on the overworld, but they can immediately enter Kibombo Mountains' south icon and pass through it to exit from its north icon, which is south of Kibombo itself.
Be aware, however, that the Lash Psynergy is needed to pass through Kibombo Mountains successfully. It is technically possible for the player to have missed playing through Kandorean Temple at the start of the game and earning the Lash Pebble at that time, and the only consequences for lacking it prior to this point are that several side objectives will have had to be put on hold for later. Since Kibombo Mountains is the first point in the game's main campaign where its use is mandatory, some players may find themselves having to retreat from Gondowan and pass back north through Indra via Dehkan Plateau to pick up the Lash Pebble.
Initial visit
As you climb up the initial stairs and approach the torches, a cutscene establishes that Kibombo warriors are on the lookout throughout both of the large screens comprising this area. If you cross the sights of a single guard — which will happen if, for example, you walk up the steps just past the two torches — a cutscene will have lots of warriors forcibly deposit Felix back underneath the torches. You can immediately begin exploring Kibombo Mountains again to make another attempt to sneak past the guards.
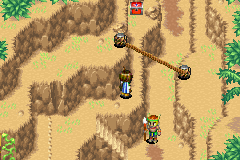
Push the tall crate east of the two torches all the way right and up, and cast Move to move the right crate one tile left, letting you climb the ivy and hop east across the two crates. Follow along the linear route northwest, across the wooden gate above the patrolling front guard, and push an earth pillar left into a gap to lock its position onto an indentation in the ground. This creates a shortcut left of the starting torches that can be used to save some time the next time you are deposited south of the torches. Climb up the ivy here at the left side of the area.
You will climb up to a point with a standing puddle and a tall crate west of a patrolling guard walking left and right. There is no risk of alerting the guard even if you purposefully push the crate toward him right while he is facing directly toward the crate; on the other hand, the guard will immediately blow your cover the moment you step into the open space underneath the markings on the ground indicating where you can push around the crate, regardless of how far away to the right the guard is. Climb up the ivy next to the crate, but do not climb down the ivy next of that; the guard will catch you the moment you either start climbing down or step into any of the four tiles of space underneath this ivy that you can push the upper-right crate down and left through.
To get to the chest at the northeast corner of your screen, slide down the cliff slide, and open it for the Disk Axe artifact weapon. (The guard southeast of here will only catch you if you go all the way down the short staircase left of him.) Move the crate all the way down and then all the way left through the marked space; once again, the pacing guard will not react to the crate being pushed left toward him, even if it ends up being pushed against his face. Climb up the right ivy and cast Lash on the coiled rope.
Once you have climbed down the rope, you may want to detour south and push an ivy-covered earth pillar south off a ledge onto a ground indentation that it will get locked onto. This amounts to another shortcut that can be used to get back to your task more quickly the next time you get deposited at the starting torches again. In that case, you can either hop across the two crates east of the torches (note that these crates will not retain their positions if you leave this screen) or climb the first ivy northwest of the torches and walk east across the wood gate to get to this ivy pillar at the east edge, which will let you climb directly onto the vertical route running along the east edge of the screen. At any rate, exit off the top of the screen through this narrow, elevated route to the right of the stationary northeast guard and the tied-up rope.
You are now at the southeast corner of the second, main screen of Kibombo Mountains, and you naturally do not want to head back south through the open pass south of the climbable ivy because the stationary guard in the previous screen will catch you if you walk up closely behind him (with Felix's head underneath the tied-up rope). A guard patrolling left and right in this second screen is programmed to catch you the moment you start to step into the column of floor spaces underneath the slanted part of the ledge four tiles worth of space left of the climbable ivy. You can hop across the five wood posts behind him and the chest he guards, climb down the ivy grown around the westmost post, and proceed northwest (the guard will catch you if you start to step underneath the multi-colored tree just to his lower left).
However, if you want to open the chest for its valuable Power Bread, you will have to Move the tall crate on the ledge above him two tiles left and one tile south, and wait until the guard is temporarily stopped at the right end of his patrol route to push the crate off and make it fall directly on top of him. If timed correctly, the guard will end up trapped in the apparently hollow, bottom-lacking crate, which will now be frantically jittering and bouncing as the guard tries to get out. You can talk to and Mind Read the crate, but you can now open the chest for its Power Bread. (If you cause the crate to fall next to the guard instead, he will briefly express a question mark icon while looking at the crate before resuming his patrol, and you will have to exit and reenter the screen through either of the entry points at the southeast corner to perform a puzzle reset and make the crate reappear back at its ledge.) Because it takes time to push the crate off the ledge, the guard may have already walked left of where the crate will land by the time it happens, so the best time to start pushing the crate downward is right when the guard is walking directly underneath the lower-right, multicolored tree on his way to the right.
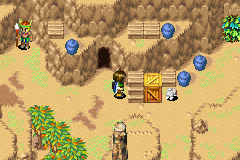
The final main obstacle of Kibombo Mountains, constituting the second screen's northeast quadrant, is tricky for uninformed players to figure out on their own. The guard looking over the pass to the west will catch you the moment you enter the Y-axis of floor tiles underneath the lone blue pot raised on a ledge just right of him, and a patrolling dog will catch you the moment you start stepping onto the Y-axis underneath where a crate with a Bone is placed precariously. In other words, there is only a narrow strip of safe space you can take to walk into the dark cave left of the bone, which contains a small room with a Smoke Bomb hidden in the right of its two wooden boxes.
The game offers two ways to get east past the dog's patrol and reach the Whirlwind-able bush east of the crate with the bone, but the dog also guards a treasure chest at the southeast end of its patrol that contains a valuable Tear Stone. The method that will be more obvious to first-time players is to push the earth pillar east off the ledge left of the dog's route (climb up the ivy on a post southwest of it and hop across two other posts to reach said pillar), which will trap the dog either below the pillar or above it. If trapped below the pillar, you can now head to the bush without incident but will have to hold off on opening the chest (though in this case, you can easily pick up the chest when making a return trip through Kibombo Mountains with Piers in your party). If the dog is trapped above the pillar, you can hop east across the pillar and climb down the ivy to claim the Tear Stone from the chest, but you will now have to backtrack to the exits at the southeast corner to perform another puzzle reset. Because of how fast the dog patrols, careful timing is needed with pushing this pillar to achieve one outcome over the other.
None of the above concerns need apply if the party has acquired the optional Tremor Bit Utility Psynergy item from Madra Catacombs (either during your first visit to Madra early in the game or, presuming you missed it back then but received Reveal at Air's Rock, during your second visit on your way to Gondowan Cliffs). Position Felix so he faces right toward the wooden stand that the crate with the bone is placed on and cast Tremor to make the crate drop into the space to its right and the bone fall off right of that, and the dog will home in on the bone and focus its attention chewing on it. You can now safely "talk" to the dog and Mind Read it, safely open the chest southeast of it for the Tear Stone, and safely saunter over to the bush northeast of it, and blow it away to enter the cave behind it.
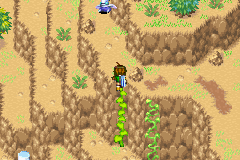
Follow along with the linear, winding route behind this cave entrance and you will eventually climb down ivy far to the west of the stationary guard. The Jupiter Djinni visible at the bottom of your screen cannot be reached yet, and the guard will catch you if you walk east far enough that you step onto the Y-axis of the left of the two flat cliff wall tiles underneath the ivy just above and left of the guard. Therefore, climb down three separate flights of stairs to the left and hop left across a river to make it out of Kibombo Mountain's northwest icon in the overworld.
Subsequent visits
After the first time Piers joins your party in Kibombo, but before playing through the Gabomba Statue dungeon, you have the opportunity to leave him behind and return all the way back south to see a brief, rarely seen cutscene with your party members at Gondowan Cliffs. This necessitates going back through Kibombo Mountains while the patrols are up; while returning to the south entrance is as simple as letting a warrior catch you and deposit you at the torches, you will once again have to sneak through the pass northward to get back to your main objective. It would be more prudent to save at Kibombo and reload a save file to save time going back.
Once you have completed Gabomba Statue at Kibombo and added Piers to your party as a permanent member, you will have to return south through Kibombo Mountains on your way back to Madra and then East Indra Shore. All the patrols will have disappeared, allowing the party to freely pass through both main screens of the pass without incident. Any chests you might not have opened during your previous visit can easily be opened now.
Since Piers will have access to the Frost Psynergy while in his default Mariner class series, the Jupiter Djinni near the west exit can now be reached: From the three long staircases, head southeast from where the upper two of the three staircases meet, and cast Frost on the puddle to turn it into a pillar. Climb the third staircase, then head southwest past the tree south of a fourth small staircase and hop right from the frost pillar. Climb up to the moving sapling and cast Growth on it (changing classes as necessary to get access to Growth, such as giving Felix a Mars Djinni or any of the other characters a Venus Djinni), and climb up to the Djinni and battle it. (This Djinni can run away on a given turn, so save near it before battling it.) You will earn the Jupiter Djinni Waft, and you can easily enter the south screen of Kibombo Mountains from your current position by climbing up the other long ivy to the right and following the route south.
Further visits to Kibombo Mountains should not be required. However, once the party has acquired the Cyclone Chip at Madra, some players may consider it prudent to return all the way to the Gabomba Statue dungeon in Kibombo and explore the optional Gabomba Catacombs dungeon underneath it. With the Cyclone Psynergy, you can now reach what will likely be your fourth Venus Djinni in your playthrough, Mud, which can give one of your party members a valuable class stage increase before fighting the Aqua Hydra boss at East Indra Shore. This will necessitate traveling through Kibombo Mountains yet again, but the lack of patrols should make heading north through it as simple as heading south through it would have been previously. In fact, if you are so inclined, Frost can be cast on the standing puddles in the two main screens to pursue an alternative route toward the northwest exit.
Enemies
| Bestiary of Kibombo Mountains | ||||||||||
| Monster Name | LVL | HP | ATK | DEF | AGI | EXP | Coins | Weakness | Drop | Drop Rate |
| Assassin | 18 | 129 | 150 | 35 | 84 | 97 | 131 | 1/16 | ||
| Dirge | 18 | 91 | 122 | 32 | 60 | 47 | 61 | 1/16 | ||
| Pixie | 18 | 75 | 135 | 31 | 112 | 96 | 127 | 1/8 | ||
| Spirit | 18 | 116 | 114 | 30 | 48 | 49 | 67 | 1/32 | ||
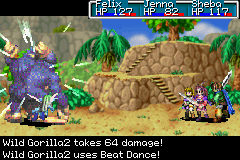
| Wild Gorilla | 16 | 130 | 122 | 32 | 76 | 77 | 80 | 1/32 | ||
| Jupiter Djinni (Waft) (unique) | 18 | 440 | 134 | 34 | 104 | 255 | 309 | N/A | ||
Enemy Formations
- Group 1: Wild Gorilla x1-2, Dirge x0-1
- Group 2: Wild Gorilla x1-2, Pixie x0-1
- Group 3: Pixie x1, Spirit x0-1
- Group 4: Pixie x1-2, Wild Gorilla x0-1
- Group 5: Dirge x1, Pixie x0-2
- Group 6: Assassin x1, Pixie x0-2
- Group 7: Assassin x1-2, Wild Gorilla x0-1
- Group 8: Pixie x2-3
Collectibles
 Disk Axe: Found in a chest at the north edge of the first main screen, near the coiled Lash rope.
 Power Bread: Found in a chest guarded by the southeast guard in the second main screen; it requires dropping a tall crate directly onto the patrolling guard near the chest.
 Smoke Bomb: Found in the right wooden box in the small cave room left of the crate with a bone on top of it.
 Tear Stone: Found in the chest east of the south end of the dog's vertical patrol path. Requires either trapping the dog north of the earth pillar or making the crate with a bone on it fall using the Tremor Psynergy.
 Waft: Jupiter Djinni that is visible near the northwest exit of Kibombo Mountains, but can only be reached by casting the Frost Psynergy that Piers has access to when he has joined the party.
History
The Kibombo tribe native to the heart of southern Gondowan is feared for their warlike ways, and the mountain pass at Kibombo Mountains serves as their patrolled border to prevent outsiders from traveling north into their domain. The short mountain range borders the east edge of a thick, flooding river running straight through the center of southern Gondowan.
When Kibombo's previous witch doctor, Oeia, passes away, the aspiring witch doctor Akafubu must successfully conduct an initiation ceremony to earn the office for himself, which involves presenting a gemstone of some kind to a mechanical idol in their village, the Gabomba Statue. A snag within its mechanisms, however, prevents the ceremony from being completed; unaware that this is the cause and presuming that the issue came down to their gem being "no good," Akafubu sends warriors into the (now-neighboring) continent of Indra to search for a replacement gem. They come back with a Black Orb pilfered from the Indran town of Madra. The warriors stationed at the pass are instructed to strengthen their lookout and are warned not to let Akafubu's ceremony get interrupted by intruders.
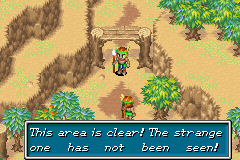
Piers, the Lemurian Mercury Adept who owns the Black Orb and needs it to commandeer his Psynergy-powered Lemurian Ship currently beached at East Indra Shore, follows the Kibombo warriors to Kibombo Mountains. Using his own Mercury Psynergy to transform standing puddles of water into ice pillars, Piers is able to sneak past the patrols, though he has no choice but to knock some guards out cold. When the other warriors later hear their testimony that they were attacked by a "strange one," they redouble their efforts to maintain a firm watch and patrol over the pass even as they fail to discover Piers.
These vigorous patrols are what Felix and his traveling company of Adepts must contend with when they follow Piers toward Kibombo, intent on joining forces with him and using his ship to facilitate their own quest to light the remaining two Elemental Lighthouses. They use their own Psynergy to stealthily navigate their own path through the pass beyond the prying eyes of the patrolling warriors.
It can be surmised that, during Felix's time in Kibombo, the rival party of Adepts led by Isaac also make an attempt to pass through Kibombo Mountains but are unsuccessful. They are described by villagers in both Madra and Naribwe as having been shocked to hear about Piers and expressed their determination to look for him for their own purposes. For context, the story of the first Golden Sun explains they had made a promise to Tolbi's monarch, Babi, to find the lost isle of Lemuria. Despite having stated out loud that they would follow Piers into Gondowan, they obviously fail to catch up to him, resulting in the inference that the warriors patrolling Kibombo Mountains successfully turned Isaac and his companions away. Isaac's party seemingly gives up on Piers and resumes his own quest.
Felix's party and Piers placate Akafubu by secretly assisting in his ceremony from inside the Gabomba Statue itself, and they retrieve the Black Orb in exchange. With the village having appointed its new witch doctor, its warriors take a less combative stance with its neighbors, and Felix and Piers' group returns south through the now-abandoned Kibombo Mountains on their way back to Piers' ship at Indra.
Trivia
- If the earth pillar next to the patrolling dog is timed just right so that it would land right on top of the dog, the dog will emit an audible yelp. Regardless, it will remain safely trapped either above or below the pillar and be capable of moving away from it.
- Kibombo Mountains, similarly to Gondowan Cliffs earlier, features several standing puddles that can be turned into ice pillars with Frost but do not have a relevant role in the player's ability to play through the area. In both cases, they serve to explain how Piers would have been able to pass through the area on his own without access to Psynergy beyond his own Frost Psynergy. (Konpa Ruins in Golden Sun: Dark Dawn is another dungeon where standing puddles that can be turned into frozen pillars exist to explain how a yet-to-be-recruited Mercury Adept gets to the end of a dungeon in advance of the player's own party.)
- The route Piers would have taken through Kibombo Mountains can be accurately recreated: After knocking out the guards stationed above the starting torches, he would have frozen the puddle left of the stairs and climbed up the ivy-covered post to hop left across it. Then, he would have climbed his way to the puddle at the upper left corner of the first screen, frozen it, and used that to reach the elevated area of the second screen where Waft lies. To reach and freeze the third puddle, he would have climbed own three separate ivy ladders, and he would then have hopped left onto and up from the ice pillar in order to reach the final three staircases at the west exit. One issue seemingly contradicting this scenario, seemingly left behind by the game out of necessity for the puzzle design faced by the player, is that there is an earth pillar left of the first standing puddle that Felix needs to push into the gap left of it as though it was not pushed yet, even though Piers would have needed to push this pillar into the gap himself in order to access the second ice puddle north of it.
