Suhalla Desert
Suhalla Desert (スハーラ砂漠 Suharra Desert) is a desert area located in northern Gondowan and functions as a mandatory dungeon-style location in Golden Sun. It features two potential bosses, valuable pieces of defensive equipment, and the game’s official means of traveling to the optional Crossbone Isle.
Walkthrough
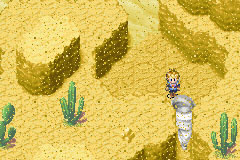
Suhalla Desert is the second desert area in Golden Sun and must be traveled through during the trip from Tolbi to Lalivero. It is entered in the north end and exited in the south end. Unlike Lamakan Desert in Angara, Suhalla does not suffer from extreme heat. An obstacle of a different sort manifests itself here: Sand whirlwinds, which block passage into certain areas, and when you step into them they will blow you out of the desert and drop you back to the village of Suhalla north of the desert. To pass these whirlwinds, you must step into one, and while you are whirling around in midair, open your Psynergy menu and use Douse. In addition, setting Douse as a shortcut can help tremendously while crossing the desert. The whirlwind will reveal itself to be a monster, a powerful Tornado Lizard, and you automatically enter into a battle with it. Once you slay it, you can progress further.
When you enter the desert from the top, the path branches; you can go right to an optional area where a dead-end with a Tornado Lizard guarding a chest that contains the Virtuous Armlet, which is what many would consider Golden Sun’s best piece of armwear to equip on Ivan period, or you can go left and progress further down the screen. You will then come to three parallel paths guarded by Tornado Lizards; The left and center paths lead to the same dead-end which contains a chest that is actually a Mimic, which rewards you with Water of Life. The rightmost path leads you to progress into the next screen.
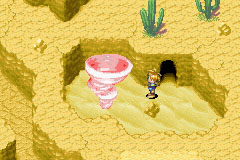
Here, you have another three paths to choose from, all guarded by whirlwinds. The left path leads to a chest containing a Cookie, while the right path leads to a dead-end with a chest containing a Lucky Medal. The center path lets you progress all the way around to the area’s south. A large, pink tornado is visible on the right along the way; this is detailed later. You will come to a cliff leading down to the yellow desert below. It is strongly recommended that you do not climb down it yet. Cast Reveal here and you should see formerly invisible footsteps leading to the upper-left a short distance away, where a normally-invisible log pillar can be seen crossing a gap. Jump across it and you will see Mars Djinni Flash in front of a cave entrance. Battle it to add it to your Djinn collection. Flash is one of the best defensive measures available in either game; it can benefit greatly in the upcoming boss fight. The cave is detailed later.
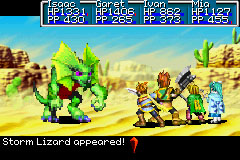
When you climb down the cliff to the yellow desert below in the south, a tornado larger than the previous whirlwinds will suddenly appear and pursue you. If it catches you, and you use Douse on it, you will enter a boss fight with the powerful Storm Lizard. This is a very tough battle at this point in the game. Once defeated, you can proceed to the end of the area down south and exit the desert through the southeast end. The Storm Lizard Boss Fight is, in a sense, an optional boss fight because you can outrun it and make it to the end of the desert before it catches you. However, the Storm Lizard tornado will stay active in Suhalla Desert and pursue you again if you return to the area, and players more often than not return to the area to make use of the secret route to Crossbone Isle, so most battle the boss anyway.
Secret route to Crossbone Isle

The cave entrance behind Mars Djinni Flash is an underground trail that leads to a pink tornado. When you step inside it, if you cast Douse as usual, you will enter an optional boss fight with the Tempest Lizard, an even stronger enemy than the Storm Lizard. After beating it, if you leave the desert and return, the pink tornado returns and you can battle the Tempest Lizard again; this is the only boss fight in the Golden Sun series, and perhaps in most RPGs in general, that can be repeatedly fought over and over again, for the same results every time.
What makes the pink tornado especially interesting, however, is that if you do not cast douse on it and let it carry you off, you will land not in Suhalla, but in the optional dungeon known as Crossbone Isle within Karagol Sea. Once you have acquired the Carry Psynergy from Venus Lighthouse, you can return here to let the Tempest Lizard take you to Crossbone Isle, and you may journey through its interior all the way to the end. The Tempest Lizard can then carry you back from the Isle to Suhalla as normal.
Enemies
Suhalla Desert has a noticeably large assortment of strong monsters fought randomly, as well as four major enemies.
| Bestiary of Suhalla Desert | ||||||||||
| Monster Name | LVL | HP | ATK | DEF | AGI | EXP | Coins | Weakness | Drop | Drop Rate |
| Acid Maggot | 22 | 160 | 255 | 60 | 78 | 86 | 102 | 1/32 | ||
| Brutal Troll | 21 | 291 | 273 | 63 | 76 | 150 | 190 | 1/16 | ||
| Harridan | 22 | 231 | 261 | 66 | 118 | 150 | 164 | 1/32 | ||
| Kobold | 20 | 220 | 230 | 62 | 75 | 107 | 154 | 1/16 | ||
| Magicore | 22 | 321 | 253 | 74 | 109 | 169 | 208 | 1/128 | ||
| Orc Captain | 21 | 231 | 248 | 69 | 90 | 125 | 142 | 1/16 | ||
| Roach | 22 | 211 | 252 | 72 | 92 | 144 | 120 | 1/32 | ||
| Stone Soldier | 22 | 179 | 241 | 105 | 104 | 98 | 98 | 1/32 | ||
| Tornado Lizard | 25 | 530 | 267 | 74 | 104 | 620 | 477 | 1/8 | ||
| Vile Dirge | 21 | 173 | 228 | 56 | 120 | 75 | 98 | 1/16 | ||
| Mimic (unique) | 26 | 997 | 303 | 94 | 139 | 669 | 547 | 1/1 | ||
| Mars Djinni (Flash) (unique) | 22 | 592 | 253 | 65 | 151 | 460 | 445 | N/A | N/A | |
| Storm Lizard (boss) | 28 | 2900 | 291 | 86 | 112 | 1300 | 6100 | 1/1 | ||
| Tempest Lizard (boss) | 28 | 3000 | 295 | 94 | 114 | 1360 | 6400 | 1/1 | ||
Enemy Formations
- Group 1: Acid Maggot x1-2, Kobold x0-2
- Group 2: Roach x1-2, Dirge x0-2
- Group 3: Brutal Troll x2
- Group 4: Magicore x1
- Group 5: Harridan x1-2, Orc Captain x0-2
- Group 6: Stone Soldier x1-3
- Group 7: Stone Soldier x1-2, Acid Maggot x0-2
- Group 8: Harridan x1-2, Roach x0-2
- Group 9: Magicore x1-2, Vile Dirge x0-1
Collectibles
Suhalla has several interesting items to be found here:
![]() Flash: A Mars Djinni that must be battled to be acquired. It is found in the second screen and must have the pathway to it Revealed.
Flash: A Mars Djinni that must be battled to be acquired. It is found in the second screen and must have the pathway to it Revealed.
![]() Cookie: Found in a treasure chest in the second screen behind a Tornado Lizard's cyclone, left of the three paths.
Cookie: Found in a treasure chest in the second screen behind a Tornado Lizard's cyclone, left of the three paths.
![]() Lucky Medal: Found in a treasure chest in the second screen behind a Tornado Lizard's cyclone, right of the three paths.
Lucky Medal: Found in a treasure chest in the second screen behind a Tornado Lizard's cyclone, right of the three paths.
![]() Virtuous Armlet: Found in a treasure chest early on in the first screen, in the upper right area and below a Tornado Lizard's cyclone.
Virtuous Armlet: Found in a treasure chest early on in the first screen, in the upper right area and below a Tornado Lizard's cyclone.
Background and story
The Suhalla Desert, though desolate, is not unbearably arid like Lamakan Desert, but much more gusty. Sand cyclones whirl through this environment, though in the past they were not all that dangerous, and the common man could pass through the desert until recently; the shower of Psynergy Stones caused by the eruption of Mt. Aleph caused these cyclones to be more frequent and violent, for the cyclones are generated by violent monsters within called Tornado Lizards, effectively rendering the desert impassable to most normal people. When people enter the desert, they will be caught up in a Tornado Lizard’s sandstorm and be blown far up into the air, landing up outside the desert perimeter near the village of Suhalla. Though dangerous, this is not necessarily fatal.
The citizens from Suhalla say that if you fight the storms, you will enrage the spirits, and they will take your life. They also believe that the recent ferocity of the sandstorms are the fault of the Angarans (meaning Tolbi); had Tolbi and its lord Babi not attempted to build Babi Lighthouse north of Lalivero, the desert spirits would not be so angry. This is incorrect superstition, of course; The Tornado Lizards (the said spirits) were driven mad and violent by the eruption of Mt.Aleph and the subsequent rain of Psynergy stones all over the world, just like so many other species of monsters across Weyard.
After Sheba was released by Babi from Tolbi, she was escorted through this desert by a group of Tolbian soldiers headed to Lalivero so that Sheba’s presence there and safety would encourage the Laliverans to build Babi Lighthouse faster, but the group was hit by the desert’s sand whirlwinds, and most of the soldiers attempted to fight back, so they perished while Sheba was lost in the desert. Two soldiers who didn’t necessarily fight survived, however. Then those soldiers watched as Saturos’ group passed by through the desert on their way to Venus Lighthouse in their objective to activate it, and when the sandstorms attacked them Alex summoned water upon them to reveal the Tornado Lizards within. Saturos and his band proceeded to slay the monsters and then continued onward.
Saturos would happen upon Sheba afterward, and he saw that Sheba was a Jupiter Adept, the one he would need to gain access into Jupiter Lighthouse in the future, so he took her hostage and his group now numbered seven as they made it out of the desert and towards Suhalla Gate to the east.
The soldiers, in the meantime, took Saturos’ example to heart and carried barrels of water from Suhalla into the desert in an attempt to replicate Saturos’ ability to get past the monster-generated whirlwinds. However, they were fatigued by the weight of the barrels, and when they encountered a whirlwind and poured water on it, the Tornado Lizard inside had its way with them. The soldiers were returned to Suhalla in seriously wounded state.
Later, Isaac and his group pass through the desert, accompanied by Babi’s chief minister, Iodem. Having heard the stories of the two soldiers, the group proceed through the desert in search of Sheba as well as Isaac in pursuit to stop Saturos’ objective to light Venus Lighthouse. The sandstorms attack them, and Isaac’s group uses the Douse Psynergy to reveal the Tornado Lizards inside and therefore slay them through fierce battle. After battling one especially fearsome Tornado Lizard relative called the Storm Lizard, Isaac’s group makes it through the desert, and Iodem remarks that Sheba is nowhere to be found; he doubts they missed her, so he states that they would leave her to the soldiers at Suhalla Gate if she didn’t make her way there already.
Name Origin
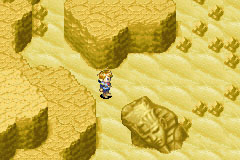
The desert's name (and the mountains mountain pass and nearby village) is a corruption of the Sahara. Interestingly, late in the trek through the desert, one can find a large statue of an Egyptian pharaoh buried up to its neck in the sand. Though it’s there purely for show, it may indicate the existence of a former Egyptian-style civilization that existed on Gondowan in Weyard’s ancient past. This is likely another reference to the desert's name.


