Kolima Forest
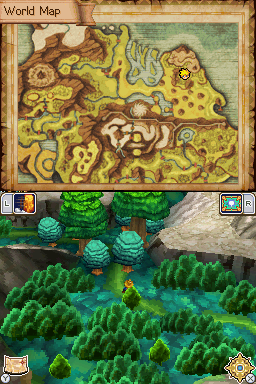
Kolima Forest (コリマの森, Kolyma Forest) is a dungeon-style area in northeastern Angara, near the town of Kolima. While rather short on its own, it is a lead-up to Tret Tree, a second dungeon-style area that should be counted together with this as one set of dungeon areas. It is visited at least once in Golden Sun, and is the home of the tree spirits Tret and Laurel.
In Dark Dawn, Matthew and his party follow Laurel's Venus Djinni emissary Pewter to meet with Tret and Laurel on their way to claim a Roc Feather from the legendary Mountain Roc at Talon Peak, a mountain deep within the forest.
Its name and placement as a forest on the northeastern part of Angara is a reference to the real-world forested region of Kolyma in northeastern Russia.
In Golden Sun
Walkthrough
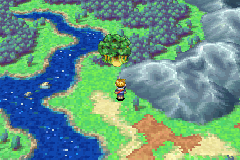
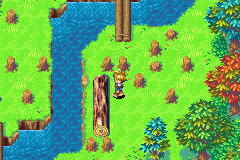
When you first enter Kolima Forest, if you hadn't already seen the cutscene that occurs when you enter the nearby town of Kolima for the first time, a shortened variation on that cutscene will transpire here, and therefore the cutscene that occurs at Kolima won't occur anymore. Regardless, when you go up, go northeast until you can push a vertical rolling log left into the river. Go up over the two-stick bridge and go left, pushing the next vertical rolling log left so you can enter the next area through the left end of the screen.
In screen #2, if you want a nut, get to the tree partially visible at the upper left of the screen (push the rolling log if you want), and use the Catch Psynergy. At any rate, go left along the bottom edge of the forested area until you get to two rolling logs perpendicular to each other. push the horizontal log down by pushing down its exposed left tip, and the path you open up leads up, then left, then up through the various trees until you get off the top end of the screen and into the next area.
In screen #3, there are two horizontal logs rollable vertically and one vertical log rollable horizontally. Roll the vertical log left, then go up and make a U-turn so that you can push the upper horizontal log down. Push the vertical log back right, then push the lower horizontal log down, and then push the upper horizontal log up again. The path is now clear for you to go back around and push the vertical log left into the river. Hop left, go up, and let the path lead you off the elevated right exit of the screen to the next area.
Screen #4 has no random monster encounters, and features a semi-unique puzzle, the only other example of which that exists in the Golden Sun series is in the late-game dungeon Crossbone Isle. The idea is that the water in the lake may be emptied and refilled by toggling the floodgate switch at the bottom part of the area, and that while the water level is empty, you go down and roll the logs around so that they'll serve as properly positioned platforms floating on the water when the lake is refilled. The lowest left log, as should be obvious, cannot be moved from its position. To get to the lone chest in this area, empty the water out, go down and push both rollable horizontal logs up, push the upper left vertical log right, push the upper left horizontal log down, push the lower left vertical log right, push the upper right horizontal log down, and push the lower vertical log back left to complete the path. Interact with the floodgate switch again, and now you can hop your way northwest to the lone chest to the upper right. It contains the Fur Coat, a unique piece of armor.
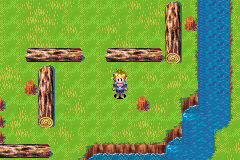
Ultimately passing this screen requires you to go up off the exit to the upper left. For convenience's sake, perform a puzzle reset by leaving the screen and immediately reentering. Go down and move the upper left vertical log one space left; that is all you need to do before toggling the floodgate switch again. Now you can hop your way up across the logs and enter the last area.
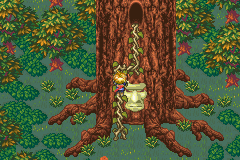
In the final screen of Kolima Forest (which returns to random monster battles), the tree spirits Tret and Laurel may be interacted with. A fairly obviously climbable vine next to Tret's face lets you climb into the entrance above his head, thus starting you off on Tret Tree, a dungeon that is essentially the "second portion" of the Kolima dungeon set. Eventually on your quest, you would want to use the Hermes' Water on Tret's face here, and in a typical game, after playing through Tret Tree and defeating the boss within, one must leave Tret Tree and Kolima Forest (easiest done with the Retreat Psynergy) and proceed on the full Mercury Lighthouse segment of the game, at the end of which you get the Hermes' Water. However, if you played through and completed Mercury Lighthouse before entering Kolima and have the Hermes' Water, you will be prevented by a brief, different cutscene from using it on Tret's face until after the boss inside Tret Tree is defeated.
Once the boss in Tret Tree has been felled, you will be able to use Hermes' Water while standing in front of Tret's face, and a cutscene will trigger. This rewards you with the town of Kolima becoming uncursed and open for business, the Gang of Three at the Bilibin Barricade becoming uncursed, and most importantly, for Kolima Bridge to become crossable, letting you progress on your quest. Cast Retreat once again.
Enemies
| Bestiary of Kolima Forest | ||||||||||
| Monster Name | LVL | HP | ATK | DEF | AGI | EXP | Coins | Weakness | Drop | Drop Rate |
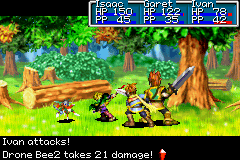
| Drone Bee | 7 | 63 | 68 | 19 | 36 | 19 | 28 | 1/16 | ||
| Rat | 6 | 49 | 52 | 27 | 15 | 14 | 17 | 1/32 | ||
| Rat Soldier | 6 | 69 | 56 | 13 | 19 | 17 | 19 | 1/16 | ||
| Skeleton | 5 | 60 | 46 | 14 | 18 | 10 | 11 | 1/16 | ||
| Troll | 7 | 101 | 73 | 16 | 14 | 30 | 34 | 1/32 | ||
| Will Head | 5 | 54 | 42 | 10 | 10 | 9 | 10 | 1/32 | ||
Enemy Formations
- Group 1: Drone Bee x1-2
- Group 2: Rat x1-2, Rat Soldier x1-2
- Group 3: Will Head x1-2, Rat Soldier x0-2
- Group 4: Skeleton x1-3, Will Head x0-3
- Group 5: Drone Bee x1, Rat x0-2, Rat Soldier x0-2
- Group 6: Troll x1
Items
![]() Nut - Dangling on a tree in the middle of the second area. Use Catch to grab it. (A bug will prevent this from appearing if the dangling nut in Vale was retrieved with Catch previously.)
Nut - Dangling on a tree in the middle of the second area. Use Catch to grab it. (A bug will prevent this from appearing if the dangling nut in Vale was retrieved with Catch previously.)
![]() Fur Coat - At the end of the water-and-dam puzzle.
Fur Coat - At the end of the water-and-dam puzzle.
Background and Story
Residing deep within this forest is a massive, noticeable tree that is the physical manifestation of a spiritual entity named Tret. Placed near it is a lesser tree inhabited by a similar entity named Laurel. The tree comprising Tret had already been known as "the sacred tree" and "the holy tree" by both the people of the town of Kolima to the south and those of the town of Bilibin to the west, and some even believe in a legend that Tret is a fairy that took up residence within the sacred tree.
Around the start of Golden Sun, the ruling lord of Bilibin and the surrounding lands, Lord McCoy, gives into the wishes of his haughty wife Lady McCoy, who wants a personal palace of her own next to that of the Lord's. To supply the lumber for the palace's construction, he orders the workers at Kolima to chop down many of the forest trees in short amounts of time; Tret is personally enraged to see them even take their axes to himself. Then the eruption of Mt. Aleph transpires, and Psynergy Stones shower all over the world; when they fall into the branches of Tret and Laurel, they are infused with unique powers connected to Psynergy, but Tret's psyche becomes more unstable, and he is soon lost in a blind rage and uses his newfound power to lay a curse on all the townspeople in Kolima and the surrounding area by making it rain a strange, spore-like substance. Every person in the Kolima region of Angara is transformed into an immobile, stationary human-sized tree, and are helpless.
The deforestation having grounded to a halt and the unaffected people of Bilibin now in a state of panic, Lord McCoy sends out whatever brave warriors he can find into Kolima Forest to neutralize the curse at its source, but all are turned into trees themselves. Some time after the event, however, the traveling Adepts led by Isaac enter Kolima Forest, having resisted Tret's cursing glamour with their Psynergy abilities and intending to do what they can to break the curse themselves. They reach Tret and climb into the tree to quell the raging entity by defeating it in battle; through Tret returns to a state of level-headedness and attempts to right the wrong he committed, he is too weak to dispel the curse he placed, and the forest gradually and continually takes on a color of death, reflecting the state of its master.
Kolima Forest is saved when the Adepts pour into Tret's roots the healing waters from the now-active Mercury Lighthouse, the Hermes' Water. The forest changes back to a bold, green color as Tret's life is renewed, and Tret, as his first token of gratitude to the young Adepts, swiftly uncurses all the people in the Kolima region. Isaac receives counsel from Tret on the state of matters beyond Kolima that Laurel had forseen, such as that an evil forest quickly sprouted all across Mogall Prairie as a result of the shower of Psynergy Stones. Isaac's party leaves Kolima Forest on this note and head east and south along Angara in their continued pursuit of their objective.
In Dark Dawn
Walkthrough
Once you have completed the event at Kolima Village to the south and defeated Sludge in the Phantasmal Bog, the next time you enter Kolima Forest to the north, the Venus Djinni Pewter will smile and beckon you to follow him through the entrance north. Before following him, go inspect the wooden box to the lower right of the tree house at the right end of the area and get a Hard Nut. There is nothing of importance inside the treehouse itself, so follow Pewter to the next screen, which has three entrances in three different directions. There is a dead-end with an unimportant NPC through the left entrance, and the upper entrance connects to the large central area of the forest, but this is a dead-end too for the time being. Approach Pewter again and he will lead you through the right entrance into the next area.
In this next area, Pewter will show you that you want to go through the entrance to the upper left of the screen. Cast Growth on the plant on the right tree to turn it into climbable ivy. Climb to the top of the tree, hop left, and climb down the other ivy at left to follow Pewter into a larger area above, where once again he shows you that you need to follow him through the upper left exit. Climb the ivy, hop to the right of the two short stumps with holes in them, and slide into the right stump's hole. The linear route takes you on top of an elevated tree stump with a hole in its center and a growable plant at its left branch; there is no point sliding down the hole, so grow and climb down the plant, then hop to the upper left tree stump that also has a hole in it. You can follow Pewter into the next screen from here, but if you want the chest with the Potion in it, instead slide down the hole, get the chest, then cast Growth on the plant southwest of the chest to get back to the stumps at the bottom of the screen. Repeat the process to get back to the upper left tree stump, then follow Pewter.
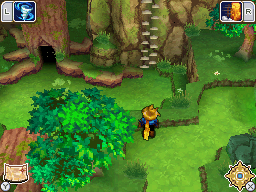
The large "central" screen you emerge into has a large boulder blocking your path; use your recently-found Crush Psynergy to remove it. The ladder you open up connects you to the shortcut to the four-way screen from earlier, but the important thing is what happens when you jump onto the bush at the upper center of the screen; this triggers a very long set of story-relevant cutscenes, after which you will be returned to this spot and automatically obtain the Venus Djinni Pewter. The story directs you through the northern exit out of the forest, but before doing that, hop to the tree stump below the bush, hop left, and go through the entrance at the lower left corner of the area into a screen with a river. After another short cutscene near the base of a tall tree stump, climb the ivy to the left of the tree and Grow the plant hanging down the tree stump's hole, and climb down it and talk to the NPC to gain the Yew Bow artifact weapon. Climb back up and face the Apple hanging on the branch to the far right, and cast Grip to obtain it. Now you are done with Kolima Forest, so retrace your steps and take the north exit out of the forest towards the Kolima Junction.
Enemies
| Bestiary of Kolima Forest | ||||||||||
| Monster Name | LVL | HP | ATK | DEF | AGI | EXP | Coins | Weakness | Drop | Drop Rate |
| Leaf Bat | 25 | 126 | 202 | 51 | 118 | 239 | 93 | 1/16 | ||
| Mad Plant | 25 | 272 | 228 | 65 | 114 | 478 | 335 | 1/8 | ||
| Mean Bugman | 25 | 145 | 228 | 105 | 100 | 319 | 107 | 1/16 | ||
| Mole Mage | 25 | 217 | 226 | 49 | 92 | 239 | 93 | 1/16 | ||
Enemy Formations
- Group 1: Leaf Bat x1-2
- Group 2: Mad Plant x1-2
- Group 3: Mean Bugman x1-3
- Group 4: Leaf Bat x1, Mean Bugman x1-3
- Group 5: Mean Bugman x1, Mad Plant x1-2
- Group 6: Mole Mage x1, Leaf Bat x0-1
- Group 7: Mole Mage x1, Mad Plant x1-2
- Group 8: Mole Mage x1, Mean Bugman x1
Items
![]() Hard Nut: found in a box near a house at the southern entrance of the forest
Hard Nut: found in a box near a house at the southern entrance of the forest
![]() Potion: found in a chest in the third section of the forest.
Potion: found in a chest in the third section of the forest.
![]() Apple: found hanging in a tree in the section to the southwest of Tret and Laurel. Use Grip to obtain
Apple: found hanging in a tree in the section to the southwest of Tret and Laurel. Use Grip to obtain
![]() Yew Bow: given as a reward by the guide after rescuing him from the tree trunk.
Yew Bow: given as a reward by the guide after rescuing him from the tree trunk.
Background and Story
Following the Golden Sun event, Kolima Forest and Kolima Village, are miraculously moved eastward, into what would eventually become the country of Morgal. The area where the forest landed was previously an uninhabitable marshland. After the move, the area would become fertile ground, but the marshland and its inhabitants would be destroyed. Also, Tret and Laurel would be injured from the move, and spent years recovering.
One of the marsh's former residents, a lizard-like monster called Sludge began haunting the area, and cast a curse. The curse would sicken Kolima Village's Dream Tree, and render the forest completely unnavigable. Two Vendors from Saha would try to navigate the forest with help from a guide, but the guide would become lost himself. Normally, Laurel and Tret would have reversed the curse, but neither was at full power due to their previous injuries. Luckily, Matthew's party of Adepts is able to break the curse by defeating Sludge. The party would then enter the forest to meet Laurel and Tret, guided by the Venus Djinni Pewter.
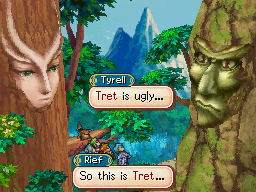
Upon meeting with Tret and Laurel, the group tries get the two to give them a feather from the Mountain Roc, as they need the feather from it to complete their quest. Tret and Laurel provide what information they can, but note that the Roc is in a deep sleep and can only be awakened via the Slap Psynergy, so getting a feather is impossible otherwise. Instead, the group asks for knowledge of how to break into Belinsk's fortress to rescue the Sanan princess Hou Ju and the Champan pirate Eoleo. Tret and Laurel tell them of an underground dungeon that leads to the fortress, but warn them of a dangerous machine called an Alchemy Dynamo. After this, the Adepts leave the forest in pursuit of their goals.
