Gondowan Cliffs

Gondowan Cliffs (ゴンドワナ大陸を結ぶ崖, Gondwana Continent Connecting Cliff) is a dungeon-like location in Golden Sun: The Lost Age, representing the point where the continents of Indra and southern Gondowan brush up against each other as a result of the tidal wave from the Eastern Sea shifting Indra's position at the start of the game. Felix's party uses it early in the game as a stand-in for a land bridge to cross between Indra and Gondowan on foot, which is a necessary step in their early search for a ship to sail the Eastern Sea with.
The sheer cliffs making up this location make for a complicated maze of ledges and cliff slides. It can start being explored from the Indra side once the Scoop Psynergy is acquired, but the ability to use it to cross into Gondowan is only unlocked once Briggs is defeated in Alhafra shortly afterward. Once Piers is recruited in Kibombo and the Gabomba Statue dungeon is complete, the party must travel back east through Gondowan Cliffs to reach his beached Lemurian Ship at East Indra Shore. Much later in the game, once the Grind Psynergy is acquired in the Sea of Time at the end of the open Eastern Sea segment of the game, the party must sail the ship through Gondown Cliffs' north end and bore their way through to its south end to access the Western Sea portion of the game.
Walkthrough
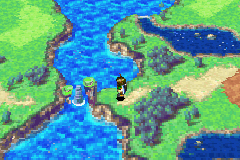
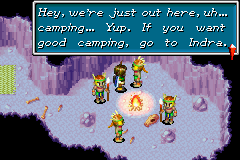
As soon as the party exits out of Dehkan Plateau's east end early in The Lost Age, it is possible for them to detour far to Indra's southwest end and enter Gondowan Cliffs. A dog fixated on a spot on the ground, when Mind Read, will explicitly tell you that you should "dig" there, which you do not have the Psynergy to perform yet. You can follow the winding trail into a cave in the cliffs and approach four Kibombo tribe warriors huddled around a campfire, who will act suspiciously. The only relevance taking this step has on the quest is that, when the town of Madra to the east is revisited after defeating Briggs in Alhafra at Osenia far to the east, the cutscene that plays at the gate will have Kraden mentioning that the tribesmen encountered in the cave played a part in the town's misfortunes that will have taken place in the party's absence.
During the party's time in Osenia, you will have acquired the Scoop Gem in Yampi Desert leading up to your arrival in Alhafra. It is possible to hold off on the boss battle with Briggs there and make the lengthy return trip all the way to Gondown Cliffs early, where it is now possible to explore most of the location thanks to the Scoop Psynergy. A pair of rarely encountered Kibombo warrior NPCs will be standing at a point late in the "dungeon" where a tightrope would normally allow you to walk west onto the Gondowan side of the cliffs, preventing you from heading to Gondowan prematurely. However, it will be possible to collect the Mars Djinni standing on the cliffs earlier than normal, which can be useful to bring all the way back to the Briggs battle east.
The normal course of the game intends for the player to defeat Briggs in Alhafra, then return to Madra in hopes of meeting up with Piers, who would have been freed from the jail thanks to their efforts. However, the party will find that the Kibombo tribe attacked Madra in their absence and made off with Piers' Black Orb, and that Piers had since pursued the Kibombo tribe west through Gondowan Cliffs in hopes of retrieving it. Despite how significant this cutscene is for establishing context and directing the player to head west through Gondowan Cliffs to search for Piers in Kibombo, revisiting Madra is not technically mandatory at all, and the party can immediately head to the Cliffs to "properly" explore and pass it.
It should be noted that the Lash Psynergy, collected at the technically skippable Kandorean Temple at the start of the game, will be required to pass through the Kibombo Mountains "dungeon" following this, so do not bother proceeding west through Gondowan Cliffs until you have the Lash Pebble. If you do not, you will have to detour back north through Dehkan Plateau to retrieve it.
Trip through to Gondowan
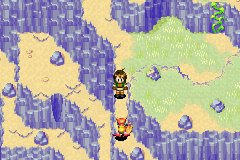
When you are ready to proceed west through the dungeon, cast Scoop on the dirt tile left of the dog to expose a water spout, and stand on top of it so that it propels you up to a point where you can hop left to a cliff ledge. Slide down, hop left, and climb up the first ivy ladder you see, underneath an out-of-reach red mushroom. Head northwest past it and climb up two more ivy ladders, and you will find a set of three cliff slides. Slide down the center cliff slide and follow along northwest to a thick, short, stump-shaped earth pillar, and cast Move to remotely push it off to the left, completing a maze of rocks in the ocean water below. When you slide down from this ledge, you will end up in the area the left and right cliff slides from above would have led you into — an area where the only way back is to cast Lash on a coiled rope off to the right, letting you climb up the two ivy ladders above you again to return to the three cliff slides.

Climb down the ivy ladder at the southwest edge to step onto the maze of hoppable rocks in the ocean, and hop left three times, hop up twice, hop left once, and hop up once to reach a pair of rocks arranged in a horizontal line, just to the lower left of a giant rock in the water. Hopping left from this pair of rocks begins you on an entirely linear, winding course through the rest of the maze (which entails hopping left twice, down twice, left once, up thrice, right four times, up three times across the earth pillar you dropped, and left twice to reach the ivy wall at the north end of the water). Continue following along through the cliffs, climbing an ivy ladder and heading a short ways southeast so you can hop left across a gap from a tree left of an elevated chest on a cliff. To get to that chest, head north past the pair of trees and follow along the route, where it will give you a Sleep Bomb. Return to the pair of trees and climb down the ivy underneath them, and once again follow along back northwest.
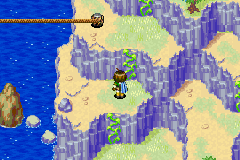
You will end up at the east end of a tightrope connecting the two continental cliffs comprising the area (or, if you came here without beating Briggs yet, a pair of Kibombo tribesmen). Before heading west along the tightrope, climb the wall ivy to your upper right and another wall ivy east of that, and follow the route southeast without climbing any more ivy. Far at the bottom, south of a standing puddle of water, is a Mars Djinni you will have to battle to your collection, Kindle, so save your game before battling it.
The wall ivy northeast of that Djinni leads you down a linear series of wall ivy ladders hugging the "top end" of the dungeon's perimeter that will eventually bring you to a cliff slide that would deposit you back near the dog at the east end of the area. Clearly, you want to avoid taking this slide at this point and setting yourself back. However, two "ledge floors" above the ledge with this slide is a detour south past a pair of trees, where you can pick up the red mushroom seen earlier: the Laughing Fungus. The only practical purpose of this item is to sell it for 525 Coins because, if you bring back to old couple in the two-story building in the center of Madra, they will tell you that it isn't the right kind of mushroom they are looking for, hinting that you need to bring them the green mushroom you will have seen shortly before navigating the rock maze in the water. The green mushroom can only be acquired on a return visit to Gondowan Cliffs.
Head back to the tightrope, walk west across it, and follow along the winding, linear route west out of Gondowan Cliffs' west exit to begin exploring southern Gondowan.
Subsequent visits
At the end of your time spent fulfilling mandatory steps of your campaign in Kibombo, you will have permanently added Piers to your party's roster, and your next required step will be to bring Piers back to Madra. This will require making a return trip through Gondowan Cliffs to its east exit.

When coming back through Gondowan cliffs, once you have crossed the tightrope back east, once again climb up the two ivy ladders northeast of that and follow along the winding route between cliff walls in the direction you originally took to get to the Mars Djinni, and you should reach the standing puddle along the way. Cast Frost on it to turn it into an ice pillar, then head back north and climb the northeast ivy ladder and follow along south so you can hop west across the ice pillar. Slide down the cliff slide and follow along with the narrow ledge southwest to reach the green mushroom, the Healing Fungus, before sliding down again. Travel back east using the coiled diagonal tightrope as necessary and exit out of the east end. (Give the Healing Fungus to the old couple in the two-story building in the center of Madra to gain the Mars Djinni Char from them.)
Once you have gotten the Cyclone Chip during a mandatory cutscene with the Mayor of Madra at his manor, the next stage of your journey would be to return to East Indra Shore and play through the Lemurian Ship "dungeon", which involves a tough boss fight against the Aqua Hydra. Some players might consider it worthwhile to travel all the way back to Kibombo in southern Gondowan and complete the optional Gabomba Catacombs dungeon to get an extra Venus Djinni, which may improve one party member's class stage. This will require yet another trip west through Gondowan Cliffs, but with Piers in your party, this will take much less time. Simply head to the standing puddle north of the dog, turn it into an ice pillar with Frost, and use it to climb up the many ivy ladders lining the upper perimeter of the dungeon location to reach the tightrope connecting the two continents. The trip back east will allow you to use this same upper-perimeter route just as easily.
As soon as you defeat the Aqua Hydra and gain the ability to sail the Eastern Sea, it becomes possible to sail the ship into the north end of Gondowan Cliffs' icon on the overworld by steering the ship through the narrow strip of ocean being flanked by Indra and Gondowan's respective landmasses. However, a giant, brown spire will be blocking you from accessing the Western Sea that comprises the late stages of the game. Once you have completed the Sea of Time and acquired the Grindstone from Lemuria, sail into Gondowan Cliffs' north end and cast the Grind Psynergy to remove the spire.
Bestiary
| Bestiary of Gondowan Cliffs | ||||||||||
| Monster Name | LVL | HP | ATK | DEF | AGI | EXP | Coins | Weakness | Drop | Drop Rate |
| Flash Ant | 16 | 76 | 119 | 38 | 62 | 61 | 71 | 1/32 | ||
| Wild Gorilla | 16 | 130 | 122 | 32 | 76 | 77 | 80 | 1/32 | ||
| Wolfkin Cub | 16 | 115 | 136 | 32 | 79 | 82 | 95 | 1/32 | ||
| Wyvern Chick | 16 | 124 | 128 | 36 | 76 | 83 | 76 | 1/32 | ||
| Mars Djinni (Kindle) (unique) | 16 | 403 | 114 | 29 | 90 | 228 | 273 | N/A | ||
Enemy Formations
- Group 1: Flash Ant x1-2
- Group 2: Wyvern Chick x1
- Group 3: Wyvern Chick x1, Flash Ant x1
- Group 4: Wolfkin Cub x1
- Group 5: Wolfkin Cub x1, Wyvern Chick x1
- Group 6: Wild Gorilla x1-2
- Group 7: Wild Gorilla x1, Wolfkin Cub x1
Collectibles
 Sleep Bomb: Found in a treasure chest shortly after climbing up from the maze of rocks in the ocean.
 Kindle: Below a Frost-sensitive puddle reached by climbing northeast from the tightrope between continents. Must be battled to be earned.
 Laughing Fungus: Is visible on a cliff outcropping early on. Can only be reached by climbing up a vine northeast of Kindle's position and exploring each ledge underneath the string of vine ladders eventually leading back to the east entrance to Gondowan Cliffs. Its only practical gameplay use is to be sold off for 525 Coins.
 Healing Fungus: Is visible while dropping the thick earth pillar into the maze of rocks in the ocean, but can only be acquired once Piers is in your party. Cast Frost on a Frost-sensitive puddle north of where Kindle was standing and then hop across it and slide down the cliff slide near it to land on the ledge where the mushroom stands. Give it to an old couple in a two-story building in Madra to have them give you the Mars Djinni Char they keep in their holding pen upstairs.
Trivia
- When encountering the four Kibombo behind the bush early in the game, it is possible to avoid triggering the brief cutscene where they react to having been found out by hugging the right slanted wall as you approach the campfire. It becomes possible to talk to them and then trigger the cutscene on your way back down.
- The lone puddle north of the dog at the east end of Gondowan Cliffs functions in-game as a convenient retroactive shortcut allowing the party to more quickly travel from the east edge of the location to its west edge once Piers has been recruited and his Frost Psynergy becomes available for its utility use, but before the Lemurian Ship is obtained. In-universe, this puddle also serves to explain how Piers was able to travel through Gondowan Cliffs by himself with only his access to Mercury Psynergy like Frost.
- Early in the party's exploration of the "main" part of Gondowan Cliffs starting from the water spout near the dog, there is a point where the party must slide down one of three adjacent cliff slides. If either the left or right slides are taken first, the maze of rocks in the ocean will not be traversable yet, so the party will have no choice but to cast the Lash Psynergy to climb back east to return to the slides. Taking the center slide will give the party the opportunity to drop a thick, stump-like earth pillar into the rock maze to complete it, but the player can neglect to do that and slide further down anyway, landing into the same area where Lash is needed to climb back. The issue is that it is also possible to play through Gondowan Cliffs without having yet gotten the Lash Pebble at Kandorean Temple, and the first point in the game where its usage becomes mandatory for the main quest is at Kibombo Mountains coming up. Therefore, in this highly specific circumstance, it is possible for the party to get trapped in a part of Gondowan Cliffs until they cast the Retreat Psynergy to free themselves.
- Once you have met Piers in the village of Kibombo, you are allowed to temporarily leave him behind and exit Kibombo before playing through and finishing the Gabomba Statue dungeon. However, the game will rather arbitrarily lock you within Gondowan until you complete the Gabomba Statue with Piers; if you reenter Gondowan Cliffs from the west, a short cutscene will play where Kraden asks where Felix is going and points out that they should recover Piers' black orb. Jenna and Sheba will agree with Kraden, Kraden will declare that "the majority wins", and Felix will automatically walk back out west into the overworld. This cutscene is a potential issue for players who might have decided they had good reason to go back east into the cliffs and beyond before playing through the Gabomba Statue, such as picking up the previously missed Mars Djinni Kindle.
- If the party qualifies for the above cutscene while somehow managing to reenter Gondowan Cliffs from its east entrance (through either hacking or some advanced applications of the Retreat glitch), a slower and buggier version of it will take place at the east end of the area, and it will successfully deposit the party back outside the area's west entrance regardless. Viewable here.
- Despite being portrayed as the same area, accessing Gondowan Cliffs by land loads a different map than the one accessed when entering Gondowan Cliffs by sea. This is only noticeable if you gain access to the ship before defeating Briggs through use of a cheat device or glitches. In this case, the rope required to traverse Gondowan Cliffs will not be visible if the Cliffs are accessed by land, but will be there if you access the Cliffs by sea.
- The Retreat glitch is a method of temporarily scrambling the pointers on the current map by assigning the Retreat Psynergy to a shoulder button shortcut and deliberately attempting and failing to cast it through said shortcut because the Venus Adept in question does not have the 6 PP needed to carry it out. A very tricky application of this glitch, which requires RNG and blind navigation off the edge of the screen at points, allows the party to warp past the west exit of Gondowan Cliffs without even having collected the Scoop Psynergy, which in turn allows the player to see an ordinarily dummied-out alternative version of the cutscene where the party meets Piers in Kibombo. See this video for a full reproduction of this process.
