Gabomba Statue

The Gabomba Statue (ガンボマ像, Ganboma Statue) is a dungeon in Golden Sun: The Lost Age. Located in the tribal village of Kibombo in southern Gondowan, it is a giant idol that contains a labyrinth full of ancient gears and cogs. It is worshiped by the tribesmen of Kibombo, who rely on its mechanisms to carry out a succession ritual that appoints a new witch doctor to lead the village. The superstitions of the villagers regarding the statue are not entirely unfounded, given the nature of the entity that has actually taken residence within its depths.
In The Lost Age, the efforts of the aspiring village leader Akafubu to earn the title and office of witch doctor from the Gabomba Statue are stymied by corroded mechanisms, which render the statue incapable of taking a ceremonial jewel into itself. Akafubu erroneously believes that he needs a "better" jewel and has his warriors raid the village of Madra for what turns out to be the Black Orb owned by Piers, who needs it to commandeer his Psynergy-powered Lemurian Ship. Piers sneaks into Kibombo during the ritual and is caught up to by Felix and his traveling party of Adepts, who have need for Piers' talents and vessel, and they join forces to infiltrate the Gabomba Statue together to retrieve his orb.
After completing the dungeon, the party needs to go back to Madra with Piers to get the Cyclone Chip. This Utility Psynergy item makes it possible to return to the depths of the Gabomba Statue's labyrinth and explore the cave-like Gabomba Catacombs underneath it.
Walkthrough
Once Felix has defeated the pirate Briggs in the southeastern continent of Osenia, his party must return west through the neighboring continent of Indra, cross west into southern Gondowan via Gondowan Cliffs, and cross north through Kibombo Mountains to meet Piers just left of the upper screen in Kibombo where the Gabomba Statue sits. The Lash Psynergy will be needed to cross Kibombo Mountains, and it will also be used to solve a puzzle in Gabomba Statue itself; however, it is possible to play up to the Kibombo Mountains without having yet gotten the Lash Pebble from the early Kandorean Temple dungeon, so the player would have to make a detour back to that dungeon to fetch the Lash Pebble before reaching Kibombo.

When Kibombo itself is first entered, the crowds are blocking the way to the Gabomba Statue and the ritual taking place in front of it, which makes entering the statue a puzzle in and of itself. You must first cast Lash on the coiled rope west of the bottom exit into the overworld and then hop east across the reddish-brown totem pillars, then walk along the cliff-like ledge running along the east edge of the screen. Talk to the Great Healer for his services if you wish, but hop west across another set of totem pillars until you approach a spot where a standing puddle lies on the ground; hop from the south totem pillar onto the two-room structure with the two peaked roofs and hop left from them to enter the upper screen, where a short cutscene showing Akafubu beginning his ritual takes place. Approach Piers for a longer cutscene, then cast Move as instructed to drop the earth pillar north of Piers left into the gap to initiate a cutscene that will eventually add Piers to your party. If you attempt to head back south, Piers will automatically leave your party, but you can regain his membership by approaching him at the far north end of the screen with the Gabomba Statue.
Follow clockwise along the cliff ledge running along the upper perimeter of the screen until you climb down ivy far off to the right, then head back northwest into the space behind the Gabomba Statue. Another cutscene will take place, and you must agree to Kraden's request to use the Scoop Psynergy to progress with the cutscene and expose four arrows leading to what Kraden describes as a former entrance leading into the Gabomba Statue from underneath. Since that entrance is presently sealed up by a rock, Jenna will suggest digging up a spot elsewhere to expose an air supply for the original builders of the Gabomba Statue. The player is expected to use this as their cue to cast Scoop on the similarly marked tile of space just southwest of the right ivy, which will open the functional entrance into the Gabomba Statue dungeon.
Exploring the statue

Follow the winding cave trail to a pair of giant, rotating red fan blades and climb up the ladder, causing the fan blades to push you upward. You will climb up into a green-floored maze; ignore the side to your left and head up to where you can travel down four separate, narrow routes. The leftmost route brings you to a chest that attacks you as a Mimic when you inspect it, and it will drop a Hard Nut when felled. The second path from the left leads you all the way to the chest visible at the northeast corner, which contains the highly defensive Bone Armlet. Since the third downward route leads to a dead-end, head down the rightmost route to climb up to the next floor.
In the floor above, a pair of large, spinning fan blades will push Felix back downward, so instead head left past them to find a coiled rope placed left of a tall, spinning blue gear with a small cleat spinning along its top surface. Open your Psynergy menu while the cleat is at the leftmost edge of its rotation cycle to effectively freeze time, letting you cast Lash to tie the coiled rope onto the cleat; this will cause the blue gear to stop, and every other gear in the room will also stop rotating, including the fan blades. You can ignore the other coiled rope south of the northeast wall ladder, which will take you up to a floor with a visible Venus Djinni standing among the gears. Hop left across the gap south of the Djinni, and proceed past the various gears through the room in a clockwise direction until you get to the next wall ladder leading upward.

The next floor sees Felix surrounded by a large, scattered collection of spinning, colorful cogs and gears. Follow the only available route south through the gears to get to a ladder attached to a thin square pillar near the bottom of the screen. If you climb this ladder, you will find that the small floor above features fan blades that will push Felix south and away, so you will have to instead head northwest from the ladder-pillar past more gears. When you start going west past the northwest corner of the traversable space in this room, a brief, scripted scene will show Felix watching a mouse jump onto and "ride" atop the vertically aligned red gear, then hop onto and across the horizontally rotating blue and green gears surrounding the red gear. This demonstrates that Felix himself can ride and traverse these gears to the same effect.
For the moment, it is recommended that you continue heading southwest through the gears scattered through the left part of the screen and hop across the gaps below and above the large, horizontally rotating blue gear at the left end to reach the ladder. Climb down both this ladder and a second ladder just underneath it, then follow the linear path until you get to three linear routes south of said ladder; take the left path down to reach a room where a giant cog is flashing beige and green while rotating between two stakes you are expected to drive into the ground with the Pound Psynergy. Once you Pound the left stake, backtrack to the spot two floors above where you had watched the mouse climb the cogs; you can save time getting to this spot by riding the upper-right light-blue vertical cog just right of the ladder you climb back out of.
Follow the course the mouse previously showed you by jumping onto the red, vertical gear from its right end, hopping north from it onto the left giant blue cog, and hopping right and down across thin green cogs. Hop right from the next blue cog and then up to the northeast blue cog, hop right across two more narrow green cogs, and hop down to another red, vertical gear so that you can disembark off its right end. Follow the twisting yet linear route to the right ladder leading down into the floor, then climb down the ladder below that to reach an area where you can travel either left or right past the wall ladder; the left route brings you to a chest with an Elixir, while the right route brings you to the right side of the flashing cog from earlier. Pounding its right stake into the ground lowers the flashing cog and changes the direction that all cogs and gears in the dungeon rotate.

Backtrack again to the large room full of scattered, colored gears, which include a pair of pink, vertical gears now spinning "into" a square abyss. Riding one of these drops you into the floor below, and which gear you pick makes you land in a different spot near the Venus Djinni from earlier. Ride the left pink gear to land into the enclosed section of the floor below that contains the Venus Djinni, and save your game before battling it to attempt to add the Venus Djinni Steel to your collection. Then, navigate your way back to and through the wall ladder to return to the floor filled with cogs, and climb up the ladder affixed to the south pillar. (If you rode the right pink gear into the abyss, you would have dropped outside Steel's enclosure, and you would have had to traverse the multicolored cogs and gears in this floor all over again to get back to the two pink gears in order to ride the left one for the Djinni.)
Because you had previously changed the rotation of all gears in the dungeon, the two fan blades in the small room above the ladder-pillar are now rotating in a way that will push Felix north through them. (The coiled rope left of them exists for if you had neglected to collect a prior treasure in one of the floors below.) Climb up the wall ladder at the northwest corner to a special room that represents the "mouth layer" inside the Gabomba Statue's head, and pass by the idol at the upper wall to climb up the wall ladder at the northeast corner.
Conduit puzzle
When you climb into the top floor of the dungeon, which represents the upper "head" of the Gabomba Statue, you will automatically watch a cutscene where Akafubu's attempt to carry out his ceremony causes red and blue sparks of energy to travel along the "floor circuits" covering the floor of the room. This will fail for Akafubu because red and blue sparks will not reach the idol at the center of the room at the same time. Your party members will agree to reconnect the conduits to allow for this.

When you cast Pound on the stake at the top of the screen, all of the beige-colored "conduit tiles" will be made to float in the air and can be individually fitted back into the holes underneath them by casting Pound on them. When you step onto either of the "rotation buttons" flanking the Pound stake, all currently floating tiles will rotate 90 degrees in the pictured direction, allowing you to Pound them into their square slots. After some time passes (time that is paused while any menu is open), whether or not you are done realigning all of the conduit tiles, Akafubu outside will attempt to channel energy into the idol again; if it fails again, he will try again after the same span of time has passed again.
It is possible to see different variations of the cutscene in which Akafubu retries his ritual by connecting the conduits in a way that results in only one colored spark reaching the idol in the center, or at least reaching it before the other colored spark can. If a blue spark first reaches (or is the only spark to reach) the idol in the puzzle, the dancing warriors outside will panic when the Gabomba Statue's eyes glow an ominous blue and vibrate in their sockets, and Akafubu calms them down by reasoning that the prayers of the warriors have not appeased the Great Gabomba. If a red spark first reaches (or is the only spark to reach) the idol in the puzzle, the Gabomba Statue will outright terrorize the tribesmen by spewing a jet of flame, and Akafubu exclaims that the Great Gabomba is only angered by the presence of "wicked thoughts" and calls on the warriors to cast those thoughts away.

In an oddity that will not be seen by most players, the conduit puzzle itself is dynamically determined by the name the player input for Felix at the start of The Lost Age. The layout of the conduits and the necessary solution are changed in a way that treats the letters composing Felix's name as the "random seed," which means that having input the same name for Felix between different game files will generate the same puzzle exclusive to that name but different from all other possible names. Some puzzle variations will make it impossible to see either the "blue eyes" or "flame jet" cutscenes, but both cutscenes are possible in the puzzle that is always generated for players who leave the main player-character's name as "Felix". (Note that different-language versions of the game give different default names for Felix, such as "Pavel" in the French version.)
The puzzle generated based on the name "Felix" only requires you to Pound the upper-right "straight-line block" back into its slot, then step on the right rotation button once, then Pound every other tile back into their slots, to set up the solution. If both sparks reach the center idol at the same moment, a series of cutscenes will deposit the party back at the now-open mouth section of Gabomba Statue's head. You can walk out of the bottom edge of the screen along the statue's extended tongue to talk to the formerly dancing warriors outside if you wish, but follow Akafubu deeper into the tunnel that has opened up. Interact with the Black Orb held by the idol to trigger another cutscene that awards it to you; note the ladder that appears near the idol before you automatically return to Kibombo's village in the daytime.
Functionally, there is currently no need to reenter the Gabomba Statue by climbing into its mouth using its extended tongue as a long set of stairs. If you follow it to the ladder that appeared at the end of the tunnel, you will enter the first part of the optional Gabomba Catacombs dungeon, but you cannot progress any further without the Cyclone Psynergy. The Cyclone Chip that grants it is given to you during a mandatory cutscene back at Madra, your next destination at any rate. Whether you decide to come back to the Catacombs with the Cyclone Chip in hand before or after the boss battle at East Indra Shore, you will be allowed to play through the Catacombs to earn its own Venus Djinni and (assuming you also have the Reveal Psynergy) a class-changing item.
Enemies
| Bestiary of Gabomba Statue | ||||||||||
| Monster Name | LVL | HP | ATK | DEF | AGI | EXP | Coins | Weakness | Drop | Drop Rate |
| Bone Fighter | 17 | 122 | 131 | 35 | 52 | 51 | 63 | 1/32 | ||
| Death Head | 17 | 128 | 130 | 31 | 47 | 55 | 73 | 1/16 | ||
| Doomsayer | 19 | 107 | 148 | 31 | 77 | 107 | 173 | 1/32 | ||
| Red Demon | 19 | 228 | 173 | 43 | 90 | 129 | 154 | 1/64 | ||
| Salamander | 19 | 212 | 158 | 49 | 50 | 84 | 190 | 1/16 | ||
| Spirit | 18 | 116 | 114 | 30 | 48 | 49 | 67 | 1/32 | ||
| Mimic (unique) | 19 | 536 | 177 | 43 | 110 | 400 | 380 | 1/1 | ||
| Venus Djinni (Steel) (unique) | 19 | 466 | 143 | 37 | 116 | 279 | 340 | N/A | ||
Enemy Formations
- Group 1: Bone Fighter x1-2
- Group 2: Doomsayer x1, Bone Fighter x0-1
- Group 3: Doomsayer x1-2, Bone Fighter x0-1
- Group 4: Salamander x1
- Group 5: Death Head x1, Bone Fighter x0-2
- Group 6: Salamander x0-1, Spirit x1
- Group 7: Red Demon x1, Doomsayer x1
- Group 8: Red Demon x1-2
Collectibles
 Bone Armlet: In the northeast chest in the green-tiled room just one floor above the cave-like basement level, in the same room as the Mimic that drops a Hard Nut.
 Elixir: In the chest that lies along the way to the east side of the flashing cog that reverses the rotation of all gears in the dungeon.
 Steel: Visible in the central room one floor underneath the large room full of differently colored cogs, but only reachable after having reversed the rotations of all the gears in the dungeon. In the floor above the one with Steel, climb onto the left of two pink gears that rotate into a square pit and it will drop you through the pit, landing next to Steel in its enclosure; you must battle it to earn it.
History

Upon reaching Kibombo in search of Piers, Felix's party finds that the whole village is captivated by a nighttime ritual being performed by the aspiring witch doctor, Akafubu, seeking to succeed the position held by his departed predecessor Oeia. Felix's party finds Piers spying on the ritual from a cliff, and it is found that Akafubu had previously had his warriors steal Piers' Black Orb at Madra to try to offer it to the Gabomba Statue as part of the succession ceremony. While introductions are being made, Felix's side proposes they sneak into the statue together with Piers, anticipating that Akafubu's ritual will all but deliver the Black Orb to them without him knowing.
Felix and Piers' party successfully fix ancient mechanisms that had corroded over time and were responsible for Akafubu's previous attempts at this ceremony failing. When Akafubu enters the statue's now-open mouth, though he is stunned to see strangers inside the statue venerated by his people, he is willing to let them take their Black Orb back. An idol that lies in the furthest depths of the Gabomba Statue's interior, however, reveals itself to contain a very real supernatural entity that goes by the name "Great Gabomba," which adorns Akafubu's outfit with the feathers denoting his office and standing. Akafubu lets the joy of the situation get to his head and leaves the chamber before the Great Gabomba's spirit can give him ancient magics, leading the spirit to remark that he is a hasty fool.

The spirit instructs Felix to pass the message onto Akafubu that he must come back and earn the magic himself by traversing the catacombs underneath, which it opens a passageway down into. The spirit, however, concurs with Kraden's observation that Felix has the opportunity to reach and acquire said power first. At a later date, Felix's party makes a successful attempt to reach the end of the catacombs, and the spirit — not wanting Kibombo to suffer a dispirited leader in light of this development — promises that it will personally teach this magic to Akafubu should he reach this far himself. Felix is sworn not to mention his achievement to Akafubu.
Thirty years later, Felix's entry into the Gabomba Statue is recognized as one of the famed exploits of the Warriors of Vale and is represented as one of the obstacles that Adepts must contend with in the Psynergy Training Grounds. The Encyclopedia feature in Golden Sun: Dark Dawn features the following entry describing the Gabomba Statue:
- This huge statue was revered by a village in central Gondowan.
- The statue was the entrance to a vast clockwork labyrinth that was powered by Psynergy.
Trivia
- When entering the Gabomba Statue from behind during the night, it is possible to cast Scoop on its true entrance off to the side before initiating the cutscene that would take place just by walking immediately northwest of it. If the entrance is exposed first, the cutscene will not transpire at all even if the player then heads upward and casts Scoop on the other four marks on the ground to expose buried arrow symbols pointing to a rock. Since the cutscene explains how the four arrows and the rock merely represent a piece of in-universe world-building and that the player should look for a different spot to Scoop open, new players who miss the cutscene may end up questioning the relevance of the four symbols even though the idle rock they point to cannot be interacted with in any meaningful way.
- When the large, flashing cog is lowered by Pounding two stakes into the ground, the respective rotations of all gears throughout the dungeon reverse direction, and the placement of the gears just underneath it suggests that the flashing cog is forcing the gears now interlocking with it to spin in the other direction. If this is the intent, however, it is perplexing and contradictory that the previous, counter-clockwise rotation of the flashing cog also reverses direction to now spin clockwise, even though the narrow, green cog it is supposedly interlocking with has just been made to spin clockwise as well.
-
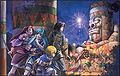 Official artwork of Felix's party spying on Akafubu's ritual at the Gabomba Statue
 -
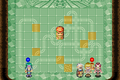 Example of an alternative puzzle generated from a different name for Felix

