Apollo Sanctum
The Apollo Sanctum (アポロ神殿, Apollo Sanctuary) is part of the final dungeon "set" of Golden Sun: Dark Dawn. It is entered and explored after climbing through the Apollo Ascent dungeon area, which itself is found at the end of the Endless Wall, which can only be fully traversed once the three orbs have been collected. The Sanctum itself can only be explored if the player has collected the Umbra Gear. The main dungeon area is called Apollo Sanctum Gate, and it is the final area of the game beyond that, the Apollo Sanctum, that is the site of the game's final battles.
Walkthrough
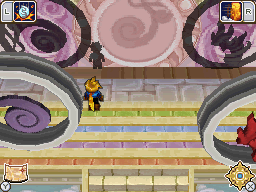
After solving the skull-shaped final screen of the Apollo Ascent, climb up through the new stairs at the top, and use and pass by a Wise One stone. Beyond that is the "main" area of the dungeon named the Apollo Sanctum Gate, a large horizontally aligned area with colored lines on the ground and Matthew's shadow being cast on the wall to the north. Take the stairwell to the left to begin the first of four sub-areas.
Mars sub-area
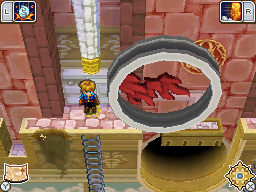
Climb down the ladder and go all the way left until you reach and open a chest at the left end of the area containing a Mint. Then go back to the right until you stand at the top of the stairs to the immediate lower left of a white spire poking out of the wall. Cast Grip to swing to a ladder to climb up, and at the top of this ladder is a floor switch that will cause a platform to appear above a giant circular chasm as long as it is pressed down. Hop left of that, then run left without stopping because the archer statues to the south will automatically fire at you once you cross their sights, and if they hit you, you'll have to grip-swing again.
When you use the Crush Psynergy on the brown pillar at the left end of the area, a giant ring will be ejected out of the wall and roll left across the area; your goal is to outrun it by running to the right until you reach and step on the floor switch. The platform that emerges will prevent the giant ring from falling into the chasm, and it will roll into the Apollo Sanctum Gate area. If there is no platform and the ring falls into the chasm, it will be placed back at its original starting point, and you will have to try again. Each of the other three sub areas of Apollo Sanctum is structured around this specific type of mechanic. Slide down the wide slide just below you and return to the Apollo Sanctum Gate to the right.
The ring with the Mars pattern in it is now on the red Mars line of the main area and can be rolled along it, so push it right to roll it so that its shadow aligns with the corresponding pattern on the wall. This lowers the wall to reveal another wall behind it with a different ring pattern in a different spot, and opens up a stairwell to the next sub-area to the lower right. There are three more sub areas to clear and therefore three more walls to lower. Take the new stairwell to the lower right.
Jupiter sub-area
Position yourself south of the white fan and cast Whirlwind on it to make a platform appear, and hop right across it. Of the three human statues you pass by on your way to the right, push the right off the floor switch it is standing on to make part of a wall recede and allow you to go up a short stairwell to the right and cast Grip on a spire to transport yourself right. Then climb down the ladder before the brown pillar, then go all the way left between two brown pillars, one extended and one in the ground. Crush the left pillar to make the right rise up, then position yourself south of the right pillar and crush that back down. Then cast Whirlwind on the white fan here to make a stairwell appear.
Then go left and grip-swing to the left, then run and hop your way across the linear path all the way to the right side of the screen - along the way, Whirlwind the white fan above the circular chasm to prevent this area's ring from falling into the chasm. At the right end of the area is a chest containing a Psy Crystal. Now cast Growth on the small plant to create ivy to climb down, then climb the ladder to the left. As there is now nothing obstructing the ring's path back into the Apollo Sanctum Gate, Crush the brown pillar at the right end and let the ring roll ahead into it. Return to the Apollo Sanctum Gate and roll the Jupiter ring right twice to align its shadow, lower the second wall, and open the upper left stairwell to the next sub-area.
Mercury sub-area
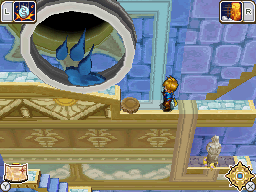
Go left above the circular chasm, then climb down the ladder. Go left without going down the stairs, then cast Move to move the statue enclosed by two brown rectangular structures one space right onto the other floor switch. Climb back up the ladder, and now go left and slide down the wall slide at the left end. Push the statue to your left off its floor switch, then go to the right to the enclosed statue from earlier and Move it back one space left to where it was originally. Now slide down another wall slide, and go left here to get to a chest at the left end of the area with a Hard Nut. Then grip-swing right and climb back up the ladder, and now hop many times left to get to where the ring mechanism is.
Before setting the ring off, climb up the nearby stairs and push the statue two spaces left onto a floor switch to open a path right. Step on the floor switch to the right of that, then Grip the white spire beyond that to make it to the right before the wall closes right back on you. At the right end of your current elevation, remotely Move the lone, elevated statue and make it fall down onto the floor switch below, capping the circular chasm. Slide down the wall slide, hop many times left again, and now set the ring mechanism off. The Mercury ring will roll into the Apollo Sanctum Gate. Return to the gate, roll the Mercury ring left four times, lower the next wall and open up the stairwell to the fourth sub-area to the upper right, and go into it.
Venus sub-area
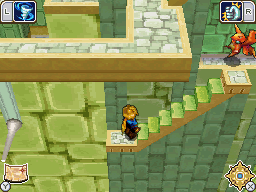
Progress to the right end, outrunning the archer statues along the way - the arrows that two of these statues will shoot will end up getting stuck into the wall they hit, and end up serving the same function as a grip-swing spire. In the general vicinity of this area's ring mechanism, first go down the nearby stairwell to the right and follow it to the right of the line of archer statues, and investigate the rightmost statue to obtain the Zephyr's Bow. Then return to the ring mechanism area and push the statue left of the ring off its floor switch to extend a grip-swing spire below, then travel far to the left and push another statue off its floor switch to make another grip-swing spire appear above. Climb the large stairwell up and use this new spire to swing across to the left. Then above that, remotely Move another statue one space down so that it falls onto a floor switch below, making another spire appear, then slide down the wall slide and return to the general vicinity of the ring mechanism.
The two arrows stuck in the wall and the spire in the space in between them complete a path, so stand to the right of the rightmost arrow and cast Grip on it; you will automatically swing three times to the left. Now climb down the long ladder, go right, grip-swing to the right, and you can reach the Mars Djinni, Aurora, which comes without a fight. Retrace your steps up the ladder and return to the ring mechanism - knowing how to swing across to the left three times quickly is fast because when you Crush the brown pillar that sets the ring off, you need to swing left across these three right away so that you can outpace the ring and land right next to the floor switch that you need to be standing on so that a platform will prevent the ring from falling into its circular chasm.
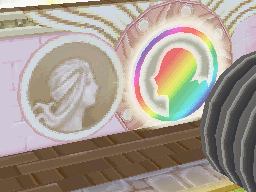
Once the Venus ring has rolled into the Apollo Sanctum Gate, return to the gate area and roll the Venus ring right three times to make the fourth wall lower. Then, one final wall will remain to be opened, and this time roll the Mars, Jupiter, and Mercury rings to line them up behind the Venus ring's current position. This will cause their silhouettes on the wall to overlap and give the optical illusion of the silhouette of a human profile. Enter the newly opened gate.
Final area
As soon as you go up the first stairs, a cutscene will explain a new mechanic: As long as you are in an area where there is bright light, your player-controlled character will be Sveta, with Matthew tailing her, and they will both be in a dark field. An endurance gauge at the left will increase in a bright spot, and if it fills up fully, you will be returned to the Wise One stone and lose half of your money as though you got a Game Over. The gauge will lower back down to zero while you are in a shadowy area. As soon as you regain control, run and hop up to the next screen, the final area of the game, and reach the shade.
In the shaded portion of this final area, run to the circular altar to the left and use the Blue Orb on it. Run right through the shade and use the Yellow Orb on it. Run to the altar at the top of the area and use the Red Orb on it, then as soon as you gain control, run down and grab the sword out of its altar to obtain the game's best weapon, the Sol Blade. Not only is this the ideal weapon for Matthew that only he can equip, but it is also used as a key in this and a couple other areas of the game. After the next series of physical events, you will end up standing safe in a newly shaded area, so run down to the original shaded area at the bottom, inspect the silver door, and when prompted to use something, use the Sol Blade to open it up. Inside the new chamber, Crush all of the colored pillars adorning the perimeter of this room. Then stand in the center and Grip and rotate the three spires that appear one at a time, each of which will cause a major effect outside.
Once you're done, exit the chamber to trigger a lengthy and story-relevant cutscene, and when you regain control, the area will now be filled with random encounters with the most EXP-rewarding enemies in the game. Use these enemies for some easy level-building and for raising Matthew's weapon experience with the Sol Blade, for once you arrive at the intended destination at the elevated center of the area, more cutscenes will trigger that will lead to the first final encounter. Win that battle, then the following cutscene will allow your party to heal and re-equip themselves before engaging in the game's final boss battle. This is a much tougher battle than almost any other boss encounter before. When you win, follow along with the resultant cutscenes, climbing up a ladder multiple times when directed, and eventually you will automatically leave Apollo Sanctum.
Story
Once Sveta's Umbra Gear and the elemental orbs have been collected, Matthew & Co. can scale up to the top of Apollo Sanctum to activate the Apollo Lens and nullify the effects of the Luna Tower, ending the Grave Eclipse. Without the Umbra Gear's barrier of darkness, the group of travelers would be overwhelmed by the immense light that shines down onto the sanctum, so the armor acts as a counteract to the environment of the sanctum's peak. The 3 orbs are needed to grant Matthew access to the Sol Blade, the strongest weapon in the game, and a 'key' to open the sun doors in Apollo Sanctum and other dungeons around Weyard.
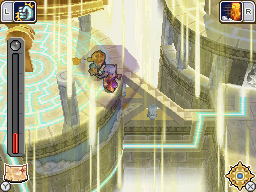
Once the Apollo statue in the centre of the sanctum's peak has moved all the lenses towards the Apollo Lens, Matthew and Sveta can activate the Apollo Lens, which focuses enough light energy from the other lenses to shoot a beam that quickly stops the Grave Eclipse. However, once they reach the ladder that leads to the Lens, the Chaos Hound arrives to stop them in a rage. Strangely, once Sveta approaches it, the beast seems to calm down. Sveta, in a panic, uses the Slap Psynergy on it, and the Chaos Hound becomes upset. Suddenly, Chaos Hound is surrounded in darkness, and Blados & Chalis teleport next to it, explaining that the Eclipse had changed it, but they also went through their way to give it a few more 'improvements'. They then say that now they can't lose because the darkness of the Luna Tower's Grave Eclipse gave them a power enhancement, and challenges Matthew and Co. to a battle.
Blados and Chalis are knocked down, and Chalis say that they have to go into their alternate plan. Chaos Hound then becomes engulfed in darkness and begin to suck in the Tuaparang duo. Blados in horror realises that he's being pulled in, but Chalis proclaims that if winning against Matthew's "whelps" means being absorbed into the Chaos Hound then so be it. Matthew & Co. in a final battle face off against the Chaos Chimera, and after an intense fight emerges victorious. Sveta goes up to the Chaos Hound, and finally realises the horrific truth: that it was really a mutated form of her brother, Volechek. While everybody takes in what happened, Matthew tries to climb up to activate the Apollo Lens, but he's knocked back due to the heart of the light in Apollo Sanctum coming from that one place. Matthew tries a 2nd time, but he fails again and "Arcanus" telepathically tells Matthew to stop and that he can't do it. Matthew attempts to climb up a third time and fails.
Sveta, who has finished weeping for her near unconscious brother, walks up to Matthew but collapses on her knees. Kraden says that she absorbed too much light on her way to the Apollo Lens, and if she were to absorb any more she would surely die. But Matthew willfully decides to lend Sveta his spirit, and together they head up Apollo Lane. Once they reach the top, however, Volechek/Chaos Hound jumps to the top and knocks Sveta off the platform. Matthew's spirit falls straight back on him, and he jumps up and catches Sveta before she hits the ground. Chaos Hound, reverting back to Volechek for a split second, says sorry to Sveta for what he's put her through, and activates the Apollo Lens. The Lens shoots a laser of light towards the Luna Tower, which ends the Grave Eclipse and Volechek's life.
Enemies
| Bestiary of Apollo Sanctum | ||||||||||
| Monster Name | LVL | HP | ATK | DEF | AGI | EXP | Coins | Weakness | Drop | Drop Rate |
| Tua Warrior | 44 | 482 | 436 | 229 | 247 | 13720 | 520 | 1/1 | ||
| Blados (boss) | 44 | 3052 | 514 | 223 | 303 | 0 | 0 | N/A | N/A | |
| Chalis (boss) | 44 | 2892 | 495 | 229 | 270 | 0 | 0 | N/A | N/A | |
| Chaos Hound (boss) | 44 | 3374 | 518 | 235 | 254 | 0 | 0 | N/A | N/A | |
| Chaos Chimera (boss) | 44 | 9640 | 536 | 247 | 315 | 0 | 0 | N/A | N/A | |
Enemy Formations
- Group 1: Tua Warrior x2-3
Collectibles
![]() Mint
Mint
![]() Psy Crystal
Psy Crystal
![]() Hard Nut
Hard Nut
![]() Zephyr's Bow
Zephyr's Bow
![]() Mars Djinni Aurora
Mars Djinni Aurora
